Toyota Tundra (2015 year). Manual - part 2506


  Index      Toyota     Toyota Tundra (2015 year) - Service and Repair Manual


Search            copyright infringement  


Content   ..  2504  2505  2506  2507   ..


Toyota Tundra (2015 year). Manual - part 2506


Last Modified: 9-16-2014

6.6 A

Doc ID: RM000002XDR00OX

Model Year: 2015

Model: Tundra

Prod Date Range: [08/2014 -           ]

Title: SEAT: FRONT SEATBACK HEATER (for Manual Seat): INSTALLATION; 2015 MY Tundra [08/2014 -        ]

INSTALLATION

CAUTION:

Wear protective gloves. Sharp areas on the seat frame and adjuster may injure your hands.

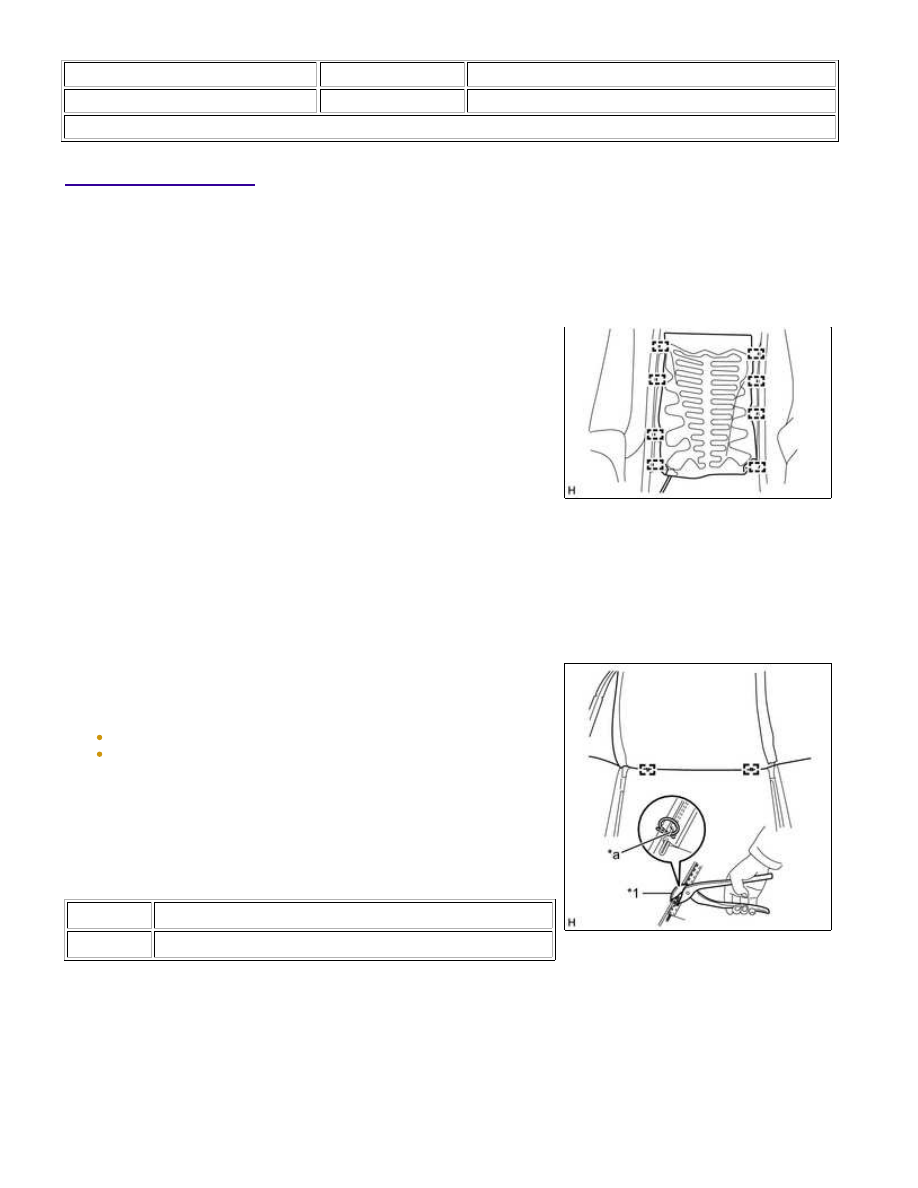
1. INSTALL FRONT SEATBACK HEATER ASSEMBLY RH

(a) Set the front seatback heater assembly RH on the separate type front seatback cover.

(b) Using a tacker, install the front seatback heater assembly RH to

the separate type front seatback cover with 8 new tack pins as

shown in the illustration.

NOTICE:

Do not substitute other metal parts for tack pins.

2. INSTALL SEPARATE TYPE FRONT SEATBACK COVER

(a) Set the separate type front seatback cover in place.

(b) Attach the 4 claws to install the 2 front seat headrest supports.

(c) Using hog ring pliers, install the separate type front seatback

cover to the separate type front seatback pad with 2 new hog

rings as shown in the illustration.

NOTICE:

Be careful not to damage the separate type front seatback cover.
Be sure to securely install the hog rings as shown in the
illustration while preventing wrinkles from forming on the
separate type front seatback cover.

HINT:

Install the hog rings at the cutouts if they are there.

Text in Illustration

*1

Hog Ring Pliers

*a

Cutout

SEAT: FRONT SEATBACK HEATER (for Manual Seat): INSTALLATIO...

(d) Attach the 6 fasteners.

Text in Illustration

*1

Fastener

CAUTION:

For vehicles with a front seat airbag assembly, the separate type front seatback cover must be securely
installed. Otherwise, the front seat airbag assembly may not deploy properly.
Make sure that the strap is not twisted after attach the 2 hooks.
Attach the 2 hooks securely.

(1) Slide each hook to attach them.

(2) Install the 4 clips.

(g) Close the 2 fasteners.

(h) Pass the 2 wire harnesses through the separate type front seatback cover.

(i) Detach the hook.

3. INSTALL SEPARATE TYPE FRONT SEATBACK ASSEMBLY

(a) When reusing a bolt:

Adhesive:

Toyota Genuine Adhesive 1324, Three Bond 1324 or equivalent.

SEAT: FRONT SEATBACK HEATER (for Manual Seat): INSTALLATIO...

(b) Install the separate type front seatback assembly with the 4

bolts.

Torque:

45 N·m {459 kgf·cm, 33ft·lbf}

(c) Attach the connector clamp and 3 wire harness clamps to connect

*1

Connector Clamp

*2

Wire Harness Clamp

4. INSTALL FRONT INNER NO. 1 SEAT CUSHION SHIELD RH

(a) Attach the guide in the direction indicated by the arrow shown in

the illustration to install the front inner No. 1 seat cushion shield

RH.

(b) Install the 2 screws.

Torque:

3.0 N·m {31 kgf·cm, 27in·lbf}

5. INSTALL FRONT SEAT CUSHION SHIELD RH

SEAT: FRONT SEATBACK HEATER (for Manual Seat): INSTALLATIO...

(a) Attach the 2 claws, clip and guide as indicated by the arrows in

the order shown in the illustration to install the front seat cushion

shield RH.

(b) Install the 3 screws.

Torque:

3.0 N·m {31 kgf·cm, 27in·lbf}

(c) Connect the 2 rubber bands.

6. INSTALL RECLINING ADJUSTER RELEASE HANDLE RH

(a) Attach the claw to install the reclining adjuster release handle RH.

7. INSTALL FRONT SEAT ASSEMBLY RH

HINT:

Use the same procedure as for the driver seat 


.

SEAT: FRONT SEATBACK HEATER (for Manual Seat): INSTALLATIO...


Content   ..  2504  2505  2506  2507   ..