Toyota Tundra (2015 year). Manual - part 1378


  Index      Toyota     Toyota Tundra (2015 year) - Service and Repair Manual


Search            copyright infringement  


Content   ..  1376  1377  1378  1379   ..


Toyota Tundra (2015 year). Manual - part 1378


Last Modified: 9-16-2014

6.6 A

Doc ID: RM0000031GV02DX

Model Year: 2015

Model: Tundra

Prod Date Range: [08/2014 -           ]

Title: 1UR-FE EXHAUST: EXHAUST MANIFOLD: INSTALLATION; 2015 MY Tundra [08/2014 -        ]

INSTALLATION

HINT:

If an exhaust gas leak has been repaired, perform an inspection following the repair 


.

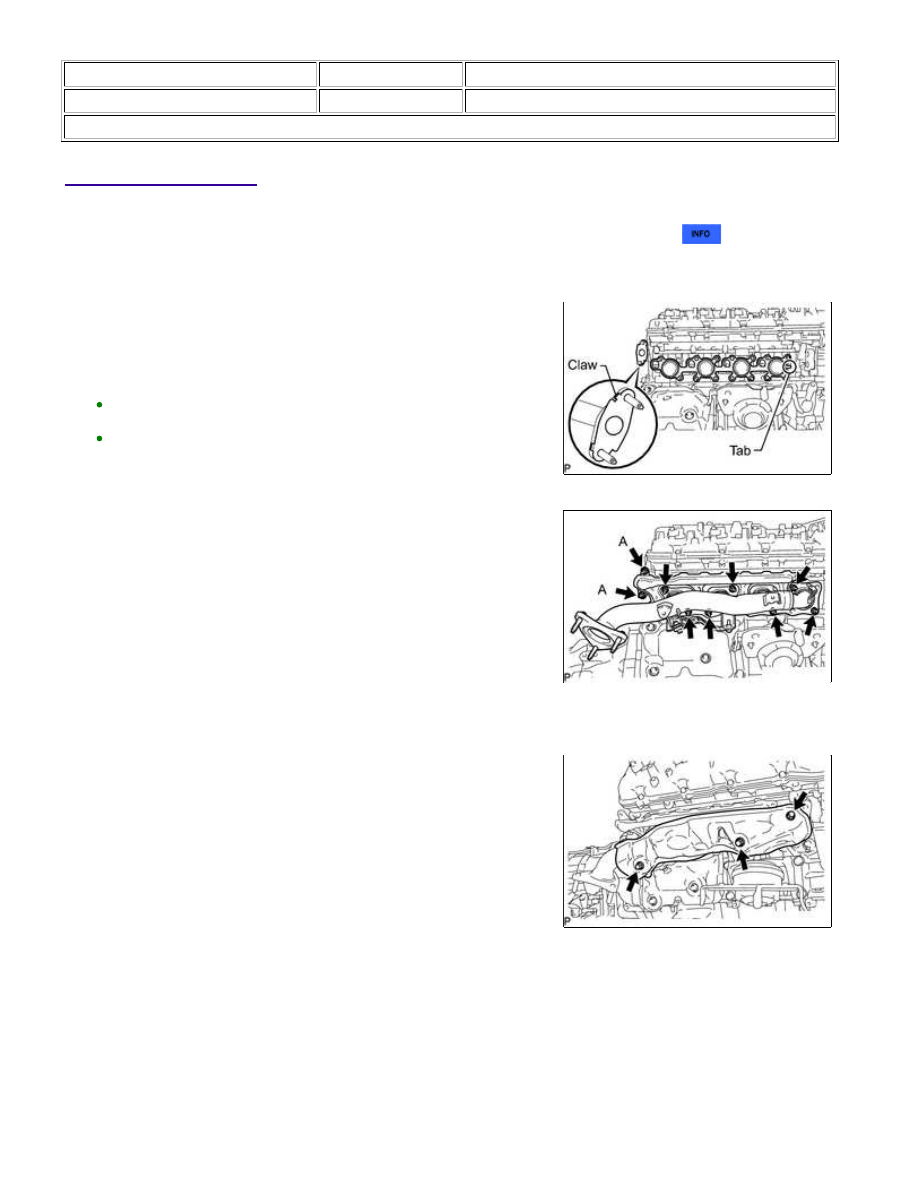
1. INSTALL EXHAUST MANIFOLD SUB-ASSEMBLY RH

(a) Install a new gasket to the cylinder head and a new gasket to

the No. 3 air tube.

HINT:

then uniformly tighten the 7 nuts that are not labeled A. Then

tighten the 2 nuts labeled A in the illustration.

Torque:

for nut A -

10 N·m {102 kgf·cm, 7ft·lbf}

except nut A -

21 N·m {214 kgf·cm, 15ft·lbf}

2. INSTALL NO. 1 EXHAUST MANIFOLD HEAT INSULATOR

(a) Install the heat insulator with the 3 bolts.

Torque:

10 N·m {102 kgf·cm, 7ft·lbf}

3. INSTALL EXHAUST MANIFOLD SUB-ASSEMBLY LH

1UR-FE EXHAUST: EXHAUST MANIFOLD: INSTALLATION; 201...

(a) Install a new gasket to the cylinder head and a new gasket to

the No. 4 air tube.

HINT:

then uniformly tighten the 7 nuts that are not labeled A. Then

tighten the 2 nuts labeled A in the illustration.

Torque:

for nut A -

10 N·m {102 kgf·cm, 7ft·lbf}

except nut A -

21 N·m {214 kgf·cm, 15ft·lbf}

4. INSTALL NO. 2 EXHAUST MANIFOLD HEAT INSULATOR

(a) Install the heat insulator with the 3 bolts.

Torque:

10 N·m {102 kgf·cm, 7ft·lbf}

5. INSTALL NO. 1 EGR PIPE SUB-ASSEMBLY

(a) Install 2 new gaskets.

(b) Install the EGR pipe with the 4 nuts, and tighten the nuts in the

sequence shown in the illustration.

Torque:

21 N·m {214 kgf·cm, 15ft·lbf}

6. INSTALL FRONT NO. 3 FLOOR HEAT INSULATOR

1UR-FE EXHAUST: EXHAUST MANIFOLD: INSTALLATION; 201...

(a) Install the front floor heat insulator with the 4 bolts.

Torque:

5.5 N·m {56 kgf·cm, 49in·lbf}

7. INSTALL FRONT NO. 4 FLOOR HEAT INSULATOR

(a) Install the front floor heat insulator with the 4 bolts.

Torque:

5.5 N·m {56 kgf·cm, 49in·lbf}

8. INSTALL FRONT PROPELLER SHAFT ASSEMBLY (for 4WD)

9. INSTALL EXHAUST PIPE ASSEMBLY

10. CONNECT COOLER COMPRESSOR ASSEMBLY 

11. INSTALL GENERATOR ASSEMBLY

12. INSTALL ENGINE OIL LEVEL DIPSTICK GUIDE

(c) Install the dipstick guide with the bolt.

Torque:

10 N·m {102 kgf·cm, 7ft·lbf}

(d) Install the dipstick.

13. INSTALL INTAKE MANIFOLD

1UR-FE EXHAUST: EXHAUST MANIFOLD: INSTALLATION; 201...

14. INSPECT FOR EXHAUST GAS LEAK

HINT:

If an exhaust gas leak has been repaired, perform an inspection following the repair 


.

If gas is leaking, tighten the areas necessary to stop the leak. Replace damaged parts as necessary.

15. INSTALL FRONT FENDER APRON SEAL REAR LH

(a) Install the fender apron seal with the 5 clips.

16. INSTALL FRONT FENDER APRON SEAL LH

(a) Install the fender apron seal with the 6 clips.

17. INSTALL FRONT FENDER APRON SEAL REAR RH

(a) Install the fender apron seal with the 5 clips.

18. INSTALL FRONT FENDER APRON SEAL RH

(a) Install the fender apron seal with the 6 clips.

1UR-FE EXHAUST: EXHAUST MANIFOLD: INSTALLATION; 201...


Content   ..  1376  1377  1378  1379   ..