Toyota Tundra (2015 year). Manual - part 1353


  Index      Toyota     Toyota Tundra (2015 year) - Service and Repair Manual


Search            copyright infringement  


Content   ..  1351  1352  1353  1354   ..


Toyota Tundra (2015 year). Manual - part 1353


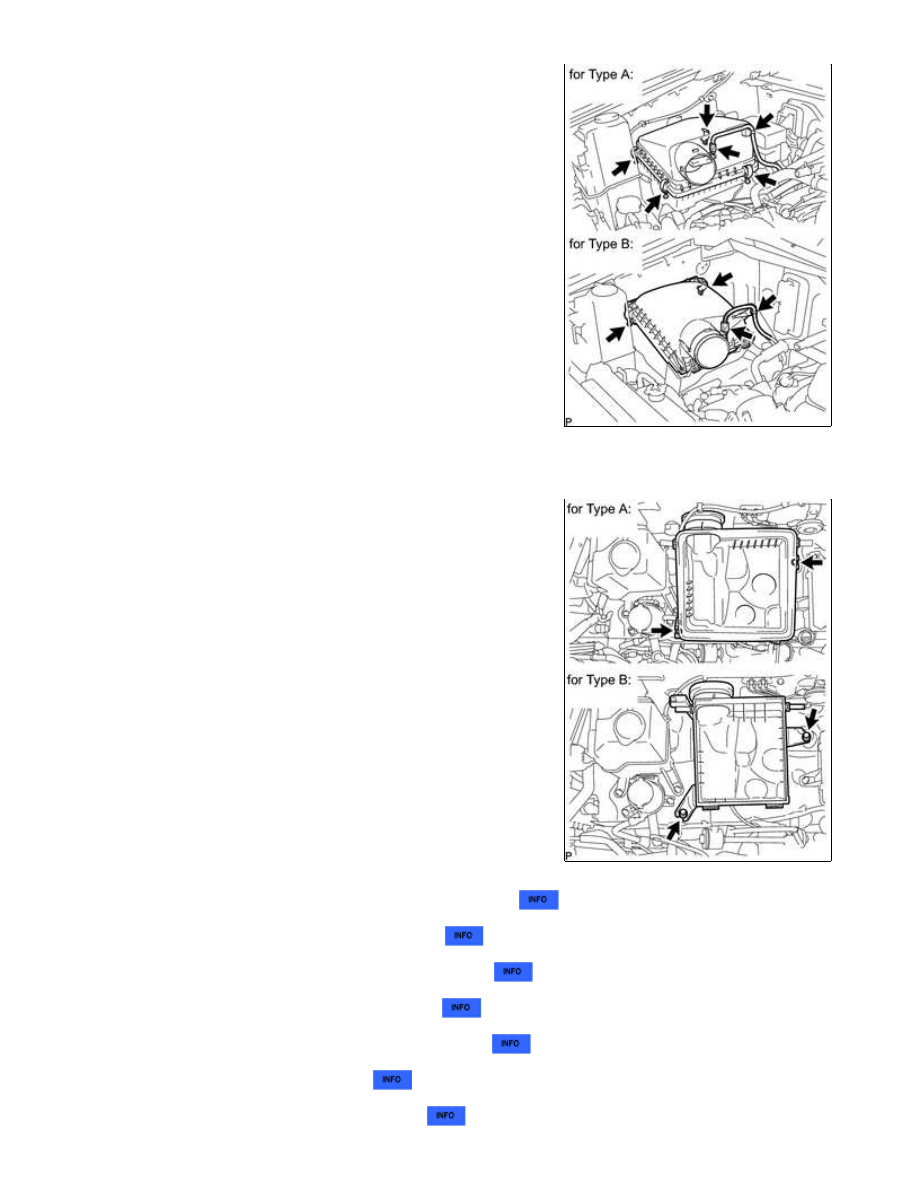
(a) Remove the air cleaner cap.

(1) Disconnect the MAF meter connector.

(2) Using a clip remover, detach the wire harness clamp.

(3) for Type A:

Unfasten the 4 hook clamps and then remove the air cleaner

cap.

(4) for Type B:

Unfasten the 2 hook clamps and then remove the air cleaner

cap.

(b) Remove the air cleaner element.

(c) Remove the 2 bolts and air cleaner case.

12. REMOVE COWL TOP OUTER PANEL SUB-ASSEMBLY 

13. REMOVE FRONT FENDER APRON SEAL RH 

14. REMOVE FRONT FENDER APRON SEAL REAR RH 

15. REMOVE FRONT FENDER APRON SEAL LH 

16. REMOVE FRONT FENDER APRON SEAL REAR LH 

17. REMOVE INLET RADIATOR HOSE 

18. DISCONNECT OUTLET RADIATOR HOSE 

1UR-FE ENGINE MECHANICAL: ENGINE ASSEMBLY: REMOVAL...

19. REMOVE RADIATOR GRILLE SUB-ASSEMBLY 

20. REMOVE RADIATOR SIDE DEFLECTOR RH 

21. REMOVE RADIATOR SIDE DEFLECTOR LH 

22. REMOVE FAN AND GENERATOR V BELT 

23. REMOVE FAN SHROUD 

24. REMOVE RADIATOR ASSEMBLY 

25. DISCONNECT NO. 12 WATER BY-PASS HOSE 

26. DISCONNECT NO. 13 WATER BY-PASS HOSE 

27. REMOVE EGR VALVE ASSEMBLY 

28. REMOVE EGR VALVE BRACKET 

29. REMOVE VENTILATION HOSE ASSEMBLY 

30. REMOVE AIR TUBE SUB-ASSEMBLY LH 

31. REMOVE INTAKE MANIFOLD 

32. DISCONNECT NO. 1 FUEL PIPE SUB-ASSEMBLY

(a) Remove the fuel pipe clamp.

(b) Disconnect the No. 1 fuel pipe 


.

33. DISCONNECT NO. 2 FUEL TUBE SUB-ASSEMBLY

(a) Disconnect the No. 2 fuel tube 


.

34. DISCONNECT WIRE HARNESS AND HOSE

(a) Disconnect the clamp and ECM connector.

HINT:

Refer to the following procedures to disconnect the ECM

connector 


.

1UR-FE ENGINE MECHANICAL: ENGINE ASSEMBLY: REMOVAL...

(b) Disconnect the No. 4 water by-pass hose.

(c) Disconnect the 2 heater hoses.

(d) Disconnect the 4 connectors from the connector holder block.

(e) Remove the bolt and disconnect the clamp and ground wire.

(f) Disconnect the air pump connector and 2 clamps.

(g) Remove the nut and connector bracket.

(h) Disconnect the air injection system hose.

1UR-FE ENGINE MECHANICAL: ENGINE ASSEMBLY: REMOVAL...

(i) Remove the nut and disconnect the wire from the positive (+)

battery cable.

(j) Disconnect the cable from the positive (+) battery terminal.

(k) Remove the bolt and disconnect the ground wire.

(l) Disconnect the 4 air injection control driver connectors.

(m) Remove the nut and disconnect the wire and 2 clips from the engine room junction block.

(n) Disconnect the 2 connectors and 2 clips from the engine room junction block.

35. DISCONNECT COOLER COMPRESSOR ASSEMBLY 

36. DISCONNECT VANE PUMP ASSEMBLY 

37. REMOVE GENERATOR ASSEMBLY 

38. REMOVE PROPELLER SHAFT ASSEMBLY

(a) for 2WD:

Refer to the following procedures 


.

(b) for 4WD:

Refer to the following procedures 


.

39. REMOVE FRONT PROPELLER SHAFT ASSEMBLY (for 4WD)

(a) Remove the front propeller shaft 


.

40. REMOVE EXHAUST PIPE ASSEMBLY

(a) Remove the exhaust pipe assembly 


.

41. DISCONNECT NO. 1 WATER BY-PASS PIPE

1UR-FE ENGINE MECHANICAL: ENGINE ASSEMBLY: REMOVAL...


Content   ..  1351  1352  1353  1354   ..