Subaru Legacy IV (2008 year). Manual - part 874


  Index      Subaru     Subaru Legacy IV - service repair manual 2008 year


Search            


Content   ..  872  873  874  875   ..


Subaru Legacy IV (2008 year). Manual - part 874


DI-45

Rear Differential (T-type)

DIFFERENTIALS

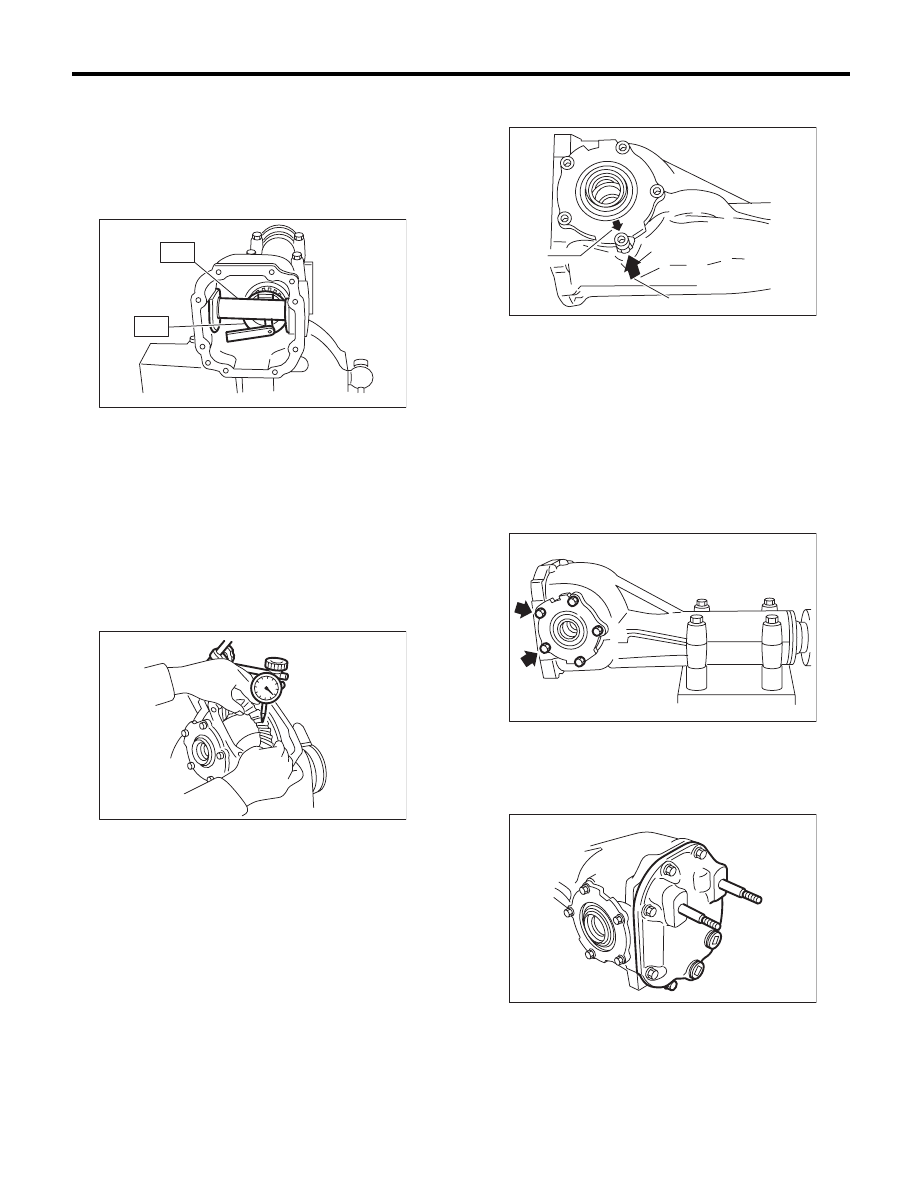
20) If proper tooth contact is not obtained, readjust
the drive pinion height by changing the RH and LH
side retainer shims and the hypoid gear backlash.

(1) Drive pinion height

ST1

398507702

DUMMY SHAFT

ST2

398507701

DIFFERENTIAL CARRIER 
GAUGE

T = To + N – (H × 0.01) – 0.20 mm (0.008 in)
Place:
T = Thickness of pinion height adjusting washer
mm (in)
To = Thickness of washer temporarily inserted
mm (in)
N = Clearance of thickness gauge mm (in)
H = Figure marked on drive pinion head
(2) Hypoid gear backlash

Backlash:

0.10 — 0.20 mm (0.004 — 0.008 in)

21) Remove the RH and LH side retainers.
22) Install new O-rings to side retainers of both
sides.
23) Install oil seals to the side retainers on both
sides. <Ref. to DI-88, REPLACEMENT, Rear Dif-
ferential Side Oil Seal.>

24) When installing, align the arrow mark on the dif-
ferential carrier with the mark on the side retainer.

25) Apply liquid gasket to the bolt with arrow marks
and install the side retainer bolt.

Liquid gasket:

THREE BOND 1110B (Part No. K0879Y0020) 
or equivalent

Tightening torque:

10.5 N·m (1.1 kgf-m, 7.7 ft-lb)

26) Install the new gasket and rear cover, and tight-
en the bolts to the specified torque.

Tightening torque:

29.5 N·m (3.0 kgf-m, 21.8 ft-lb)

ST2

ST1

DI-00084

DI-00099

(A) Arrow mark (Side retainer side)

(B) Arrow mark (Differential carrier side)

DI-00543

(B)

(A)

DI-00461

DI-00490

DI-46

Rear Differential (T-type)

DIFFERENTIALS

27) Install the air breather cap.

28) Install the oil drain plug and filler plug.

Tightening torque:

49 N·m (5.0 kgf-m, 36.1 ft-lb)

2. GT SPEC. B 6MT MODEL

NOTE:
• Assemble in the reverse order of disassembly.
• Check and adjust each part during assembly.
• Keep the shims and washers in order, so that
they are not improperly installed.
• Thoroughly clean the surfaces on which the
shims, washers and bearings are to be installed.
• Apply differential gear oil when installing the
bearings and thrust washers.
• Be careful not to mix up the RH and LH bearing
races.
• Use a new O-ring and gasket.
• Be careful not to mix up the oil seal RH and LH.
• Replace the oil seal with a new part at every dis-
assembly.
• Apply the differential gear oil between the lips
when installing the oil seal.

1) Adjusting preload for front and rear bearings

NOTE:
Adjust the bearing preload between front and rear
bearings with spacer and washer. Pinion height ad-
justing washer is not affected by this adjustment.
The adjustment must not be carried out with oil seal
inserted.

2) Using the ST, press-fit the rear bearing race to
the differential carrier.
ST

398417700

DRIFT

3) Using the ST, press-fit the front bearing race to
the differential carrier.
ST

398477702

DRIFT

4) Selection of pinion height adjusting washer

(1) Measure the thickness of the inserted pinion
height adjusting washer.

(2) Read the stamps of the attached drive pin-
ion gear and a new part.

NOTE:
When there is no stamp, it indicates 0 (zero).

(A) Air breather cap

(B) Rear cover

(A)

(B)

DI-00489

DI-00078

ST

DI-00318

DI-00319

0

0

5

5

10

10

15

DI-00320

+2

DI-00321

DI-47

Rear Differential (T-type)

DIFFERENTIALS

(3) Obtain the thickness of pinion height adjusting
washer to be inserted from the following formula,
and replace the installed washer with this one.
T = T1 + (T2 × 0.01 – T3 × 0.01)

(Example of calculation)
T1 = 3.30 mm (0.1299 in), T2 = +2, T3 = –1
T = 3.30 mm (0.1299 in) + {(2 × 0.01) – (–1 ×
0.01)} = 3.33 mm (0.1311 in)
Result: Thickness = 3.33 mm (0.1311 in)
A washer to be used is 38336AA310.

5) Install the selected pinion height adjusting wash-
er on drive pinion, and press the rear bearing cone
into position with ST.
ST

18674AA000

INSTALLER

6) Insert the drive pinion into the differential carrier,
and install the originally attached bearing preload
adjusting spacer and washer.

7) Insert the spacer, then press-fit the pilot bearing
with the ST.
ST1

399780104

WEIGHT

ST2

899580100

INSTALLER

ST3

398507703

DUMMY COLLAR

ST4

498937110

HOLDER DRIVE PINION

8) Press-fit the companion flange with ST1, ST2
and ST3.

NOTE:
Be careful not to damage the bearing.
ST1

899874100

INSTALLER

ST2

399780104

WEIGHT

ST3

498937110

HOLDER DRIVE PINION

T mm (in)

Thickness of the selected pinion height adjust-
ing washer

T1 mm (in)

Thickness of the inserted pinion height adjust-
ing washer

T2 mm (in)

Numbers stamped on the attached drive pinion 
gear

T3 mm (in)

Numbers stamped on a new drive pinion gear

Pinion height adjusting washer

Part No.

Thickness mm (in)

38336AA230

3.09 (0.1217)

38336AA240

3.12 (0.1228)

38336AA250

3.15 (0.1240)

38336AA260

3.18 (0.1252)

38336AA270

3.21 (0.1264)

38336AA280

3.24 (0.1276)

38336AA290

3.27 (0.1287)

38336AA300

3.30 (0.1299)

38336AA310

3.33 (0.1311)

38336AA320

3.36 (0.1323)

38336AA330

3.39 (0.1335)

38336AA340

3.42 (0.1346)

38336AA350

3.45 (0.1358)

38336AA360

3.48 (0.1370)

38336AA370

3.51 (0.1382)

38336AA380

3.54 (0.1394)

38336AA390

3.57 (0.1406)

38336AA400

3.60 (0.1417)

38336AA410

3.63 (0.1429)

38336AA420

3.66 (0.1441)

ST

DI-00085

(A) Drive pinion

(B) Bearing preload adjusting spacer

(C) Bearing preload adjusting washer

(D) Differential carrier

(A)

(B)

(C)

(D)

DI-00086

ST2

ST3

ST1

ST4

ST1

ST4

DI-00322

ST3

ST1

ST2

ST2

DI-00323

DI-48

Rear Differential (T-type)

DIFFERENTIALS

9) Install the self-locking nut. Tighten using the ST.
ST

498427200

FLANGE WRENCH

Tightening torque:

181.5 N·m (18.5 kgf-m, 133.9 ft-lb)

10) Turn the drive pinion shaft 10 or more times to
make it fit in each taper roller bearing, and measure
the initial load or initial torque.

Initial load:

24.1 — 38.6 N (2.5 — 3.9 kgf, 5.4 — 8.7 lb)

Initial torque:

0.91 — 1.46 N·m 
(0.09 — 0.15 kgf-m, 0.67 — 1.08 ft-lb)

11) If the bearing preload is outside the specifica-
tion range, select a preload adjusting washer and
spacer from the table below to fit within the specifi-
cation range.

12) Remove the self-locking nut while holding the
companion flange with ST.
ST

498427200

FLANGE WRENCH

ST

DI-00091

DI-00117

DI-00481

Preload adjusting washer

Part No.

Thickness mm (in)

383705200

2.59 (0.1020)

383715200

2.57 (0.1012)

383725200

2.55 (0.1004)

383735200

2.53 (0.0996)

383745200

2.51 (0.0988)

383755200

2.49 (0.0980)

383765200

2.47 (0.0972)

383775200

2.45 (0.0965)

383785200

2.43 (0.0957)

383795200

2.41 (0.0949)

383805200

2.39 (0.0941)

383815200

2.37 (0.0933)

383825200

2.35 (0.0925)

383835200

2.33 (0.0917)

383845200

2.31 (0.0909)

Preload adjusting spacer

Part No.

Length mm (in)

31454AA130

52.2 (2.055)

31454AA140

52.4 (2.063)

31454AA150

52.6 (2.071)

31454AA160

52.8 (2.079)

31454AA170

53.0 (2.087)

31454AA180

53.2 (2.094)

ST

DI-00091


Content   ..  872  873  874  875   ..