Subaru Legacy IV (2008 year). Manual - part 852


  Index      Subaru     Subaru Legacy IV - service repair manual 2008 year


Search            


Content   ..  850  851  852  853   ..


Subaru Legacy IV (2008 year). Manual - part 852


WT-7

Steel Wheel

WHEEL AND TIRE SYSTEM

3. Steel Wheel

A: REMOVAL

1) Apply the parking brake, and position select le-
ver or shift lever to “P” range (AT model) or “1st
gear” (MT model).
2) Set the shop jacks or a lift to the specified points,
and support the vehicle with its wheels slightly con-
tacting the floor.
3) Loosen the wheel nuts.
4) Raise the vehicle until its wheels are off the
ground using the jack or a lift.
5) Remove the wheel nuts and wheels.

NOTE:
• When removing the wheels, be careful not to
damage the hub bolts.
• Place the wheels with their outer sides facing up-
ward to prevent wheels from being damaged.

B: INSTALLATION

1) Remove dirt from the mating surface of the
wheel and brake rotor.
2) Attach the wheel to the hub by aligning the wheel
bolt holes with the hub bolts.
3) Temporarily attach the wheel nuts to the hub
bolts. (In the case of aluminum wheels, use SUBA-
RU genuine wheel nuts for aluminum wheels.)
4) Tighten the nuts by hand, making sure the wheel
hub hole is aligned correctly to the guide portion of
hub.
5) Tighten the wheel nuts in a diagonal selection to
the specified torque. Use a wheel nut wrench.

Wheel nut tightening torque:

120 N·m (12.2 kgf-m, 88.5 ft-lb)

CAUTION:
• Tighten the wheel nuts in two or three steps
by gradually increasing the torque on opposing
nuts, until they reach the specified torque.
• Do not push the wrench by foot. Always use
both hands when tightening the nuts.
• Make sure the bolt, nut and the nut seating
surface of the wheel are free from oil.
6) If a wheel is removed for replacement or for re-
pair of a puncture, retighten the wheel nuts to the
specified torque after driving 1,000 km (600 miles).

C: INSPECTION

1) Deformation or damage to the rim may cause air
leakage. Check the rim flange for deformation,
cracks or damage, and repair or replace as neces-
sary.
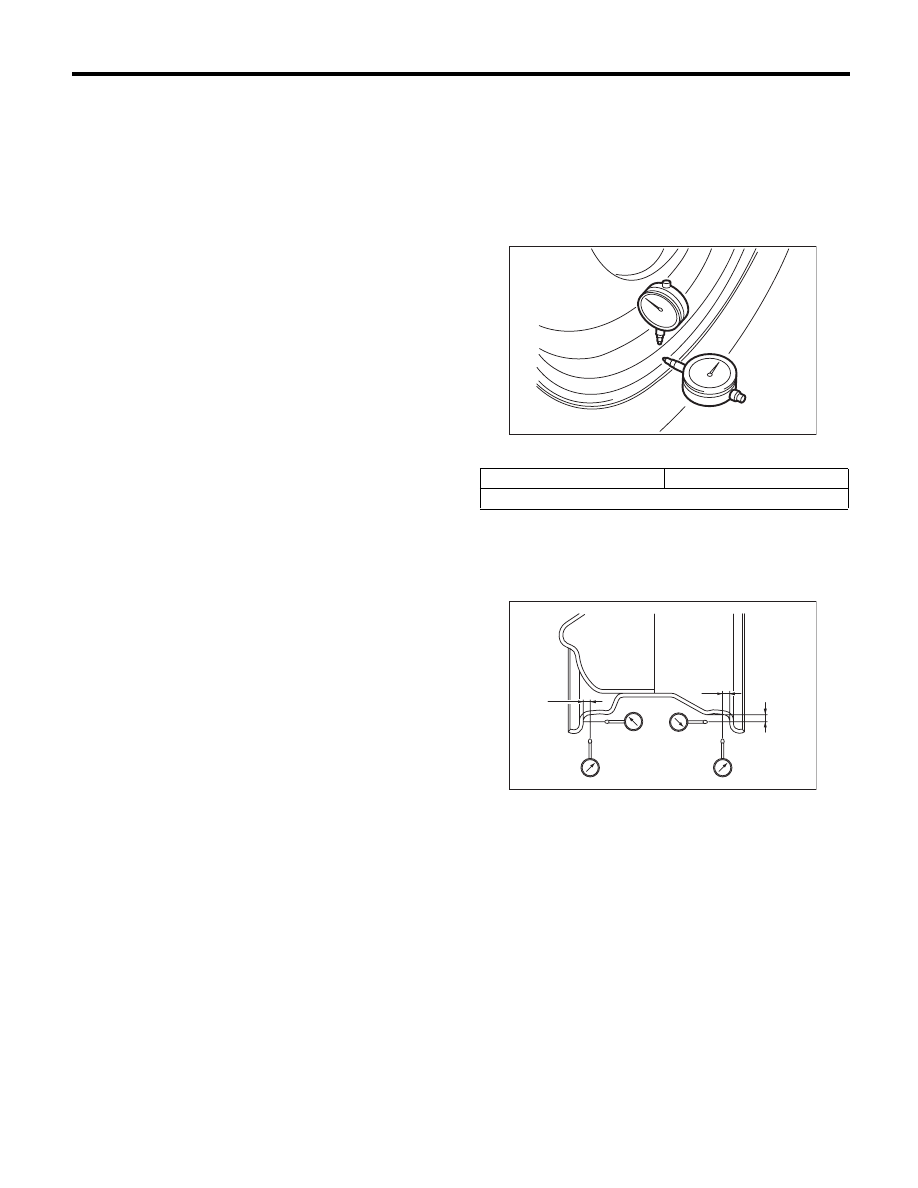
2) Jack-up the vehicle until wheels clear the floor.
3) Slowly rotate the wheel to check rim “runout” us-
ing a dial gauge.

Rim runout:

4) If the rim runout exceeds specifications, remove
the tire from the wheel and check runout with the
dial gauge attached to positions shown in the fig-
ure.

5) If the measured runout still exceeds specifica-
tions, replace the wheel.

Axial runout limit

Vertical run-out limit

1.5 mm (0.059 in)

(1) Approx. 7 mm (0.28 in)

WT-00004

WT-00005

(1)

(1)

(1)

WT-8

Aluminum Wheel

WHEEL AND TIRE SYSTEM

4. Aluminum Wheel

A: REMOVAL

Refer to “Steel Wheels” for removal procedure of
aluminum wheels. <Ref. to WT-6, REMOVAL,
Steel Wheel.>

B: INSTALLATION

Refer to “Steel Wheels” for installation procedure of
aluminum wheels. <Ref. to WT-6, INSTALLATION,
Steel Wheel.>

C: INSPECTION

Refer to “Steel Wheels” for inspection procedure of
aluminum wheels. <Ref. to WT-6, INSPECTION,
Steel Wheel.>

Rim runout:

D: CAUTION

Aluminum wheels are easily scratched. To main-
tain their appearance and safety, be careful of the
following:
1) Do not damage the aluminum wheels during re-
moval, installation, wheel balancing, etc. After re-
moving aluminum wheels, place them on a rubber
mat etc.
2) When washing the aluminum wheel, use neutral
synthetic detergent and water. Avoid using cleans-
ers containing abrasives, hard brushes or an auto-
matic car washer.

Axial runout limit

Vertical run-out limit

1.0 mm (0.039 in)

WT-9

Wheel Balancing

WHEEL AND TIRE SYSTEM

5. Wheel Balancing

A: ADJUSTMENT

NOTE:
Because an adhesive type weight is adopted for
the outside balance weight of 17-inch and 18-inch
wheels, change the setting of the wheel balancer to
adhesive type weight.
1) Remove the balance weights.

CAUTION:
• Be careful not to damage the wheel.
• Completely remove the double-sided tape of
the adhesive weight from the wheel.
2) Using the wheel balancer, measure wheel bal-
ance.
3) Select a weight close to the value measured by
wheel balancer.

CAUTION:
Use SUBARU genuine balance weights.

Balance weight part number

(Knock-on type weight for steel wheels)

Weight

28101AA001

5 g (0.18 oz)

28101AA011

10 g (0.35 oz)

28101AA021

15 g (0.53 oz)

28101AA031

20 g (0.71 oz)

28101AA041

25 g (0.88 oz)

28101AA051

30 g (1.06 oz)

28101AA061

35 g (1.23 oz)

28101AA071

40 g (1.41 oz)

28101AA081

45 g (1.59 oz)

28101AA091

50 g (1.76 oz)

28101AA101

55 g (1.94 oz)

28101AA111

60 g (2.12 oz)

Balance weight part number

(Knock-on type weight for aluminum wheel)

Weight

28101SA000

5 g (0.18 oz)

28101SA010

10 g (0.35 oz)

28101SA020

15 g (0.53 oz)

28101SA030

20 g (0.71 oz)

28101SA040

25 g (0.88 oz)

28101SA100

30 g (1.06 oz)

28101SA110

35 g (1.23 oz)

28101SA120

40 g (1.41 oz)

28101SA130

45 g (1.59 oz)

28101SA140

50 g (1.76 oz)

28101XA000

55 g (1.94 oz)

28101SA150

60 g (2.12 oz)

Balance weight part number

(Adhesive type weight for aluminum wheel)

Weight

28101AE00B

5 g (0.18 oz)

28101AE01B

7.5 g (0.26 oz)

28101AE02B

10 g (0.35 oz)

28101AE03B

12.5 g (0.44 oz)

28101AE04B

15 g (0.53 oz)

28101AE05B

17.5 g (0.62 oz)

28101AE06B

20 g (0.71 oz)

28101AE07B

22.5 g (0.79 oz)

28101AE08B

25 g (0.88 oz)

28101AE09B

27.5 g (0.97 oz)

28101AE10B

30 g (1.06 oz)

28101AE11B

32.5 g (1.15 oz)

28101AE12B

35 g (1.23 oz)

28101AE13B

37.5 g (1.32 oz)

28101AE14B

40 g (1.41 oz)

28101AE15B

42.5 g (1.50 oz)

28101AE16B

45 g (1.59 oz)

28101AE17B

47.5 g (1.68 oz)

28101AE18B

50 g (1.76 oz)

28101AE19B

52.5 g (1.85 oz)

28101AE20B

55 g (1.94 oz)

28101AE21B

57.5 g (2.03 oz)

28101AE22B

60 g (2.12 oz)

28101AE23B

62.5 g (2.20 oz)

28101AE24B

65 g (2.29 oz)

28101AE25B

67.5 g (2.38 oz)

28101AE26B

70 g (2.47 oz)

28101AE27B

72.5 g (2.56 oz)

28101AE28B

75 g (2.65 oz)

28101AE29B

77.5 g (2.73 oz)

28101AE30B

80 g (2.82 oz)

28101AE31B

82.5 g (2.91 oz)

28101AE32B

85 g (3.00 oz)

28101AE33B

87.5 g (3.09 oz)

28101AE34B

90 g (3.17 oz)

28101AE35B

92.5 g (3.26 oz)

28101AE36B

95 g (3.35 oz)

28101AE37B

97.5 g (3.44 oz)

28101AE38B

100 g (3.53 oz)

28101AG50B

102.5 g (3.62 oz)

28101AG51B

105 g (3.70 oz)

28101AG52B

107.5 g (3.79 oz)

28101AG53B

110 g (3.88 oz)

28101AG54B

112.5 g (3.97 oz)

28101AG51B

115 g (4.06 oz)

28101AG56B

117.5 g (4.14 oz)

28101AG57B

120 g (4.23 oz)

WT-10

Wheel Balancing

WHEEL AND TIRE SYSTEM

4) Install the selected weight to the point designat-
ed by the wheel balancer.

CAUTION:
• Degrease the wheel surface where the adhe-
sive type weight will be applied.
• Press the adhesive type weight by 25 N (2.5
kgf, 5.6 lb) or more per 5 g (0.18 oz) for 2 sec-
onds or more and attain full adhesion.
• Total application of the adhesive type weight
should be 100 g (3.53 oz) or less.
• The total weight of all adhesive weight on
models with transmitters (tire pressure sensor)
is to be 120 g (4.23 oz) or less.
5) Using the wheel balancer, measure the wheel
balance again. Check that wheel balance is cor-
rectly adjusted.

NOTE:
Knock-on type balance weights for aluminum
wheels can be used on any 15 to 18 inch aluminum
wheels.

Service limit A:

Knock-on type weight for steel wheel:

5 — 25 g (0.18 — 0.88 oz) 2.0 mm (0.08 in)

30 g (1.06 oz) or more 1.8 mm (0.07 in)
Knock-on type weight for aluminum wheel:

5 — 25 g (0.18 — 0.88 oz) 5.0 mm (0.20 in)

30 g (1.06 oz) or more 4.5 mm (0.177 in)

(1) Knock-on type weight for aluminum wheel

(2) Knock-on type weight for steel wheel

WT-00006

A

A


Content   ..  850  851  852  853   ..