Subaru Legacy IV (2008 year). Manual - part 662


  Index      Subaru     Subaru Legacy IV - service repair manual 2008 year


Search            


Content   ..  660  661  662  663   ..


Subaru Legacy IV (2008 year). Manual - part 662


CS-55

Reverse Check Cable

CONTROL SYSTEMS

9. Reverse Check Cable
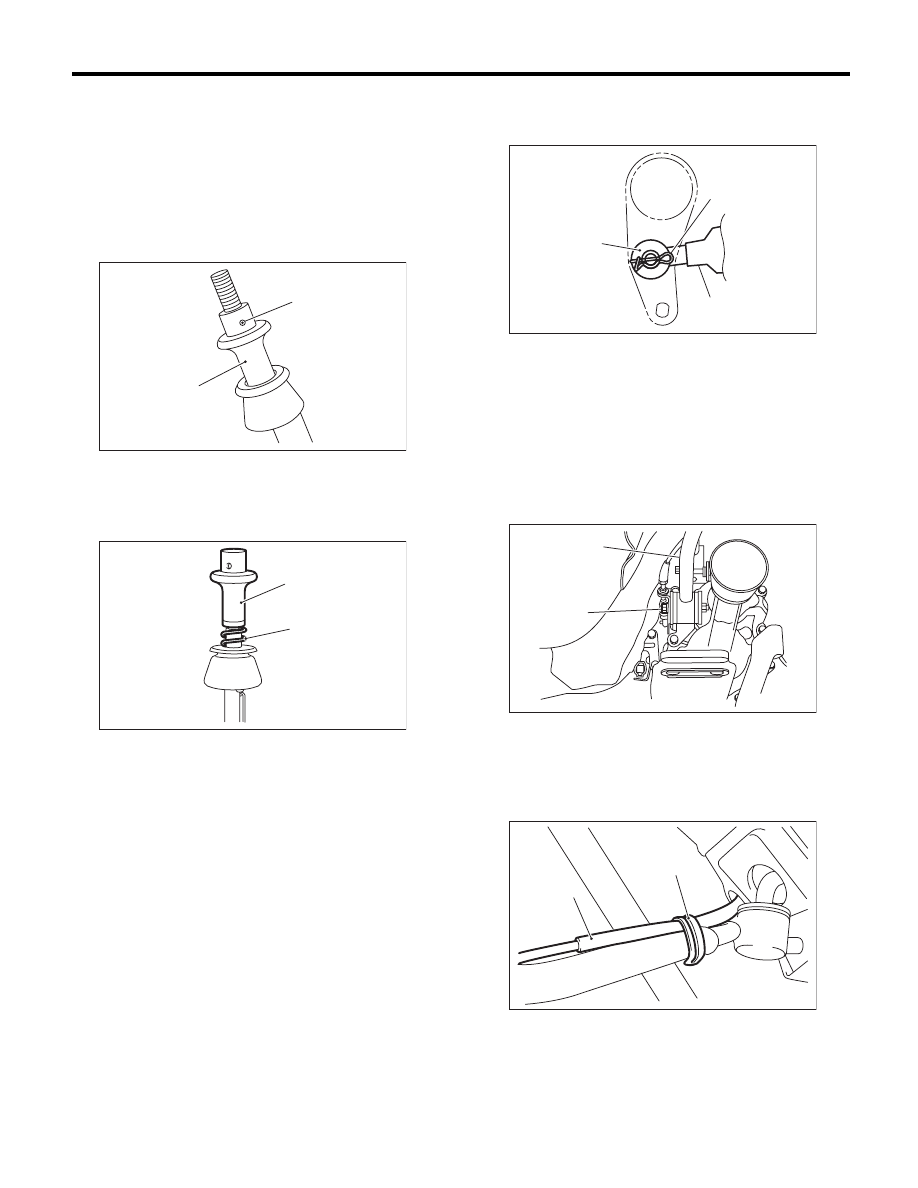
A: REMOVAL

1) Set the vehicle on a lift.
2) Remove the gear shift knob.
3) Remove the console box front. <Ref. to EI-54,
REMOVAL, Console Box.>
4) Remove the front cover assembly.
5) Remove the spring pin from the slider.

6) Remove the slider and spring.

7) Cut the band clip, and separate the reverse
check cable from the gear shift lever.
8) Lift up the vehicle.
9) Remove the under cover.
10) Remove the rear exhaust pipe and muffler.
<Ref. to EX(H4DOTC)-12, REMOVAL, Rear Ex-
haust Pipe.> <Ref. to EX(H4DOTC)-14, REMOV-
AL, Muffler.>
11) Remove the crossmember. <Ref. to 6MT-30,
REMOVAL, Transmission Mounting System.>

12) Remove the snap pin and washer, and sepa-
rate the reverse check cable from the reverse
check lever.

13) Move the transmission to the right side, and re-
move the stay bolts and the reverse check cable.

NOTE:
If the transmission is not moved aside, the stay
bolts may contact the body and cause damage.

14) Lift the stay clip, and separate the stay and the
reverse check cable.

(A) Slider

(B) Spring pin

(A) Slider

(B) Spring

CS-00225

(A)

(B)

CS-00226

(A)

(B)

(A) Snap pin

(B) Washer

(C) Reverse check cable

(A) Stay

(B) Stay bolt

(A) Reverse check cable

(B) Clip

CS-00220

(B)

(A)

(C)

CS-00245

(A)

(B)

CS-00243

(A)

(B)

CS-56

Reverse Check Cable

CONTROL SYSTEMS

15) Pull out the reverse check cable from under-
side of the vehicle to remove it.

NOTE:
Be careful not to damage the inner boot.
16) Loosen the lock nut, and remove the reverse
check cable from the cable plate.

B: INSTALLATION

1) Insert the reverse check cable into the inner boot
hole from underside of the vehicle.
2) Insert the reverse check cable into the gear shift
lever assembly, and secure it with the band clip.

NOTE:
• Cut the excess band clip.
• Make sure that the reverse check cable is insert-
ed into the gearshift lever with no gaps.
3) Use the spring pin to secure the end of the slider
and the reverse check cable.

NOTE:
Apply grease to the moving part of slider.

4) Lift up the vehicle.
5) With the cable pulled (the slider is lowered), ad-
just the distance between the edge of cable plate
and the reverse check cable to 84 mm (3.31 in),
and tighten the lock nut.

Tightening torque:

6 N·m (0.6 kgf-m, 4.4 ft-lb)

(A) Cable plate

(B) Reverse check cable

CS-00228

(A)

(B)

(A) Slider

(B) Spring pin

(A) 84 mm (3.31 in)

CS-00225

(A)

(B)

CS-00961

(A)

CS-57

Reverse Check Cable

CONTROL SYSTEMS

6) Move the transmission to the right side, and in-
stall the stay.

Tightening torque:

T: 32 N·m (3.3 kgf-m, 23.6 ft-lb)

7) Attach the reverse check cable, washer and
snap pin to the reverse check lever.

NOTE:
Take care to install the snap pin in proper direction.

8) Secure the reverse check cable to the stay clip.

NOTE:
Install the reverse check cable on top of the stay.

9) Install the rear exhaust pipe and muffler. <Ref. to
EX(H4DOTC)-13, INSTALLATION, Rear Exhaust
Pipe.> <Ref. to EX(H4DOTC)-14, INSTALLATION,
Muffler.>
10) Lower the vehicle.
11) Install the front cover assembly.
12) Install the console box. <Ref. to EI-54, INSTAL-
LATION, Console Box.>
13) Install the gear shift knob.

C: INSPECTION

1) Make sure the slider moves smoothly. If it does
not move, adjust the reverse check cable, or check
the slider for damage. <Ref. to CS-58, ADJUST-
MENT, Reverse Check Cable.>
2) Check that the gear shifts into reverse when the
slider is pulled up. If the gear is not shifted to the re-
verse, adjust the reverse check cable. <Ref. to CS-
58, ADJUSTMENT, Reverse Check Cable.>
3) Check that the gear does not shift into reverse
when the slider is not pulled up. If the gear is shifted
to the reverse, adjust or replace the reverse check
cable. <Ref. to CS-58, ADJUSTMENT, Reverse
Check Cable.>

(A) Stay

(A) Reverse check cable

(B) Washer

(C) Snap pin

(D) Front side

(A) Reverse check cable

(B) Clip

CS-00246

(A)

T

CS-00224

(B)

(D)

(C)

(A)

CS-00243

(A)

(B)

CS-58

Reverse Check Cable

CONTROL SYSTEMS

D: ADJUSTMENT

1) Set the vehicle on a lift.
2) Remove the under cover.
3) Remove the rear exhaust pipe and muffler.
<Ref. to EX(H4DOTC)-12, REMOVAL, Rear Ex-
haust Pipe.> <Ref. to EX(H4DOTC)-14, REMOV-
AL, Muffler.>
4) Remove the crossmember. <Ref. to 6MT-30,
REMOVAL, Transmission Mounting System.>
5) Remove the snap pin and washer, and separate
the reverse check cable from the reverse check le-
ver.

6) Move the transmission to the right side, and re-
move the stay bolts and the reverse check cable.

NOTE:
If the transmission is not moved aside, the stay
bolts may contact the body and cause damage.

7) With the cable pulled (the slider is lowered), ad-
just the distance between the edge of cable plate
and the reverse check cable to 84 mm (3.31 in),
and tighten the lock nut.

Tightening torque:

6 N·m (0.6 kgf-m, 4.4 ft-lb)

8) Move the transmission to the right side, and in-
stall the stay.

Tightening torque:

T: 32 N·m (3.3 kgf-m, 23.6 ft-lb)

9) Install the crossmember. <Ref. to 6MT-30, IN-
STALLATION, Transmission Mounting System.>
10) Install the rear exhaust pipe and muffler. <Ref.
to EX(H4DOTC)-13, INSTALLATION, Rear Ex-
haust Pipe.> <Ref. to EX(H4DOTC)-14, INSTAL-
LATION, Muffler.>

(A) Snap pin

(B) Washer

(C) Reverse check cable

(A) Stay

(B) Stay bolt

CS-00220

(B)

(A)

(C)

CS-00245

(A)

(B)

(A) 84 mm (3.31 in)

(A) Stay

CS-00961

(A)

CS-00246

(A)

T


Content   ..  660  661  662  663   ..