Subaru Legacy IV (2008 year). Manual - part 1123


  Index      Subaru     Subaru Legacy IV - service repair manual 2008 year


Search            


Content   ..  1121  1122  1123  1124   ..


Subaru Legacy IV (2008 year). Manual - part 1123


SR-6

Glass Lid

SUNROOF/T-TOP/CONVERTIBLE TOP (SUNROOF)

3. Glass Lid

A: REMOVAL

1. SEDAN MODEL

1) Completely close the glass lid, and then open
the sunshade.
2) Remove the cover (A), and then remove the
TORX

®

 bolts (B).

CAUTION:
The thread locker is applied to the TORX

®

 bolts,

so use the new parts once they are removed.

3) Remove the glass lid carefully.

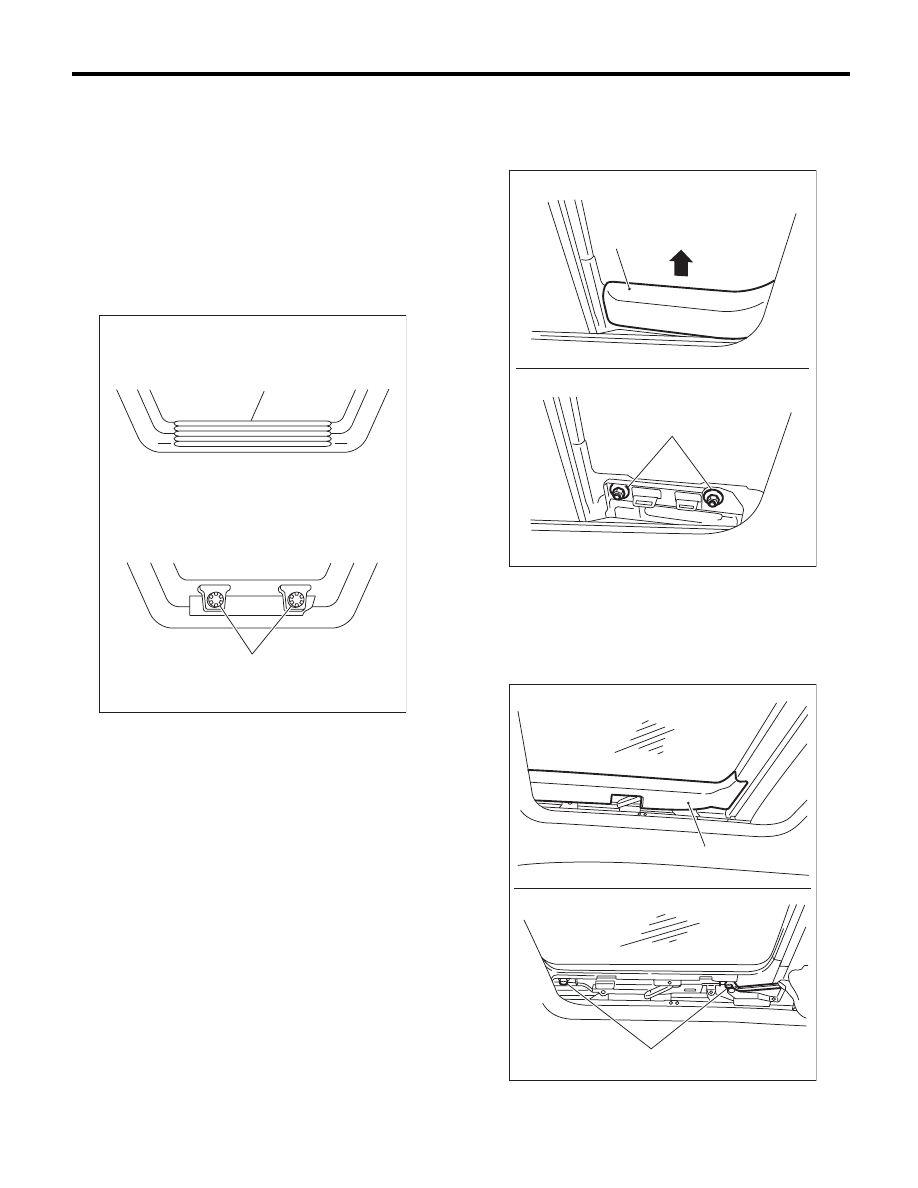
2. WAGON MODEL (FRONT)

1) Open the sunshade.
2) Pull out the cover (A) towards the arrow mark,
and remove the nuts (B).

3) Remove the glass lid (front) carefully.

3. WAGON MODEL (REAR)

1) Tilt the glass lid (front) up, then open the sun-
shade.
2) Remove the cover (A), then remove the nuts (B).

3) Remove the glass lid carefully.

(A)

(B)

SR-00091

SR-00104

(B)

(A)

SR-00103

(A)

(B)

SR-7

Glass Lid

SUNROOF/T-TOP/CONVERTIBLE TOP (SUNROOF)

B: INSTALLATION

Install in the reverse order of removal.

C: ADJUSTMENT

1. SEDAN MODEL

Loosen the glass lid mounting TORX

®

 bolts (A),

and then adjust the height with moving the lid.

Difference in height between glass lid and roof 
panel L:

2.0

r

1.0 mm (0.079

r

0.039 in)

2. WAGON MODEL

Loosen the glass lid installation nuts, and adjust the
height by adding (max: four pieces) or extracting
(min: zero piece) shims (B) (standard: two pieces)
between the glass lid (A) and body.

Difference in height between glass lid and roof 
panel L:

2.0

r

1.0 mm (0.079

r

0.039 in)

(A)

SR-00117

L

SR-00077

L

(A)

(B)

(B)

SR-8

Glass Lid

SUNROOF/T-TOP/CONVERTIBLE TOP (SUNROOF)

D: FORCED DRIVE

CAUTION:
After a forced operation, make sure to perform
an initialize operation. <Ref. to SR-5, INSPEC-
TION, Sunroof Control System.>
If the glass lid does not operate or is not supplied
with power, move the glass lid using the hexagon
wrench.
Sedan model: bolt width 4 mm (0.16 in)
Wagon model: bolt width 5 mm (0.20 in)

1. SEDAN MODEL

1) Remove the spot map light. <Ref. to LI-32, RE-
MOVAL, Spot Map Light.>
2) Insert the hexagon wrench securely until it
touches the motor shaft end.
3) Turn the hexagon wrench, and move the glass
lid.
• Turning right, the glass lid open.
• Turning left, the glass lid close.

CAUTION:
Be careful not to damage the adjacent parts
with the rod end when moving the glass lid with
the hexagon wrench.

2. WAGON MODEL

1) Slide the slider (A) towards the rear of the vehi-
cle (C), and remove the sun shade from the slider
by raising the rod (B).

2) Slide the sunshade forward.
3) Remove the plug to the rear of the roof trim.

4) Insert the hexagon wrench securely until it
touches the motor shaft end.
5) Turn the wrench to right, and close the glass lid
(front and rear).

CAUTION:
Be careful not to damage the adjacent parts
with the rod end when moving the glass lid with
the hexagon wrench.

SR-00099

SR-00118

(A)

(B)

(C)

SR-00100

SR-00101

SR-9

Sunroof Assembly

SUNROOF/T-TOP/CONVERTIBLE TOP (SUNROOF)

4. Sunroof Assembly

A: REMOVAL

1. SEDAN MODEL

1) Disconnect the ground cable from the battery.
2) Remove the roof trim. <Ref. to EI-67, SEDAN
MODEL, REMOVAL, Roof Trim.>
3) Disconnect the harness connector of sunroof
motor.
4) Remove the glass lid. <Ref. to SR-6, SEDAN
MODEL, REMOVAL, Glass Lid.>
5) Remove the drain tube from frame assembly.
6) Remove the assist rail bracket (front) (A) and
sunroof bracket (rear) (B).

7) Remove the nuts, and then remove the frame
assembly.

2. WAGON MODEL

1) Disconnect the ground cable from the battery.
2) Remove the roof trim. <Ref. to EI-67, WAGON
MODEL, REMOVAL, Roof Trim.>
3) Disconnect the harness connector of the motor
assembly.

4) Remove the front and rear glass lid. <Ref. to SR-
6, WAGON MODEL (FRONT), REMOVAL, Glass
Lid.> <Ref. to SR-6, WAGON MODEL (REAR),
REMOVAL, Glass Lid.>
5) Remove the attachment bolts (A) on the rear
frame bracket of the frame assembly.

6) Remove the drain tube from frame assembly.
7) Remove the frame bracket (A).
8) Remove bolts (B) and nuts (C), then remove the
frame assembly.

SR-00078

(A)

(B)

SR-00079

SR-00080

(A)

SR-00081

(A)

(A)

(C)

(B)

(B)

SR-00127


Content   ..  1121  1122  1123  1124   ..