SsangYong Korando II (1996-2006 year). Manual - part 448


  Index      SsangYong     SsangYong Korando II - service repair manual 1996-2006 year


Search            


Content   ..  446  447  448  449   ..


SsangYong Korando II (1996-2006 year). Manual - part 448


SSANGYONG  MY2002

9L-8  GLASS AND MIRRORS

KAA9L140

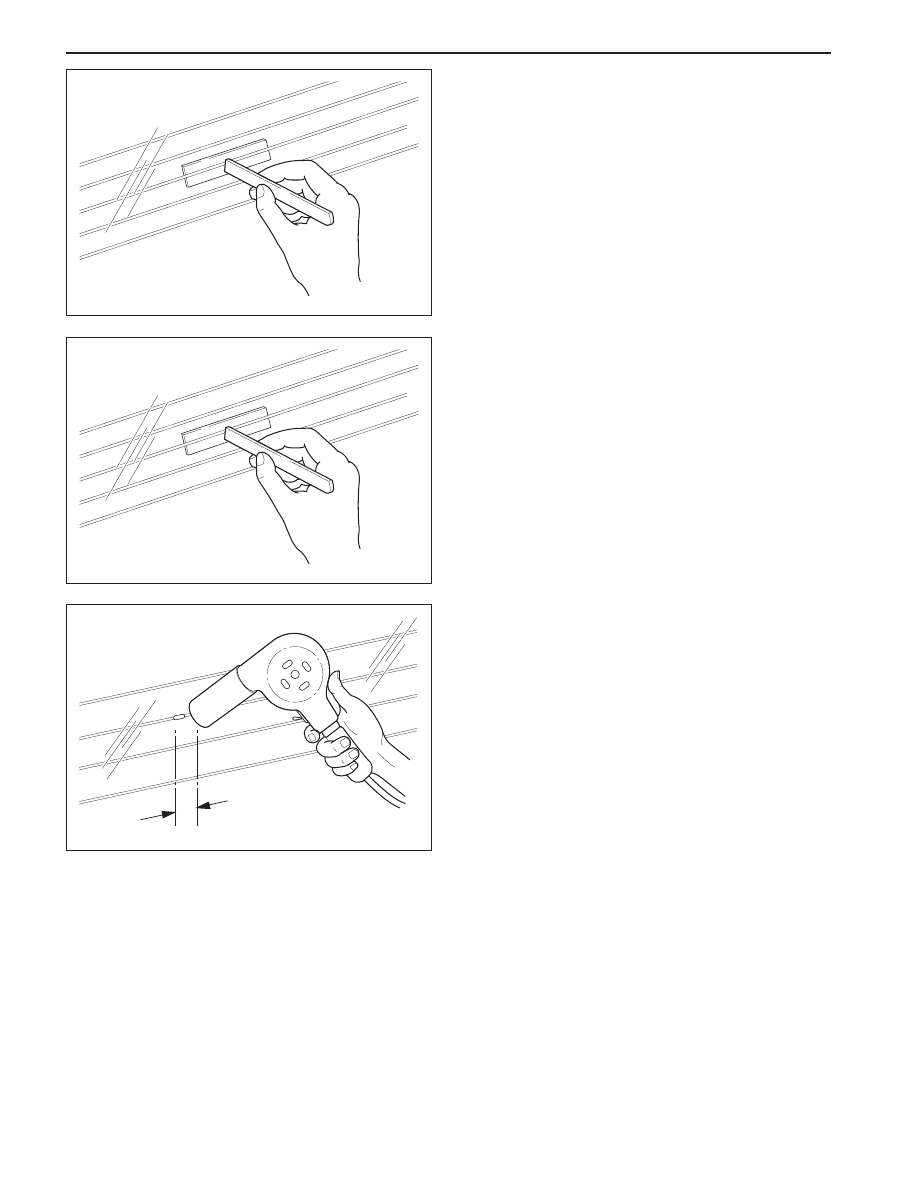
Notice: The grid line repair material must be cured
with heat. In order to avoid heat damage to the
interior trim, protect the trim near the repair area
where heat will be applied.

9. Heat the repair area for 1 to 2 minutes.

10. Hold the heat gun nozzle 25 mm (1 inch) from the

surface. A minimum temperature of 149°C (300°F)
is required.

11. Inspect the grid line repair area. If the repair

appears discolored, apply a coating of tincture of
iodine to the area using a pipe cleaner or a line
brush. Allow the iodine to dry for about 30
seconds. Carefully wipe off the excess iodine with
a lint-free cloth.

12. Test the operation of the rear window defogger in

order to verify that the repair was successful.

Important:  At least 24 hours is required for
complete curing of the repair materials. The repair
area should not be physically disturbed until after
that time.

13. Installation should follow the removal procedure

in the reverse order.

KAA9L130

REAR WINDOW DEFOGGER GRID
LINE REPAIR

1. Disconnect the negative battery cable.

2. Disconnect the rear window defogger electrical

connector.

3. Inspect the rear window defogger grid lines.

4. Mark the grid line break on the outside of the glass

with a wax pencil or a crayon.

5. Buff the grid lines that are to be repaired with steel

wool. Wipe the lines clean using a cloth dampened
with alcohol. Buff and clean about 6 mm (0.25 inch)
beyond each side of the break in the grid line.

KAA9L130

6. Attach a grid line repair decal or two strips of tape

above and below the repair areas.

A repair decal or tape must be used in order to
control the width of the repair areas.

If a decal is used, the die-cut metered slot must
be the same width as the grid line.

7. Apply the grid repair material to the repair area

using a small wooden stick or a spatula. The grid
repair material should be at room temperature.

8. Carefully remove the decal or the tape.

GLASS AND MIRRORS  9L-9

SSANGYONG  MY2002

KAA9L160

KAA9L170

FRONT DOOR GLASS

Removal Procedure

1. Remove the door seal trim. Refer to Section 9P,

Doors.

2. Remove the screws that secure the glass to the

window regulator.

3. Remove the glass from the door.

4. Removal procedure should follow the installation

procedure in the reverse order.

Installation Procedure

1. Install the glass in the door and position the glass

within the window regulator.

Notice:  Dissimilar metals in direct contact with
each other may corrode rapidly. Make sure to use
the correct fasteners to prevent premature
corrosion.

2. Install the glass to the window regulator with the

screws.

Installation Notice

3. Install the door seal trim. Refer to Section 9P,

Doors.

4. Removal procedure should follow the installation

procedure in the reverse order.

Tightening Torque

1.96 - 2.94 N•m

 (17.50 - 26.25 lb-in)

KAA9L180

FIXED GLASS

Removal and Installation Procedure

1. Remove the exterior B-pillar molding. Refer to

Section 9M, Exterior Trim.

2. Remove the screws that secure the glass to the

window regulator.

3. Remove the glass from the door.

Installation Notice

Dissimilar metals in direct contact with each
other may corrode rapidly. Make sure to use
the correct fasteners to prevent premature
corrosion.

4. Installation should follow the removal procedure

in the reverse order.

Tightening Torque

7 N•m (62 lb-in)

SSANGYONG  MY2002

9L-10  GLASS AND MIRRORS

KAA9L190

KAA9L200

OUTSIDE REARVIEW MIRROR

Removal and Installation Procedure

1. Remove the tweeter inner cover.

2. Remove the screws with the outside rearview

mirror.

Installation Notice

Dissimilar metals in direct contact with each
other may corrode rapidly. Make sure to use
the correct fasteners to prevent premature
corrosion.

3. Installation should follow the removal procedure

in the reverse order.

INSIDE REARVIEW MIRROR

Removal and Installation Procedure

1. Remove the screw with the inside rearview mirror.

Installation Notice

Dissimilar metals in direct contact with each
other may corrode rapidly. Make sure to use
the correct fasteners to prevent premature
corrosion.

2. Installation should follow the removal procedure

in the reverse order.

Tightening Torque

1.4 - 1.7 N•m

 (9 lb-in)

Tightening Torque

3 - 5 N•m

 (27 - 44 lb-in)

GLASS AND MIRRORS  9L-11

SSANGYONG  MY2002

SPECIFICATIONS

FASTENER TIGHTENING SPECIFICATIONS

Fixed Glass Door Glass

Front Door

Outside Mirror

Room Mirror

Application

N•m

Lb-Ft

Lb-In

7

1.96 - 2.94

3 - 5

1.4 - 1.7

-

1.46 - 2.19

-

-

62

17.50 - 26.25

27 - 44

9


Content   ..  446  447  448  449   ..