Opel Frontera UBS. Manual - part 2519


  Index      Opel     Opel Frontera UBS - service repair manual 1998-2002 year


Search            


Content   ..  2517  2518  2519  2520   ..


Opel Frontera UBS. Manual - part 2519


7A–34

AUTOMATIC TRANSMISSION (4L30–E)

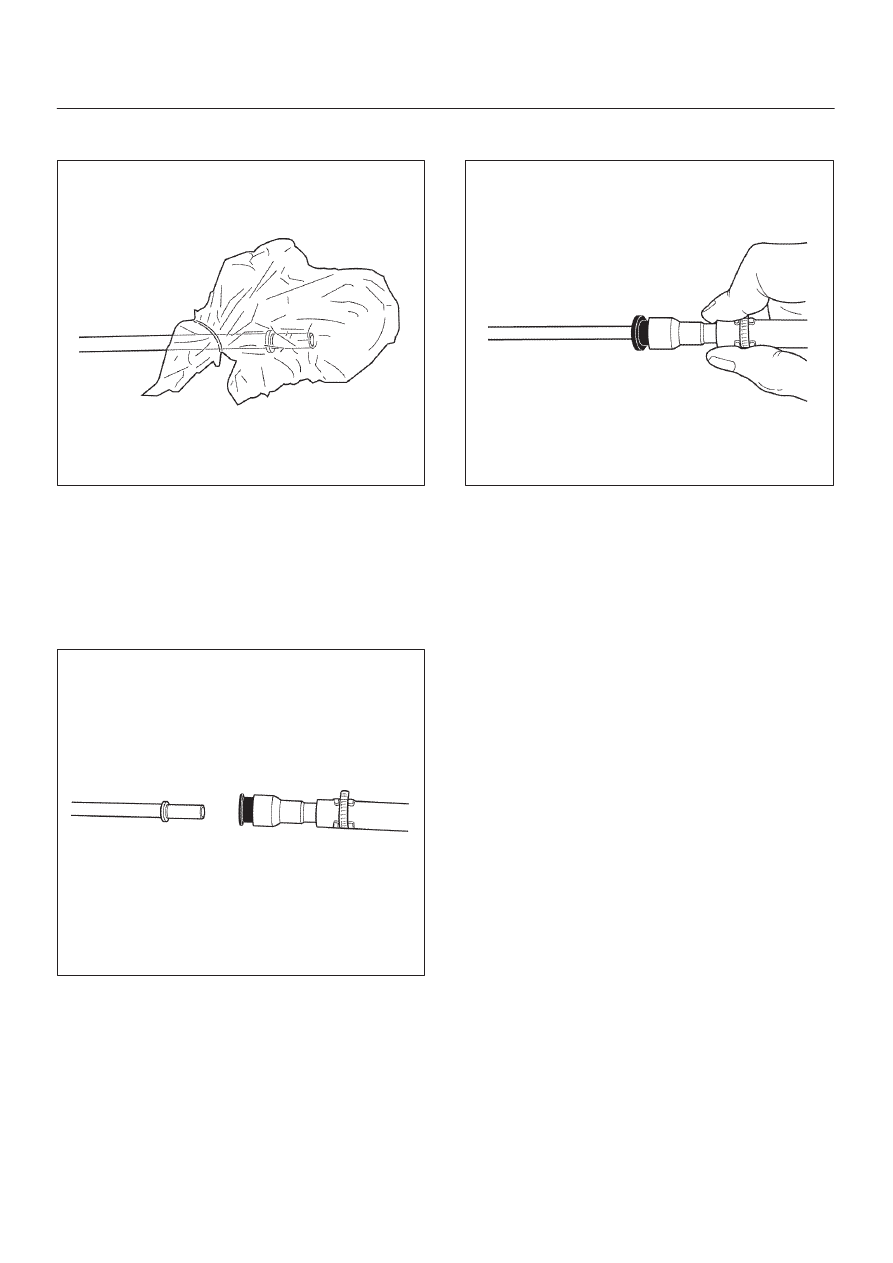
3. Tie a vinyl bag around the connector and fuel

pipe to protect them from dirt.

141RY00004

2. Joining the connector and fuel hose

1. Remove the vinyl bag from the connector and

fuel hose. Check that the contact surfaces are
undamaged and free of dirt and other foreign
material. Clean if necessary.

2. Align the axis of the fuel pipe and connector.

Push the connector into the fuel pipe until a
distinct click is heard.

141RY00005

3. Gently pull on the connector to check that it is

securely latched.

141RY00006

23. Disconnect transmission harness connectors (15)

from transmission, transfer, and right catalytic
converter.

24. Remove under covers (3 pieces) (16) from

transmission case.

25. Remove flex plate torque converter fixing bolts (6

pieces) (17) by turning crankshaft.

26. Support the transmission with a transmission jack,

and hoist engine with a chain block.

27. Remove engine transmission fixing bolts (18). 
28. Remove transmission assembly with transfer case

(19).

29. Remove transfer case from the transmission

assembly if necessary.

Installation

1. Slowly raise transmission jack until front of the

transmission is aligned with rear of the engine, then
install transmission assembly.

7A–35

AUTOMATIC TRANSMISSION (4L30–E)

2. Tighten engine transmission bolts, to the specified

torque.

F07RW041

3. Support transfer case with a jack, and remove the

transmission jack.

4. Install flex plate torque converter bolts (6 pieces) by

turning crankshaft.

Torque: 54 N

m (5.5 kg·m/40 Ib ft)

NOTE: Do not reuse the flex plate torque converter bolt.

240RY003

5. Install the under cover (3 pieces), and tighten the

bolts to the specified torque.

Torque: 8 N

m (0.8 kg·m/69 Ib in)

6. Install the starter, and tighten the bolts to the specified

torque.

Torque: 40 N

m (4.1 kg·m/30 Ib ft)

7. Connect transmission harness connectors to

transmission, transfer, and right catalytic converter.

8. Connect fuel pipe brackets to transmission side.

NOTE: See “NOTE” of removal steps.

7A–36

AUTOMATIC TRANSMISSION (4L30–E)

For TOD

141RW001

7A–37

AUTOMATIC TRANSMISSION (4L30–E)

For except TOD

141RW027

9. Install transmission oil cooler pipe to transmission.

Torque: 44 N

m (4.5 kg·m/33 Ib ft)

10. Install oil pipe clamp to torque converter housing

bracket.

11. Tighten oil pipe clamp bolt at engine mount side.

12. Install right catalytic converter, tighten to the specified

torque.

Torque: 67 N

m (6.8 kg·m/49 Ib ft)

13. Install left catalytic converter assembly, and tighten

the bolts to the specified torque.

Exh. pipe to exh. manifold  67 N

m

(6.8 kg·m/49 Ib ft)

Exh. pipe flange bolt  43 N

m (4.4 kg·m/32 Ib ft)

14. Install left seat belt tension rod.

Torque: 39 N

m (4.0 kg·m/29 Ib ft)

15. Connect two left side oxygen sensor connectors to

the transmission harness.

16. Install front exhaust silencer mounting nuts.
17. Install third crossmember, and tighten the bolts to the

specified torque.

Torque: 76 N

m (7.8 kg·m/56 Ib ft)

18. Install rear mount nuts, and tighten the bolts to the

specified torque.

Torque: 50 N

m (5.1 kg·m/37 Ib ft)

19. Remove the jack from the transfer case.


Content   ..  2517  2518  2519  2520   ..