Nissan Armada (2022 year). Manual in english - page 13


  Index      Manuals     Nissan Armada (2022 year). Manual in english


Search            copyright infringement  


Content      ..     11      12      13      14     ..


Nissan Armada (2022 year). Manual in english - page 13


WARNING

The Intelligent Key transmits radio

waves when the buttons are pushed.

The FAA advises that radio waves

may affect aircraft navigation and

communication systems. Do not op-

erate the Intelligent Key while on an

airplane. Make sure the buttons are

not operated unintentionally when

the unit is stored for a flight.

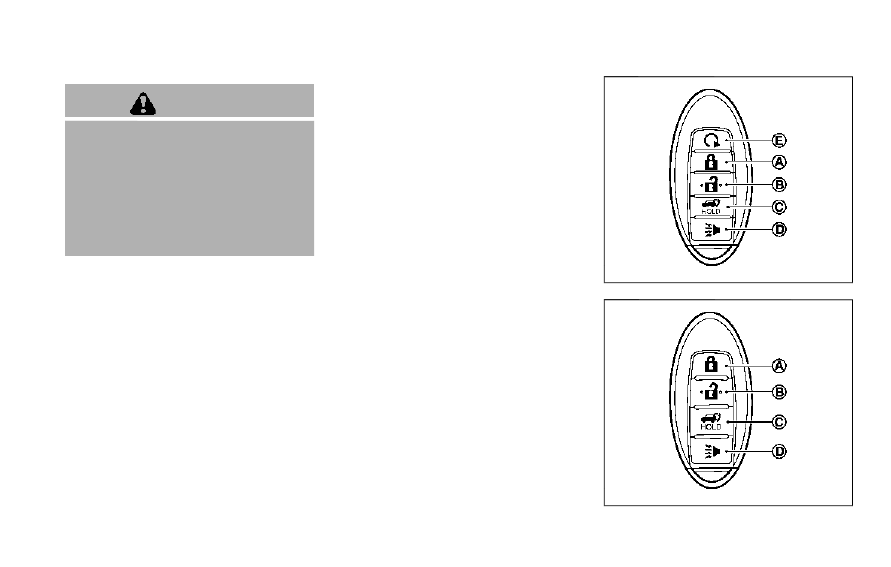
It is possible to lock/unlock all doors, fuel-

filler door, activate the panic alarm and

open the windows by pushing the but-

tons on the Intelligent Key from outside

the vehicle.

Before locking the doors, make sure the

Intelligent Key is not left in the vehicle.

The LOCK/UNLOCK button on the Intelli-

gent Key can operate at a distance of

approximately 33 ft (10 m) from the

vehicle. (The effective distance depends

upon the conditions around the vehicle.)
As many as 4 Intelligent Keys can be used

with one vehicle. For information con-

cerning the purchase and use of addi-

tional Intelligent Keys, contact a NISSAN

dealer.
The lock and unlock buttons on the

Intelligent Key will not operate when:

.

the distance between the Intelligent

Key and the vehicle is over 33 ft (10 m).

.

the Intelligent Key battery runs down.

After locking with the remote keyless

entry function, pull the door handle to

make sure the doors are securely locked.
The LOCK/UNLOCK operating range var-

ies depending on the environment. To

securely operate the lock and unlock

buttons, approach the vehicle to about 3

ft (1 m) from the door.

JVP0156X

Type A (if so equipped)

SPA2718

Type B (if so equipped)

Pre-driving checks and adjustments

3-15

REMOTE KEYLESS ENTRY SYSTEM

-------------------------------------------------------------------------------------------------------------------------------------------------------------

3-16

Pre-driving checks and adjustments

SPA1926B

Type C (if so equipped)

LOCK button
UNLOCK button
Power liftgate button
PANIC button
Remote engine start button

HOW TO USE REMOTE KEYLESS

ENTRY SYSTEM

When you lock or unlock the doors or the

liftgate, the hazard indicator will flash and

the horn (or the outside chime) will sound

as a confirmation. For details, see “Setting

hazard indicator and horn mode” (P.3-17).

Locking doors

1. Move the shift lever to the P (Park)

position, push the ignition switch to

the OFF position and make sure you

carry the Intelligent Key with you.*

2. Close all the doors and the liftgate.
3. Push the LOCK

button

on the

Intelligent Key.

4. All the doors and the liftgate will lock.
5. The hazard indicator flashes twice

and the horn chirps once.

*: Doors will lock with the Intelligent Key

while the ignition switch is in the ACC or

ON position.

Unlocking doors

1. Push the UNLOCK

button

on

the Intelligent Key once.

2. The hazard indicator flashes once. The

driver’s door will unlock.
The puddle light and the passenger

cabin illumination will illuminate and

stay on for a short period of time (if so

equipped). (See “Welcome light” (P.2-

80).)

3. Push the UNLOCK

button on the

Intelligent Key again within 60 sec-

onds.

4. The hazard indicator flashes once

again. All the doors will unlock.

All doors will be locked automatically

unless one of the following operations is

performed within 1 minute after pushing

the UNLOCK button on the Intelligent Key

while the doors are locked. If during this 1-

minute time period, the UNLOCK button

on the Intelligent Key is pushed, all doors

will be locked automatically after another

1 minute.

.

Opening any door

.

Pushing the ignition switch

NOTE:
The unlocking operation can be chan-

ged in selective unlock in the Vehicle

Settings of the vehicle information dis-

play. See “Vehicle settings” (P.2-24).

Opening windows

To open the windows, push the door

UNLOCK

button on the Intelligent

Key for

about 3 seconds

after the door is

unlocked.
To stop opening, release the UNLOCK

button.
Window cannot be closed using the

Intelligent Key.
The door windows can be opened or

closed by turning the mechanical key in

a door lock. (See “Doors” (P.3-4).)

-------------------------------------------------------------------------------------------------------------------------------------------------------------

Opening/closing liftgate (if so

equipped)

1. Push the power liftgate button

for more than 1 second.

2. The liftgate will automatically open.
The hazard indicator flashes 4 times and

the outside chime sounds for approxi-

mately 3 seconds.
To close the liftgate, push the power

liftgate button

for more than 1

second.
The liftgate will automatically close.
If the button

is pushed while the

liftgate is being opened or closed, the

liftgate will reverse.

Using panic alarm

If you are near your vehicle and feel

threatened, you may activate the alarm

to call attention as follows:
1. Push the PANIC

button

on the

Intelligent Key for

more than 1 sec-

ond.

2. The theft warning alarm and head-

lights will stay on for 25 seconds.

3. The panic alarm stops when:

.

It has run for 25 seconds, or

.

Any of the buttons on the Intelligent

Key are pushed. (Note: Panic button

or power liftgate button should be

pushed for more than 1 second.)

Remote engine start (if so

equipped)

The remote engine start

button

is

on the Intelligent Key if the vehicle has

remote engine start function. This func-

tion allows the engine to start from

outside the vehicle. See “Remote engine

start” (P.3-19) for more details.

Setting hazard indicator and horn

mode

This vehicle is set in hazard indicator and

horn mode when you first receive the

vehicle.
In hazard indicator and horn mode, when

the LOCK

button is pushed, the

hazard indicator flashes twice and the

horn chirps once. When the UNLOCK

button is pushed, the hazard indicator

flashes once.
If horns are not necessary, the system

can be switched to the hazard indicator

mode.
In hazard indicator mode, when the LOCK

button is pushed, the hazard indica-

tor flashes twice. When the UNLOCK

button is pushed, neither the hazard

indicator nor the horn operates.

Pre-driving checks and adjustments

3-17

-------------------------------------------------------------------------------------------------------------------------------------------------------------

3-18

Pre-driving checks and adjustments

Hazard indicator and horn mode:

DOOR LOCK

DOOR UNLOCK

Intelligent Key system

(Using door handle request switch)

HAZARD -

twice

OUTSIDE CHIME -

twice

HAZARD -

once

OUTSIDE CHIME -

once

Remote keyless entry system

(Using

or

button)

HAZARD -

twice

HORN -

once

HAZARD -

once

HORN - none

Hazard indicator mode:

DOOR LOCK

DOOR UNLOCK

Intelligent Key system

(Using door handle request switch)

HAZARD -

twice

HAZARD - none

Remote keyless entry system

(Using

or

button)

HAZARD -

twice

HAZARD - none

Switching procedure:

Push the LOCK

and UNLOCK

buttons on the Intelligent Key simulta-

neously for more than 2 seconds to

switch the mode from one to the other.
When pushing the buttons to set the

hazard indicator mode, the hazard indi-

cator flashes 3 times.
When pushing the buttons to set the

hazard indicator and horn mode, the

hazard indicator flashes once and the

horn chirps once.

-------------------------------------------------------------------------------------------------------------------------------------------------------------

WARNING

To avoid risk of injury or death, do

not use the remote engine start

function when the vehicle is in an

enclosed area such as a garage.

JVP0445X

The remote engine start

button is on

the Intelligent Key if the vehicle has

remote engine start function. This func-

tion allows the engine to start from

outside the vehicle.
Some systems, such as the air conditioner

system, will turn on during a remote

engine start, if the system was on the

last time the ignition switch was turned

off.
Laws in some local communities may

restrict the use of remote engine starters.

For example, some laws require a person

using remote engine start to have the

vehicle in view. Check local regulations for

any requirements.

Other conditions may affect the remote

engine start function. See “Conditions the

remote engine start will not work” (P.3-

20).
Other conditions can affect the perfor-

mance of the Intelligent Key transmitter.

See “Intelligent Key system” (P.3-7) for

additional information.

REMOTE ENGINE START OPERATING

RANGE

The remote engine start function can

only be used when the Intelligent Key is

within the specified operating range from

the vehicle.
When the Intelligent Key battery is dis-

charged or other strong radio wave

sources are present near the operating

location, the Intelligent Key operating

range becomes narrower, and the Intelli-

gent Key may not function properly.
The remote engine start operating range

is approximately 197 ft (60 m) from the

vehicle.

REMOTE STARTING THE ENGINE

To use the remote start function to start

the engine, perform the following:
1. Aim the Intelligent Key at the vehicle.
2. Push the “LOCK”

button to lock all

doors.

Pre-driving checks and adjustments

3-19

REMOTE ENGINE START (if so equipped)

-------------------------------------------------------------------------------------------------------------------------------------------------------------

3-20

Pre-driving checks and adjustments

3. Within 5 seconds push and hold the

remote engine start

button until

the turn signal lights flash and the tail

lights illuminate. If the vehicle is not

within view, push and hold the remote

engine start

button for at least 2

seconds.

The following events will occur when the

engine starts:

.

The front parking lights will turn on

and remain on as long as the engine is

running.

.

The doors will be locked and the air

conditioner system may turn on.

.

The engine will continue to run for

about 10 minutes. Repeat the steps to

extend the time for an additional 10

minutes. See “Extending engine run

time” (P.3-20).

Depress and hold the brake pedal, then

place the ignition switch in the ON posi-

tion before driving. For further instruc-

tions, see “Driving the vehicle” (P.5-17).

EXTENDING ENGINE RUN TIME

The remote engine start function can be

extended one time by performing the

steps listed in “Remote starting the en-

gine” (P.3-19). Run time will be calculated

as follows:

.

The first 10 minute run time will start

when the remote engine start func-

tion is performed.

.

The second 10 minutes will start im-

mediately when the remote engine

start function is performed. For exam-

ple, if the engine has been running for

5 minutes, and 10 minutes are added,

the engine will run for a total of 15

minutes.

.

Extending engine run time will count

towards the two remote engine start

limit.

A maximum of two remote engine starts,

or a single start with an extension, are

allowed between ignition cycles.
The ignition switch must be cycled to the

ON position and then back to the OFF

position before the remote engine start

procedure can be used again.

CANCELING A REMOTE ENGINE

START

To cancel a remote engine start, perform

one of the following:

.

Aim the Intelligent Key at the vehicle

and push and hold the remote engine

start

button until the front park-

ing lights turn off.

.

Turn on the hazard indicator flashers.

.

Cycle the ignition switch ON and then

OFF.

.

The extended engine run time has

expired.

.

The first 10 minute timer has expired.

.

The engine hood has been opened.

.

The shift lever is moved out of the P

(Park) position.

.

The theft alarm sounds due to illegal

entry into the vehicle.

.

The ignition switch is pushed without

an Intelligent Key in the vehicle.

.

The ignition switch is pushed with an

Intelligent Key in the vehicle but the

brake pedal is not depressed.

CONDITIONS THE REMOTE ENGINE

START WILL NOT WORK

The remote engine start will not operate

if any of the following conditions are

present:

.

The ignition switch is placed in the ON

position.

.

The hood is not securely closed.

.

The hazard indicator flashers are on.

.

The engine is still running. The engine

must be completely stopped. Wait at

least 6 seconds if the engine goes

from running to off. This is not applic-

able when extending engine run time.

.

The remote engine start

button is

not pushed and held for at least 2

seconds.

-------------------------------------------------------------------------------------------------------------------------------------------------------------

.

The remote engine start

button is

not pushed and held within 5 seconds

of pushing the “LOCK”

button.

.

The brake pedal is depressed.

.

The doors are not closed and locked.

.

The liftgate is open.

.

The Key System Error warning light

remains on in the vehicle information

display.

.

An Intelligent Key is left inside the

vehicle.

.

The theft alarm sounds due to illegal

entry into the vehicle.

.

Two remote engine starts, or a single

remote engine start with an exten-

sion, have already been used.

.

The shift lever is not in the P (Park)

position.

The remote engine start may display a

warning or indicator in the vehicle infor-

mation display. For an explanation of the

warning or indicator, see “Operational

indicators” (P.2-30).

WAD0267X

1. Pull the hood lock release handle

located below the instrument panel;

the hood will then spring up slightly.

2. Pull the lever

up at the front of the

hood with your fingertips and raise

the hood.

3. When closing the hood, slowly close

the hood down and make sure it locks

into place.

WARNING

.

Make sure the hood is completely

closed and latched before driving.

Failure to do so could cause the

hood to fly open and result in an

accident.

.

If you see steam or smoke com-

ing from the engine compart-

ment, to avoid injury do not

open the hood.

Pre-driving checks and adjustments

3-21

HOOD

-------------------------------------------------------------------------------------------------------------------------------------------------------------

3-22

Pre-driving checks and adjustments

WARNING

.

Always be sure the liftgate has

been closed securely to prevent it

from opening while driving.

.

Do not drive with the liftgate

open. This could allow dangerous

exhaust gases to be drawn into

the vehicle. See “Exhaust gas

(carbon monoxide)” (P.5-4).

.

Do not leave children unattended

inside the vehicle. They could

unknowingly activate switches

or controls. Unattended children

could become involved in serious

accidents.

.

Always be sure that hands and

feet are clear of the door frame to

avoid injury while closing the

liftgate.

WAD0268X

OPERATING MANUAL LIFTGATE

To open the liftgate, unlock it and push

the liftgate opener switch

. Pull up the

liftgate to open.
The liftgate can be unlocked by:

.

pushing the unlock button

on the

Intelligent Key twice.

.

pushing the liftgate request switch

with the Intelligent Key carried on you.

.

pushing the door handle request

switch twice with the Intelligent Key

carried on you.

.

pushing the power door lock switch to

the unlock position.

.

inserting the mechanical key into the

driver’s door key cylinder and turning

it to the rear of the vehicle twice.

To close the liftgate, pull down until it

securely locks.

OPERATING POWER LIFTGATE (if so

equipped)

To operate the power liftgate, the shift

lever must be in the P (Park) position.
The power liftgate will not operate if the

battery voltage is low.

LIFTGATE

-------------------------------------------------------------------------------------------------------------------------------------------------------------

SPA2547

Power liftgate main switch

The power liftgate operation can be

turned on or off by the power liftgate

main switch on the instrument panel.
When the power liftgate main switch is

pushed to the “OFF” position, the power

operation is not available by the power

liftgate switch on the liftgate and liftgate

opener switch.
The liftgate can still be operated by the

power liftgate switch on the instrument

panel and the power liftgate button on

the Intelligent Key.

SPA2548

Power liftgate switch — Instrument panel

WAD0269X

Liftgate opener switch

JVP0214X

Intelligent Key

WAD0266X

Power liftgate close and lock switches — Liftgate

Pre-driving checks and adjustments

3-23

-------------------------------------------------------------------------------------------------------------------------------------------------------------

3-24

Pre-driving checks and adjustments

Power open

When the liftgate is fully closed, the

liftgate will fully open automatically by:

.

pushing the power liftgate switch

on the instrument panel

.

pushing the liftgate opener switch

.

pushing the power liftgate button

on the Intelligent Key for more than 1

second

The hazard flashes 4 times and the out-

side chime sounds when the liftgate

starts opening.

NOTE:
The liftgate can be opened by the

power liftgate switch

, the liftgate

opener switch

or the power liftgate

button

even if the liftgate is

locked. The liftgate will individually un-

lock and open.

Power close

When the liftgate is fully opened, the

liftgate will fully close automatically by:

.

pushing the power liftgate switch

on the instrument panel

.

pushing the power liftgate button

on the Intelligent Key for more than 1

second

.

pushing the power liftgate close

switch

on the lower part of the

liftgate

The hazard flashes 4 times and the out-

side chime sounds when the liftgate

starts closing.

NOTE:
When the liftgate is closed, it remains

unlocked. Manually lock the liftgate.

Power close and lock

When the liftgate is fully opened and the

Intelligent Key is carried with you near the

liftgate, the liftgate will fully close and lock

automatically by pushing the power lift-

gate lock switch

on the lower part of

the liftgate.
The hazard flashes 4 times and the out-

side chime sounds when the liftgate

starts closing.

Reverse function

The power liftgate will reverse immedi-

ately if one of the following actions is

performed during power open or power

close.

.

pushing the power liftgate switch

on the instrument panel

.

pushing the power liftgate button

on the Intelligent Key.

.

pushing the power liftgate close

switch

on the lower part of the

liftgate

The outside chime sounds when the

liftgate starts to reverse.

Auto reverse function

The auto-reverse function enables the

liftgate to automatically reverse when

something is caught in the liftgate as it

is opening or closing. When the control

unit detects an obstacle, the liftgate will

reverse and return to the full open or full

close position.
If a second obstacle is detected, the

liftgate motion will stop and the drive

motor will disengage. The liftgate will

enter the manual mode.
A pinch sensor is mounted on each side

of the liftgate. If an obstacle is detected

by the pinch sensor during power close,

the liftgate will reverse and return to the

full open position immediately.

NOTE:
If the pinch sensor is damaged or

removed, the power close function will

not operate.

WARNING

There is a small distance immedi-

ately before the closed position that

cannot be detected. Make sure that

all passengers keep their hands, etc.,

clear from the liftgate opening be-

fore closing the liftgate.

-------------------------------------------------------------------------------------------------------------------------------------------------------------

Manual mode

If power operation is not available, the

liftgate can be operated manually. Power

operation may not be available if multiple

obstacles have been detected in a single

power cycle or if the battery voltage is

low. When the power liftgate main switch

is in the OFF position, the liftgate can be

opened manually by pushing the liftgate

opener switch. If the power liftgate open-

er switch is pushed during power open or

close, the power operation will be can-

celed and the liftgate can be operated

manually.

JVP0466X

Safe Mode

If the gas stays of the liftgate

lose

pressure, the power liftgate safe mode is

activated. When the safe mode is acti-

vated, the liftgate intermittently closes.

Then the liftgate will be pulled to the

closed and latched position by a motor.
The power liftgate cannot be opened

using the switches at any time in the safe

mode.
Do not operate the liftgate again until it is

checked. It is recommended you visit a

NISSAN dealer for this service.

CAUTION

.

If the power liftgate does not stay

open or if the liftgate unexpect-

edly closes at any time, do not

operate the liftgate. There may

be a pressure loss in one or both

of the liftgate gas stays. Have the

liftgate inspected. It is recom-

mended you visit a NISSAN dealer

for this service.

.

Do not activate the power liftgate

if one or both of the liftgate gas

stays are removed. Damage to

the liftgate or power liftgate me-

chanisms may occur.

AUTO CLOSURE

If the liftgate is pulled down to a partly

open position, the liftgate will pull itself to

the closed position.

Do not apply excessive force when the

auto closure is operating. Excessive

force applied may cause the mechan-

ism to malfunction.

Pre-driving checks and adjustments

3-25

-------------------------------------------------------------------------------------------------------------------------------------------------------------

3-26

Pre-driving checks and adjustments

CAUTION

.

The liftgate will automatically

close from a partly open position.

To avoid pinching, keep hands

and fingers away from liftgate

opening.

.

Do not let children operate the

liftgate.

SPA2751

LIFTGATE RELEASE LEVER

If the liftgate cannot be opened with the

door lock switch due to a discharged

battery, follow these steps.
1. Remove the cover

inside of the

liftgate using a suitable tool.

2. Move the lever

as illustrated to open

the liftgate.

It is recommended you contact a NISSAN

dealer as soon as possible for repair.

WAD0273X

OPENING THE FUEL-FILLER DOOR

To open the fuel-filler door, push the

upper right side of fuel-filler door to

release.

FUEL-FILLER CAP

WARNING

.

Gasoline is extremely flammable

and highly explosive under cer-

tain conditions. You could be

burned or seriously injured if it is

misused or mishandled. Always

stop engine and do not smoke or

allow open flames or sparks near

FUEL-FILLER DOOR

-------------------------------------------------------------------------------------------------------------------------------------------------------------

the vehicle when refueling.

.

Do not attempt to top off the fuel

tank after the fuel pump nozzle

shuts off automatically. Contin-

ued refueling may cause fuel

overflow, resulting in fuel spray

and possibly a fire.

.

Use only an original equipment

type fuel-filler cap as a replace-

ment. It has a built-in safety valve

needed for proper operation of

the fuel system and emission

control system. An incorrect cap

can result in a serious malfunc-

tion and possible injury. It could

also cause the malfunction indi-

cator light to come on.

.

Never pour fuel into the throttle

body to attempt to start your

vehicle.

.

Do not fill a portable fuel contain-

er in the vehicle or trailer. Static

electricity can cause an explosion

of flammable liquid, vapor or gas

in any vehicle or trailer. To reduce

the risk of serious injury or death

when filling portable fuel contain-

ers:
— Always place the container on

the ground when filling.

— Do not use electronic devices

when filling.

— Keep the pump nozzle in con-

tact with the container while

you are filling it.

— Use only approved portable

fuel containers for flammable

liquid.

CAUTION

.

If fuel is spilled on the vehicle

body, flush it away with water to

avoid paint damage.

.

Insert the cap straight into the

fuel-filler tube, then tighten until

the fuel-filler cap clicks. Failure to

tighten the fuel-filler cap properly

may cause the

malfunction

indicator light (MIL) to illuminate.

If the

light illuminates be-

cause the fuel-filler cap is loose

or missing, tighten or install the

cap and continue to drive the

vehicle. The

light should turn

off after a few driving trips. If the

light does not turn off after a

few driving trips, have the vehicle

inspected. It is recommended you

visit a NISSAN dealer for this

service.

.

The Loose Fuel Cap warning will

appear if the fuel-filler cap is not

properly tightened. It may take a

few driving trips for the message

to be displayed. Failure to tighten

the fuel-filler cap properly after

the Loose Fuel Cap warning ap-

pears may cause the

Mal-

function Indicator Light (MIL) to

illuminate.

Turn the cap counterclockwise to re-

move. To tighten, turn the cap clockwise

until a single click is heard.

Pre-driving checks and adjustments

3-27

-------------------------------------------------------------------------------------------------------------------------------------------------------------

3-28

Pre-driving checks and adjustments

SPA2753

To remove the fuel-filler cap:
1. Turn the fuel-filler cap counterclock-

wise to remove.

2. Put the fuel-filler cap on the cap

holder

while refueling.

To install the fuel-filler cap:
1. Insert the fuel-filler cap straight into

the fuel-filler tube.

2. Turn the fuel-filler cap clockwise until

a single click is heard.

WAD0274X

Loose Fuel Cap warning

The Loose Fuel Cap warning appears on

the vehicle information display when the

fuel-filler cap is not tightened correctly

after the vehicle has been refueled. It may

take a few driving trips for the warning to

be displayed.
To turn off the warning, perform the

following:
1. Remove and install the fuel-filler cap

as soon as possible. (See “Fuel-filler

cap” (P.3-26).)

2. Tighten the fuel-filler cap until it clicks.
3. Push the

switch

on the

steering wheel to turn off the Loose

Fuel Cap warning after tightening the

fuel-filler cap.

-------------------------------------------------------------------------------------------------------------------------------------------------------------

WARNING

.

Do not adjust the steering wheel

while driving. You could lose con-

trol of your vehicle and cause an

accident.

.

Do not adjust the steering wheel

any closer to you than is neces-

sary for proper steering opera-

tion and comfort. The driver’s air

bag inflates with great force. If

you are unrestrained, leaning for-

ward, sitting sideways or out of

position in any way, you are at

greater risk of injury or death in a

crash. You may also receive ser-

ious or fatal injuries from the air

bag if you are up against it when

it inflates. Always sit back against

the seatback and as far away as

practical from the steering wheel.

Always use the seat belts.

SPA2754

ELECTRIC OPERATION
Tilt or telescopic operation

Move the lever

to adjust the steering

wheel up or down, forward or rearward to

the desired position.

Entry/Exit function operation (if so
equipped):

The memory seat system will make the

steering wheel move up automatically

when the driver’s door is opened with

the ignition switch in the LOCK position.

This lets the driver get into and out of the

seat more easily.
For more information, see “Memory seat”

(P.3-40).

SIC3451

Pre-driving checks and adjustments

3-29

TILT/TELESCOPIC STEERING

SUN VISORS

-------------------------------------------------------------------------------------------------------------------------------------------------------------

3-30

Pre-driving checks and adjustments

CAUTION

.

Do not store the main sun visor

before storing the extension sun

visor.

.

Do not pull the extension sun

visor forcedly downward.

1. To block out glare from the front,

swing down the main sun visor

.

2. To block glare from the side, remove

the main sun visor from the center

mount and swing it to the side

.

3. Draw out the extension sun visor

from the main sun visor to block from

further glare.

SPA2447

INSIDE MIRROR

Adjust the height and the angle of the

inside mirror to the desired position.

SPA2143

Manual anti-glare type (if so

equipped)

The night position

will reduce glare

from the headlights of vehicles behind

you at night.
Use the day position

when driving in

daylight hours.

WARNING

Use the night position only when

necessary, because it reduces rear

view clarity.

MIRRORS

-------------------------------------------------------------------------------------------------------------------------------------------------------------


Content      ..     11      12      13      14     ..