Nissan Armada (2022 year). Manual in english - page 14


  Index      Manuals     Nissan Armada (2022 year). Manual in english


Search            copyright infringement  


Content      ..     12      13      14      15     ..


Nissan Armada (2022 year). Manual in english - page 14


SPA2450-A

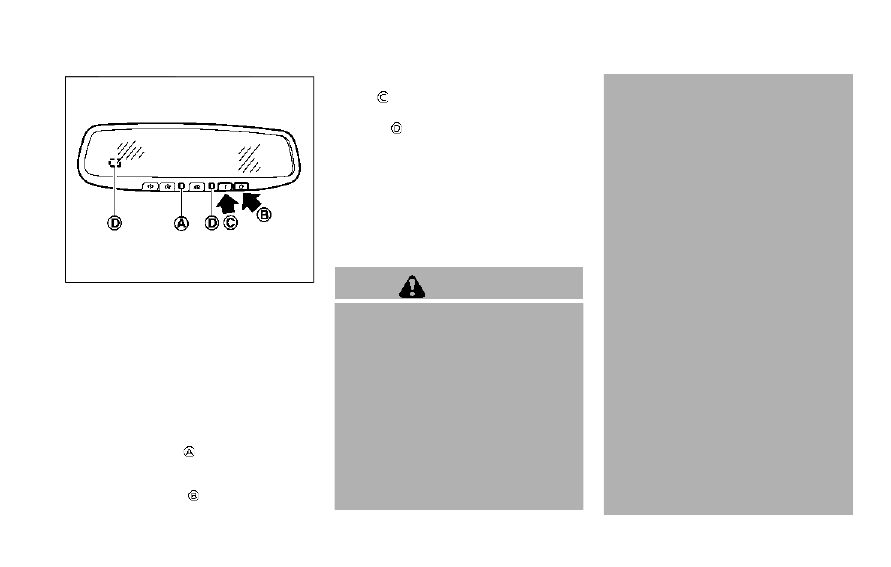
Automatic anti-glare type (if so

equipped)

The inside mirror is designed so that it

automatically changes reflection accord-

ing to the intensity of the headlights of

the following vehicle.
The anti-glare system will be automati-

cally turned on when the ignition switch is

placed in the ON position.
When the anti-glare system is turned on,

the indicator light

will illuminate and

excessive glare from the headlights of the

vehicle behind you will be reduced.
Push the “

*

” switch

to make the inside

rearview mirror operate normally. The

indicator light will turn off. Push the “I”

switch

to turn the system on.

Do not allow any object to cover the

sensors

or apply glass cleaner on

them. Doing so will reduce the sensitiv-

ity of the sensor, resulting in improper

operation.

For the HomeLink® Universal Transceiver

operation, see “HomeLink® Universal

Transceiver (Type A)” (P.2-83).

Intelligent Rear View Mirror (if so

equipped)

WARNING

Failure to follow the warnings and

instructions for proper use of the

Intelligent Rear View Mirror could

result in serious injury or death.

.

The Intelligent Rear View Mirror is

a convenience feature but it is not

a substitute for proper vehicle

operation. The system has areas

where objects cannot be viewed.

Check the blind spot of the In-

telligent Rear View Mirror before

vehicle operation. The driver is

always responsible for safe driv-

ing.

.

Do not disassemble or modify the

Intelligent Rear View Mirror, the

camera unit or wirings. If you do,

it may result in accidents or fire.

In case you notice smoke or smell

coming from the Intelligent Rear

View Mirror, stop using the sys-

tem immediately. It is recom-

mended that you see a NISSAN

dealer for servicing.

.

Do not operate the Intelligent

Rear View Mirror while driving.

Doing so can be a distraction

and it could lose control of your

vehicle and cause an accident or

serious injury.

.

Do not gaze into the Intelligent

Rear View Mirror display during

driving. It may cause a distraction

and it could lose control of your

vehicle and cause an accident or

serious injury.

.

Do not put a cigarette or flames

to the Intelligent Rear View Mir-

ror, the camera unit or wirings. It

may cause a fire.

.

Be sure to adjust the Intelligent

Rear View Mirror before driving.

Switch the system to the conven-

tional rearview mirror mode and

be properly seated on the driver’s

Pre-driving checks and adjustments

3-31

-------------------------------------------------------------------------------------------------------------------------------------------------------------

3-32

Pre-driving checks and adjustments

seat. Then adjust the mirror so as

to see the rear window properly.

Driving without adjusting the mir-

ror may cause difficulty in watch-

ing the display at Intelligent Rear

View Mirror mode (camera view

mode) due to the reflection from

the surface of the mirror.

.

If the Intelligent Rear View Mirror

malfunctions, immediately switch

the system to the conventional

rearview mirror mode.

.

When strong light (for example,

sunlight or high beams from fol-

lowing vehicles) enters the cam-

era, a light beam or a glaring light

may appear on the monitor

screen of the Intelligent Rear

View Mirror. In that case, switch

the system to the conventional

rearview mirror mode appropri-

ately.

.

If dirt, rain or snow accumulates

on the exterior glass surface cov-

ering the camera, the Intelligent

Rear View Mirror may not display

objects clearly. Use of the rear

window wiper/washer may im-

prove visibility, but if not, switch

the Intelligent Rear View Mirror to

the conventional rearview mirror

mode until a time the glass cov-

ering the camera can be cleaned.

WAD0190X

MENU button
Left button
Right button
Mode select lever
HomeLink® buttons (1-3)

Components:

Intelligent Rear View Mirror provides a

clear rearview from a camera located on

the rear of the vehicle. Intelligent Rear

View Mirror has two modes: conventional

rearview mirror mode and Intelligent Rear

View Mirror mode (camera view mode).

You can switch these two modes by the

mode select lever

.

When the Intelligent Rear View Mirror

mode is selected, the indicator

is

-------------------------------------------------------------------------------------------------------------------------------------------------------------

displayed.
For the operation of the HomeLink®

buttons

, see “HomeLink® Universal

Transceiver (Type B)” (P.2-87).

WAD0191X

How to change the mode:

The mode can be switched when the

ignition switch is in the ON position.

.

Pull the mode select lever

to switch

to the Intelligent Rear View Mirror

mode (camera view mode).

.

Push the mode select lever

to

switch to the conventional rearview

mirror mode.

WAD0192X

How to make settings of Intelligent Rear
View Mirror:

You can choose display settings of the

Intelligent Rear View Mirror such as

brightness, camera angle, textual indica-

tion ON or OFF and language.
When the Intelligent Rear View Mirror

mode is on, setting menu can be selected

by pushing the MENU button . Each time

the MENU button

is pushed, the setting

menu will change as follows:
MENU (initial screen)

?

BRIGHTNESS

?

DOWN/UP

?

LEFT/RIGHT

?

ROTATION

?

INDICATION

?

DIMMING MIRROR

?

LANGUAGE

?

MENU (initial screen)

Pre-driving checks and adjustments

3-33

-------------------------------------------------------------------------------------------------------------------------------------------------------------

3-34

Pre-driving checks and adjustments

NOTE:

.

To switch the image quality adjust-

ment items with the MENU button ,

push the button within 5 seconds

after completing the adjustment of

the previous item. If 5 seconds or

more pass, the monitor will return to

MENU (initial screen).

.

When one of the HomeLink® buttons

is pushed, the monitor will display

the HomeLink® screen.

WAD0193X

BRIGHTNESS

The brightness of the display screen can

be adjusted.

.

Push the left button

to dim the

screen.

.

Push the right button

to brighten

the screen.

WAD0194X

DOWN/UP

The vertical camera angle of the display

screen can be adjusted.

.

Push the left button

to down the

camera angle.

.

Push the right button

to up the

camera angle.

-------------------------------------------------------------------------------------------------------------------------------------------------------------

WAD0199X

LEFT/RIGHT

The horizontal camera angle of the dis-

play screen can be adjusted.

.

Push the left button

to move the

camera angle to the left.

.

Push the right button

to move the

camera angle to the right.

WAD0195X

ROTATION

The camera angle of the display screen

can be rotated.

.

Push the left button

to rotate the

camera angle to the left.

.

Push the right button

to rotate the

camera angle to the right.

WAD0196X

INDICATION

The textual indication can be turned on or

off on the Intelligent Rear View Mirror

display screen.

.

Push the right button

to disable the

textual indication on the display

screen.

.

Push the left button

to enable the

textual indication on the display

screen.

Pre-driving checks and adjustments

3-35

-------------------------------------------------------------------------------------------------------------------------------------------------------------

3-36

Pre-driving checks and adjustments

WAD0197X

DIMMING MIRROR

The mirror is designed so that it auto-

matically changes reflection according to

the intensity of the headlights of the

following vehicle. You can enable or

disable the automatic anti-glare mode.

.

Push the left button

to enable the

automatic anti-glare mode.

.

Push the right button

to disable the

automatic anti-glare mode.

WAD0198X

LANGUAGE

The language of the textual indication

can be selected on the Intelligent Rear

View Mirror display screen.
Select the language by using the

or

button. You can select English, French or

Spanish. The language setting will be

retained even if the engine is restarted.

Intelligent Rear View Mirror system
precautions:
NOTE:

.

Long-term use of this system in

stopping engine may cause battery

to be discharged.

.

Do not attach an antenna of wireless

device near the Intelligent Rear View

Mirror. Electric wave from wireless

device may cause disturbed image

in Intelligent Rear View Mirror.

.

Do not push buttons excessively or

operating the lever roughly may

cause a system failure or the Intelli-

gent Rear View Mirror itself to drop.

.

Never turn the body of Intelligent

Rear View Mirror by 90° or more. It

may damage the Intelligent Rear

View Mirror.

.

Do not apply strong shocks to the

body of Intelligent Rear View Mirror.

It may cause a system failure.

.

Do not apply heavy load to the

camera and camera-cover on the

rear of the vehicle. It may cause the

camera to be removed or may cause

a system failure.

.

If it is difficult to see the Intelligent

Rear View Mirror display screen be-

cause of a strong external light,

switch the mode to the conventional

rearview mirror mode for better use.

.

Close the sunshade (if so equipped)

when the Intelligent Rear View Mir-

ror display screen is unclear due to

strong external light.

-------------------------------------------------------------------------------------------------------------------------------------------------------------

JVP0559X

Flicker image (example)

.

When LED headlights are viewed on

the Intelligent Rear View Mirror dis-

play, the images may flicker. This is

normal.

.

Due to diffused reflection from ex-

ternal environment, images on the

screen may flicker. This is not a

malfunction.

.

A quick movement of a thing may

not be able to display on the camera

view screen. This is not a malfunc-

tion.

.

Turn on the headlights at twilight or

in a tunnel, etc.

.

The Intelligent Rear View Mirror

mode (camera view mode) display

is different from the conventional

rearview mirror. Objects in the dis-

play may differ from actual distance.

Do not solely rely on the Intelligent

Rear View Mirror. Always rely on

your own operation to avoid acci-

dents.

.

If the brightness of the camera view

display is adjusted to excessive

bright level, it may cause an eye-

strain in the driving. Adjust the

brightness properly.

.

Use the rear window wiper when it

rains. If the camera view image is

still unclear when the rear window

wiper is in operation, check the

deterioration of the rear window

wiper blade.

.

When using the rear window wiper,

images on the screen may flicker.

This is not a malfunction.

.

Defog the rear window with defros-

ter when rear window is fogged. Use

the conventional rearview mirror

mode until the rear window is fully

defogged.

.

The display of the Intelligent Rear

View Mirror may become hot. This is

not a malfunction.

.

The color of an object in the distance

or in the dark may be difficult to be

recognized. This is not a malfunc-

tion.

System maintenance (Intelligent Rear
View Mirror):

.

Always keep the mirror and camera

area of the rear window clean.

.

Clean the mirror and the camera lens

with a dry soft cloth.

.

When clean the camera area of the

rear window, using a soft cloth dam-

pend with water and a few neutral

detergent. And after, the dry it up with

dry soft cloth.

.

If the image on the Intelligent Rear

View Mirror display screen is still un-

clear even after cleaning the camera

area of the rear window, an oil film

may be adhering to the rear window

glass. Clean the rear window glass

with an oil film remover.

.

Never use alcohol, benzine, thinner, or

any similar material to clean the

mirror or camera lens. It will cause a

discoloration, deterioration or a sys-

tem malfunction.

.

Do not attach a sticker (including

transparent material) on the camera

area of the rear window.

Pre-driving checks and adjustments

3-37

-------------------------------------------------------------------------------------------------------------------------------------------------------------

3-38

Pre-driving checks and adjustments

OUTSIDE MIRRORS

WARNING

.

Objects viewed in the outside

mirror on the passenger side are

closer than they appear. Be care-

ful when moving to the right.

Using only this mirror could cause

an accident. Use the inside mirror

or glance over your shoulder to

properly judge distances to other

objects.

.

Do not adjust the mirrors while

driving. You could lose control of

your vehicle and cause an acci-

dent.

SPA2739

Adjusting outside mirrors

The outside mirror control switch is

located on the driver’s door armrest.
The outside mirror will operate only when

the ignition switch is in the ACC or ON

position.
Move the switch right or left to select the

right or left side mirror

, then adjust

using the control switch

.

Defrosting outside mirrors

The outside mirrors will be heated when

the rear window defroster switch is

operated. (See “Rear window and outside

mirror defroster switch” (P.2-45).)

-------------------------------------------------------------------------------------------------------------------------------------------------------------

SPA2738

Power foldable outside mirrors

CAUTION

.

Do not touch the mirrors while

they are moving. Your hand may

be pinched, and the mirror may

malfunction.

.

Do not drive with the mirrors

stored. You will be unable to see

behind the vehicle.

.

If the mirrors were folded or

unfolded by hand, there is a

chance that the mirror will move

forward or backward during driv-

ing. If the mirrors were folded or

unfolded by hand, be sure to

adjust them again electrically be-

fore driving.

The outside mirror remote control oper-

ates when the ignition switch is in the

ACC or ON position.
To fold the outside mirrors, push the

outside mirror folding switch to the

“CLOSE” position

. To unfold, push to

the “OPEN” position

.

If mirrors are manually operated or

bumped, the mirror body can become

loose at the pivot point. To correct

electronic mirror operation, cycle the

mirrors by pushing “CLOSE” until comple-

tely closed, then push “OPEN” until the

mirrors are in the open position.

Reverse tilt-down feature (if so

equipped)

When backing up the vehicle, the right

and left outside mirrors will turn down-

ward automatically to provide better rear

visibility.
1. Place the ignition switch in the ON

position.

2. Move the shift lever to the R (Reverse)

position.

3. Choose either the right or left outside

mirror by operating the outside mirror

control switch.

4. The outside mirror surfaces move

downward.

When one of the following conditions has

occurred, the outside mirror surfaces will

return to their original positions.

.

The shift lever is moved to any posi-

tion other than R (Reverse).

.

The outside mirror control switch is

set to the center position.

.

The ignition switch is placed in the

OFF position.

Automatic anti-glare (if so

equipped)

The outside rearview mirrors are de-

signed so that its automatically change

reflection according to the intensity of

the headlights of the vehicle following

you.
The anti-glare system will be automati-

cally turned on when the ignition switch is

placed in the ON position.

Pre-driving checks and adjustments

3-39

-------------------------------------------------------------------------------------------------------------------------------------------------------------

3-40

Pre-driving checks and adjustments

SIC4448

VANITY MIRROR

To use the front vanity mirror, pull down

the sun visor and pull up the cover.

JVP0247X

SET/memory switches

The memory seat system has three

features:

.

Entry/exit function

.

Memory storage

.

Setting memory function

ENTRY/EXIT FUNCTION

This system is designed so that the

driver’s seat and steering column will

automatically move when the automatic

transmission shift lever is in the P (Park)

position. This allows the driver to get into

and out of the driver’s seat more easily.
The driver’s seat will slide backward and

the steering wheel will move up when the

driver’s door is opened with the ignition

switch in the LOCK position.
The driver’s seat and steering wheel will

return to the previous positions when the

ignition switch is pushed to the ACC

position.
The driver’s seat will not return to the

previous positions if the seat or steering

adjusting switch is operated when the

seat is at the exit position.

Cancel or activate entry/exit func-

tion

The shift lever must be in the P (Park)

position with the ignition switch in the

OFF position.
The entry/exit function can be activated

or canceled by pressing and holding the

SET switch for more than 10 seconds.
The entry/exit function can be canceled

through “Vehicle settings” in the vehicle

information display by performing the

following:

.

Switch the “Exit Seat Slide” ON to OFF.

For additional information, refer to

“Vehicle settings” (P.2-24).

.

Switch the “Exit Steering Up” ON to

OFF. For additional information, refer

to “Vehicle settings” (P.2-24).

MEMORY SEAT (if so equipped)

-------------------------------------------------------------------------------------------------------------------------------------------------------------

Initialize entry/exit function

If the battery cable is disconnected, or if

the fuse opens, the entry/exit function

will not work though this function was set

on before. In such a case, after connect-

ing the battery or replacing with a new

fuse, open and close the driver’s door

more than two times after the ignition

switch is turned from the ON position to

the LOCK position. The entry/exit func-

tion will be activated.

MEMORY STORAGE

Two positions for the driver’s seat, steer-

ing column and outside mirrors can be

stored in the memory switch. Follow

these procedures to use the memory

system.
1. Move the shift lever to the P (Park)

position.

2. Adjust the driver’s seat, steering col-

umn and outside mirrors to the de-

sired positions by manually operating

each adjusting switch. For additional

information, see “Seats” (P.1-3) and

“Tilt/telescopic steering” (P.3-29) and

“Outside mirrors” (P.3-38).

3. Push the SET switch and, within 5

seconds, push the memory switch (1

or 2) fully for at least 1 second.
The indicator light for the pushed

memory switch will stay on for ap-

proximately 5 seconds after pushing

the switch.
When the memory is stored in the

memory switch (1 or 2), a buzzer will

sound.
If memory is stored in the same

memory switch, the previous memory

will be deleted.

Linking Intelligent Key to a stored

memory position

The Intelligent Key can be linked to a

stored memory position with the follow-

ing procedure.
1. Follow the steps for storing a memory

position.

2. While the indicator light for the mem-

ory switch being set is illuminated for

5 seconds, push the

button on the

Intelligent Key. If the indicator light

blinks, the Intelligent Key is linked to

that memory setting.

Push the ignition switch to the OFF

position, and then push the

button

on the Intelligent Key. The driver’s seat,

steering wheel and outside mirrors will

move to the memorized position.

Confirming memory storage

.

Push the ignition switch to the ON

position and push the SET switch. If

the main memory has not been

stored, the indicator light will come

on for approximately 0.5 second.

When the memory has stored in posi-

tion, the indicator light will stay on for

approximately 5 seconds.

.

If the battery cable is disconnected, or

if the fuse opens, the memory will be

canceled. In this case, reset the de-

sired position using the previous pro-

cedure.

.

If optional Intelligent Keys are added

to your vehicle, the memory storage

procedure to switch 1 or 2 and linking

Intelligent Key procedure to a stored

memory position should be per-

formed again for each Intelligent Key.

For additional Intelligent Key informa-

tion, see “Keys” (P.3-2).

Selecting the memorized position

1. Move the shift lever to the P (Park)

position.

2. Use one of the following methods to

move the driver’s seat, the outside

mirrors and the steering wheel.

.

Push the memory switch (1 or 2)

fully for at least 1 second.

Pre-driving checks and adjustments

3-41

-------------------------------------------------------------------------------------------------------------------------------------------------------------

3-42

Pre-driving checks and adjustments

The driver’s seat, steering column and

outside mirrors will move to the

memorized position or to the exit

position when the entry/exit function

is set to active with the indicator light

flashing, and then the light will stay on

for approximately 5 seconds.

SETTING MEMORY FUNCTION

The status of the following settings can

be linked to the Intelligent Key and the

memorized settings can be available for

each Intelligent Key.

.

Air conditioner system

.

Navigation system (if so equipped)

.

Audio system

To use the memory function, lock the

doors with the Intelligent Key that is

linked to the settings.
To enable the memorized settings:
1. Carry the Intelligent Key that is linked

to the settings, and unlock the doors

by pushing the driver’s door handle

request switch or “UNLOCK”

but-

ton on the Intelligent Key.

2. Place the ignition switch in the ON

position. “Connection with the key has

been done” will be displayed on the

screen and the memorized settings

are available (only when a new Intel-

ligent Key is used).

SYSTEM OPERATION

The memory seat system will not work or

will stop operating under the following

conditions:

.

When the vehicle speed is above 0

MPH (0 km/h) or 4 MPH (7 km/h) for

some limited functions such linking an

Intelligent Key to the vehicle when the

power source is turned on from off or

during the Exit function.

.

When any of the memory switches are

pushed while the memory seat is

operating.

.

When the adjusting switch for the

driver’s seat and steering column is

turned on while the memory seat is

operating.

.

When the seat has already been

moved to the memorized position.

.

When no seat position is stored in the

memory switch.

.

When the shift lever is moved from the

P (Park) position to any other position.

-------------------------------------------------------------------------------------------------------------------------------------------------------------

4 Monitor, heater, air conditioner, audio,

phone and voice recognition systems

NissanConnect® Owner’s Manual .................................... 4-3
Safety note ........................................................................................ 4-3
RearView Monitor (if so equipped) ................................. 4-4

RearView Monitor system operation ..................... 4-5
How to read the displayed lines ................................ 4-5
Difference between predictive and

actual distances ...................................................................... 4-6
How to park with predictive course lines .......... 4-7
RearView Monitor settings ............................................. 4-9
RearView Monitor system limitations................. 4-10
System maintenance ....................................................... 4-11

Intelligent Around View® Monitor (if

so equipped) .................................................................................. 4-12

Intelligent Around View® Monitor

system operation ................................................................ 4-13
Intelligent Around View® Monitor settings ...... 4-21
Intelligent Around View® Monitor

system limitations .............................................................. 4-23
System maintenance ....................................................... 4-25

Camera aiding sonar function (models with

Intelligent Around View® Monitor) ............................... 4-26

Sonar system operation ................................................ 4-26
Turning on and off the sonar function ............. 4-27
Sonar function settings ................................................. 4-28
Sonar system limitations .............................................. 4-30
System maintenance ....................................................... 4-30

Moving Object Detection (MOD) ................................... 4-31

MOD system operation ................................................ 4-32
Turning on and off the MOD system ............... 4-33
MOD function settings ................................................. 4-34
MOD system limitations .............................................. 4-34
System maintenance .................................................... 4-35

Ventilators ...................................................................................... 4-36

Center ventilators ............................................................ 4-36
Side ventilators .................................................................. 4-36
Rear ventilators.................................................................. 4-36

Heater and air conditioner ................................................ 4-37

Automatic air conditioner ......................................... 4-38
Rear automatic air conditioning system ....... 4-40
Operating tips ..................................................................... 4-43
Linking Intelligent Key (if so equipped)........... 4-43
In-cabin microfilter .......................................................... 4-43
Servicing air conditioner............................................. 4-43

Antenna ............................................................................................ 4-43

Window antenna ............................................................... 4-43
Satellite antenna ............................................................... 4-44

Car phone or CB radio ......................................................... 4-44
Rear Seat Infotainment (RSI) (if so equipped) ...... 4-45

Welcome .................................................................................. 4-45
Getting started ................................................................... 4-46
Control description ......................................................... 4-50

-------------------------------------------------------------------------------------------------------------------------------------------------------------

-------------------------------------------------------------------------------------------------------------------------------------------------------------

For models with NissanConnect® and

Services, refer to the NissanConnect®

Owner’s Manual regarding the following

information.

.

Audio system

.

Bluetooth® Hands-Free Phone

.

NissanConnect® Services

.

SiriusXM Traffic

TM

.

SiriusXM® Travel Link

.

SiriusXM® Radio

.

Navigation system

.

Voice Recognition System

.

Information and settings viewable on

NissanConnect®

.

Android Auto

TM

.

Apple CarPlay®

WARNING

.

Do not disassemble or modify

this system. If you do, it may

result in accidents, fire, or electric

shock.

.

Do not use this system if you

notice any abnormality, such as

a frozen screen or lack of sound.

Continued use of the system may

result in accident, fire or electric

shock.

.

In case you notice any foreign

object in the system hardware,

spill liquid on it, or notice smoke

or smell coming from it, stop

using the system immediately. It

is recommended you visit a

NISSAN dealer for servicing.

Ignoring such conditions may

lead to accidents, fire, or electric

shock.

.

Park the vehicle in a safe location

and apply the parking brake to

view the images on the touch

screen display.

CAUTION

Do not use the system when the

engine is not running for extended

periods of time to prevent battery

discharge.

Do not attempt to operate the system in

extreme temperature conditions [below

−4°F (−20°C) and above 158°F (70°C)].

Operating this system under these con-

ditions may result in system malfunc-

tions.

Monitor, heater, air conditioner, audio, phone and voice recognition systems

4-3

NISSANCONNECT® OWNER’S MANUAL

SAFETY NOTE

-------------------------------------------------------------------------------------------------------------------------------------------------------------

4-4

Monitor, heater, air conditioner, audio, phone and voice recognition systems

WAE0655X

1. Touch screen display
2. MENU button
3. CAMERA button

WARNING

.

Failure to follow the warnings

and instructions for proper use

of the RearView Monitor could

result in serious injury or death.

.

RearView Monitor is a conveni-

ence feature and is not a sub-

stitute for proper backing. Always

turn and look out the windows,

and check mirrors to be sure that

it is safe to move before operat-

ing the vehicle. Always back up

slowly.

.

The system is designed as an aid

to the driver in showing large

stationary objects directly behind

the vehicle, to help avoid dama-

ging the vehicle.

.

The distance guide line and the

vehicle width line should be used

as a reference only when the

vehicle is on a level paved sur-

face. The distance viewed on the

monitor is for reference only and

may be different than the actual

distance between the vehicle and

displayed objects.

CAUTION

Do not scratch the camera lens when

cleaning dirt or snow from the front

of the camera.

The RearView Monitor system automati-

REARVIEW MONITOR (if so equipped)

-------------------------------------------------------------------------------------------------------------------------------------------------------------


Content      ..     12      13      14      15     ..