Nissan Armada (2022 year). Manual in english - page 11


  Index      Manuals     Nissan Armada (2022 year). Manual in english


Search            copyright infringement  


Content      ..     9      10      11      12     ..


Nissan Armada (2022 year). Manual in english - page 11


2-76

Instruments and controls

.

Never allow children to operate

the power window. Improper op-

eration by children could lead to

an accident. Depress the window

lock button since children or

other persons could be caught in

the power window and this may

cause serious damage.

.

When operating the power win-

dows, let children know it and

make sure that their hands, arms,

etc. are not placed near the

power windows. Otherwise they

may be caught in the power

windows.

.

Make sure that the ignition switch

is in the OFF position and do not

leave the Intelligent Key and chil-

dren unattended inside the vehi-

cle. They could unknowingly

activate switches or controls. Un-

attended children could become

involved in serious accidents.

.

To help avoid risk of injury or

death through unintended opera-

tion of the vehicle and or its

systems, including entrapment

in windows or inadvertent door

lock activation, do not leave chil-

dren, people who require the

assistance of others or pets un-

attended in your vehicle. Addi-

tionally, the temperature inside a

closed vehicle on a warm day can

quickly become high enough to

cause a significant risk of injury

or death to people and pets.

The power windows operate when the

ignition switch is in the ON position, or for

a period of time after the ignition switch is

placed in the OFF position. If the driver’s

or front passenger’s door is opened dur-

ing this period of time, power to the

windows is canceled.
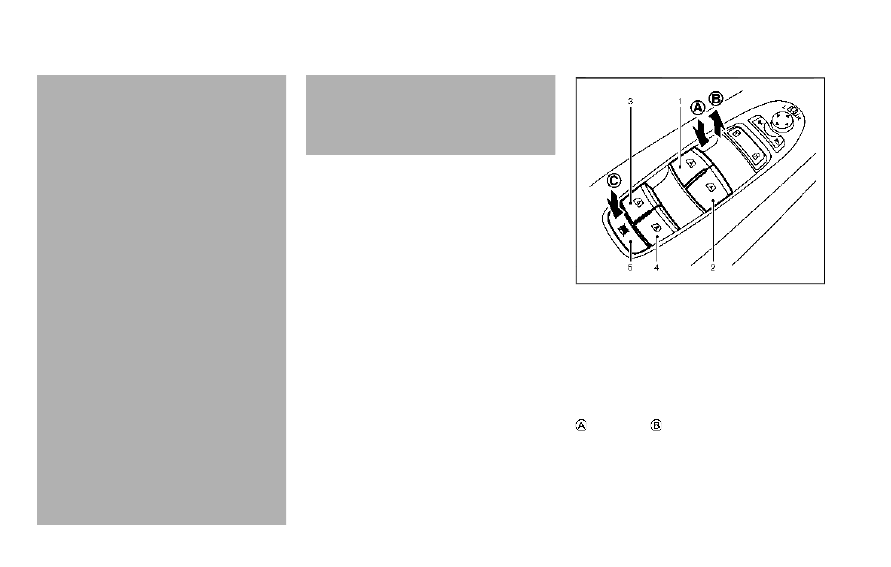
SIC4352

1.

Driver side window

2.

Front passenger side window

3.

Rear left passenger side window

4.

Rear right passenger side window

5.

Window lock button

Main power window switch (driver’s

side)

To open or close the window, push down

or pull up

the switch and hold it. The

main switch (driver side switches) will

open or close all the windows.

-------------------------------------------------------------------------------------------------------------------------------------------------------------

Locking rear passenger’s windows

When the window lock button

is

pushed, the rear passenger’s windows

cannot be operated with the rear pas-

senger’s power window switch. The rear

passenger’s windows can only be oper-

ated with the main switch (driver side

switches). To cancel the passenger’s win-

dows lock, push the window lock button

again.

SIC4353

Example

Passenger side power window

switch

The passenger’s switch can control its

corresponding window. When the win-

dow lock button on the driver’s switch is

pushed, the rear passenger’s switch can-

not be operated.

SIC4354

Automatic operation

To fully open or close the window, com-

pletely push down or pull up the switch

and release it; it need not be held. The

window will automatically open or close

all the way. To stop the window, just push

or lift the switch in the opposite direction.
A light push or pull on the switch will

cause the window to open or close until

the switch is released.

Instruments and controls

2-77

-------------------------------------------------------------------------------------------------------------------------------------------------------------

2-78

Instruments and controls

Auto reverse function

WARNING

There are some small distances im-

mediately before the closed position

which cannot be detected. Make sure

that all passengers have their hands,

etc., inside the vehicle before closing

the window.

If the control unit detects something

caught in the window as it is closing, the

window will be immediately lowered.
The auto reverse function can be acti-

vated when the window is closed by

automatic operation when the ignition

switch is in the ON position or for 45

seconds after the ignition switch is

pushed to the OFF position.

Depending on the environment or driv-

ing conditions, the auto reverse func-

tion may be activated if an impact or

load similar to something being caught

in the window occurs.

If the windows do not close auto-

matically

If the power window automatic function

(closing only) does not operate properly,

perform the following procedure to initi-

alize the power window system.
1. Push the ignition switch to start the

engine.

2. Close the door.
3. After starting the engine, open the

window completely by operating the

power window switch.

4. Pull the power window switch and

hold it to close the window, and then

hold the switch more than 3 seconds

after the window is closed completely.

5. Release the power window switch.

Operate the window by the automatic

function to confirm the initialization is

complete.

6. Perform steps 2 through 5 above for

other windows.

If the power window automatic function

does not operate properly after perform-

ing the procedure above, have your

vehicle checked. It is recommended you

visit a NISSAN dealer for this service.

WARNING

.

In an accident you could be

thrown from the vehicle through

an open moonroof. Always use

seat belts and child restraints.

.

Do not allow anyone to stand up

or extend any portion of their

body out of the moonroof open-

ing while the vehicle is in motion

or while the moonroof is closing.

CAUTION

.

Remove water drops, snow, ice or

sand from the moonroof before

opening.

.

Do not place any heavy object on

the moonroof or surrounding

area.

POWER MOONROOF

The moonroof only operates when the

ignition switch is in the ON position.
The moonroof is operational for about 45

seconds, even if the ignition switch is

pushed to the OFF position. If the driver’s

door or the passenger’s door is opened

MOONROOF (if so equipped)

-------------------------------------------------------------------------------------------------------------------------------------------------------------

during this period of about 45 seconds,

power to the moonroof is canceled.

WAC0653X

Sunshade

The sunshade will open automatically

when the moonroof is opened. However,

it must be closed manually.

Tilting the moonroof

To tilt up, first close the moonroof, then

push the moonroof switch to the up

position

. To tilt down the moonroof,

push the switch to the TILT DOWN posi-

tion

.

Sliding the moonroof

To fully open or close the moonroof, push

the switch to the OPEN

or CLOSE

position and release it; it need not be held.

The roof will automatically open or close

all the way. To stop the roof, push the

switch once more while it is opening or

closing.

Auto reverse function

WARNING

There are some small distances im-

mediately before the closed position

which cannot be detected. Make sure

that all passengers have their hands,

etc., inside the vehicle before closing

the moonroof.

If the control unit detects something

caught in the moonroof when it is closing,

the moonroof will be immediately

opened.
The auto reverse function can be acti-

vated when the moonroof is closed by

automatic operation when the ignition

switch is in the ON position or for about

45 seconds after the ignition switch is

pushed to the OFF position.
If the moonroof cannot be closed auto-

Instruments and controls

2-79

-------------------------------------------------------------------------------------------------------------------------------------------------------------

2-80

Instruments and controls

matically when the auto reverse function

activates due to a malfunction, push and

hold the switch to the CLOSE

position.

Depending on the environment or driv-

ing conditions, the auto reverse func-

tion may be activated if an impact or

load similar to something being caught

in the moonroof occurs.

If the moonroof does not operate

If the moonroof does not operate prop-

erly, perform the following procedure to

initialize the moonroof operation system.
1. If the moonroof is open, close it fully

by repeatedly pushing the moonroof

switch to the CLOSE

position.

2. Push and hold the switch to the

CLOSE

position.

3. Release the moonroof switch after the

moonroof moves slightly up and

down.

4. Push and hold the switch to the OPEN

position to fully tilt the moonroof

down.

5. Check if the moonroof switch oper-

ates normally.

If the moonroof does not operate prop-

erly after performing the procedure

above, have your moonroof checked and

repaired. It is recommended you visit a

NISSAN dealer for this service.

SIC3642

To activate or deactivate the welcome

light function, perform the following pro-

cedure.
1. Place the ignition switch in the ON

position.

2. Open the driver’s side door.
3. Within 20 seconds after the ignition

switch is placed in the ON position,

push the door open request switch on

the driver’s side door handle for more

than 5 seconds with the driver’s door

open.

4. A chime sounds when the setting is

completed.

Once the welcome light function is active,

the puddle light

and the passenger

cabin illumination will illuminate when

you approach the vehicle with the Intel-

ligent Key (within approximately 3.3 ft (1

m) of the antenna built inside the door

handles) and the following conditions are

met.

.

All doors are closed and locked.

.

The ignition switch is in the LOCK or

OFF position.

.

The Intelligent Key is outside the

vehicle.

.

The puddle light operates within a set

duration.

BATTERY SAVER SYSTEM

The welcome light function will be deac-

tivated automatically to prevent battery

discharge under the following conditions.

To activate the welcome light function

again, unlock any door.

.

If the welcome light function does not

operate within a set duration. Note

that the duration is set to 9 days as

the factory default setting.

.

If the welcome light function is acti-

vated 15 consecutive times when you

approach and leave the vehicle with

the Intelligent Key without the doors

being unlocked.

WELCOME LIGHT (if so equipped)

-------------------------------------------------------------------------------------------------------------------------------------------------------------

CAUTION

.

Turn off the lights when you leave

the vehicle.

.

Do not use the lights for extended

periods of time with the engine

stopped. This could result in a

discharged battery.

JVI0760X

INTERIOR LIGHT SWITCH

ON switch

When the ON switch

is pushed in, the

map lights and rear personal lights will

illuminate.

DOOR OFF switch

When the switch

is not pushed in, the

map lights and rear personal lights will

illuminate for a period of time under the

following conditions:

.

when the ignition switch is placed in

the OFF position.

.

when doors are unlocked by pushing

the UNLOCK

button on the In-

telligent Key or door handle request

switch with the ignition switch in the

OFF position.

.

when any door is opened and then

closed with the ignition switch in the

OFF position.

.

when any door is opened with the

ignition switch in the ACC or ON

position.
— The lights will remain on while the

door is opened. When the door is

closed, the lights will turn off.

When the "Auto Room Lamp" feature is

set to be OFF (see “Vehicle settings” (P.2-

24)), the lights will illuminate under the

following condition:

.

any door is opened with the ignition

switch in any position
— remain on while the door is opened.

When the door is closed, the lights

go off.

When the switch

is pushed in, the map

lights and rear personal lights will not

illuminate under the above condition.

Instruments and controls

2-81

INTERIOR LIGHTS

-------------------------------------------------------------------------------------------------------------------------------------------------------------

2-82

Instruments and controls

JVI0759X

CONSOLE LIGHT

The console light will turn on whenever

the front parking lights or headlights are

illuminated.

JVI0758X

MAP LIGHTS

Push the button as illustrated to turn the

light on or off.

SIC3250

REAR PERSONAL LIGHTS

Push the button as illustrated to turn the

light on or off.

-------------------------------------------------------------------------------------------------------------------------------------------------------------

SIC4448

The light on the vanity mirror will turn on

when the cover on the vanity mirror is

opened.
When the cover is closed, the light will

turn off.

The lights will also turn off after a

period of time when the lights remain

illuminated to prevent the battery from

becoming discharged.

SIC4418

The cargo light switch has three posi-

tions: ON

, center

and OFF

.

ON position
When the switch is in the ON position

,

the cargo light will illuminate.
Center position
When the switch is in the center position

, the cargo light will illuminate when the

liftgate is opened.
OFF position
When the switch is in the OFF position

,

the cargo light will not illuminate.

The HomeLink® Universal Transceiver

provides a convenient way to consolidate

the functions of up to three individual

hand-held transmitters into one built-in

device.
HomeLink® Universal Transceiver:

.

Will operate most Radio Frequency

(RF) devices such as garage doors,

gates, home and office lighting, entry

door locks and security systems.

.

Is powered by your vehicle’s battery.

No separate batteries are required. If

the vehicle’s battery is discharged or is

disconnected, HomeLink® will retain

all programming.

When the HomeLink® Universal Trans-

ceiver is programmed, retain the origi-

nal transmitter for future programming

procedures (Example: new vehicle pur-

chases). Upon sale of the vehicle, the

programmed HomeLink® Universal

Transceiver buttons should be erased

for security purposes. For additional

information, refer to “Programming

HomeLink®” (P.2-84).

WARNING

.

Do not use the HomeLink® Uni-

versal Transceiver with any gar-

age door opener that lacks safety

Instruments and controls

2-83

VANITY MIRROR LIGHTS

CARGO LIGHT

HomeLink® UNIVERSAL TRANSCEIVER

(Type A) (if so equipped)

-------------------------------------------------------------------------------------------------------------------------------------------------------------

2-84

Instruments and controls

stop and reverse features as re-

quired by federal safety stan-

dards. (These standards became

effective for opener models man-

ufactured after April 1, 1982). A

garage door opener which cannot

detect an object in the path of a

closing garage door and then

automatically stop and reverse,

does not meet current federal

safety standards. Using a garage

door opener without these fea-

tures increases the risk of serious

injury or death.

.

During the programming proce-

dure your garage door or security

gate will open and close (if the

transmitter is within range). Make

sure that people or objects are

clear of the garage door, gate,

etc. that you are programming.

.

Your vehicle’s engine should be

turned off while programming

the HomeLink® Universal Trans-

ceiver. Do not breathe exhaust

gases; they contain colorless

and odorless carbon monoxide.

Carbon monoxide is dangerous. It

can cause unconsciousness or

death.

PROGRAMMING HomeLink®

The following steps show generic instruc-

tions how to program a HomeLink®

button. If you have any questions or are

having difficulty programming your

HomeLink® buttons, refer to the

HomeLink® web site at: www.homelink.

com/nissan or call 1-800-355-3515.

NOTE:
It is also recommended that a new

battery be placed in the hand-held

transmitter of the device being pro-

grammed to HomeLink® for quicker

programming and accurate transmis-

sion of the radio-frequency.

1. Position the end of your hand-held

transmitter 1-3 in (26-76 mm) away

from the HomeLink® surface, keeping

the HomeLink® indicator light

in

view.

JVI0428X

2. Using both hands, simultaneously

press and hold the desired HomeLink®

button and handheld transmitter but-

ton. DO NOT release until the

HomeLink® indicator light

flashes

slowly and then rapidly. When the

indicator light flashes rapidly, both

buttons may be released. (The rapid

flashing indicates successful pro-

gramming.)

NOTE:

Some devices to be programmed

may require you to replace Step 2

with the cycling procedure noted in

the “Programming HomeLink® for

Canadian customers and gate open-

ers” (P.2-85).

-------------------------------------------------------------------------------------------------------------------------------------------------------------

JVI0429X

3. Press the button for 2 seconds up to 3

times.

.

If the garage door responds, pro-

graming is completed.

.

If the garage door does not re-

spond, continue with Steps 4-6 for

a rolling code device. A second

person may make the following

steps easier. Use a ladder or other

device. Do not stand on your vehi-

cle to perform the next steps.

4. At the receiver located on the garage

door opener motor in the garage,

locate the “Learn” or “Set” button (the

name and color of the button may

vary by manufacturer but it is usually

located near where the hanging an-

tenna wire is attached to the unit). If

there is difficulty locating the button,

reference the garage door opener’s

manual.

5. Press and release the “Learn” or “Set”

button.

NOTE:

Once the button is pressed, you have

approximately 30 seconds to initiate

the next step.

6. Return to the vehicle and firmly press

and hold the programmed HomeLink®

button for two seconds and release.

Repeat the “press/hold/release” se-

quence up to 3 times to complete

the programming process. HomeLink®

should now activate your rolling code

equipped device.

7. If you have any questions or are

having difficulty programming your

HomeLink® buttons, refer to the

HomeLink® web site at: www.

homelink.com/nissan or call 1-800-

355-3515.

PROGRAMMING HomeLink® FOR

CANADIAN CUSTOMERS AND GATE

OPENERS

Canadian radio-frequency laws require

transmitter signals to “time-out” (or quit)

after several seconds of transmission –

which may not be long enough for

HomeLink® to pick up the signal during

programming. Similar to this Canadian

law, some U.S. gate operators are de-

signed to “time-out” in the same manner.
If you live in Canada or you are having

difficulties programming a gate operator

or garage door opener by using the

“Programming HomeLink®” procedures,

replace “Programming HomeLink®” Step

2 with the following:

NOTE:
When programming a garage door

opener, etc., unplug the device during

the “cycling” process to prevent possi-

ble damage to the garage door opener

components.

Step 2: Using both hands, simultaneously

press and hold the desired HomeLink®

button and the hand-held transmitter

button. During programming, your hand-

held transmitter may automatically stop

transmitting. Continue to press and hold

the desired HomeLink® button while you

press and re-press (“cycle”) your hand-

Instruments and controls

2-85

-------------------------------------------------------------------------------------------------------------------------------------------------------------

2-86

Instruments and controls

held transmitter every two seconds until

the frequency signal has been learned.

The HomeLink® indicator light will flash

slowly and then rapidly after several

seconds upon successful programming.

DO NOT

release until the HomeLink®

indicator light flashes slowly and then

rapidly. When the indicator light flashes

rapidly, both buttons may be released.

The rapid flashing indicates successful

programming.
Proceed with “Programming HomeLink®”

step 3 to complete.
Remember to plug the device back in

when programming is completed.

OPERATING THE HomeLink® UNI-

VERSAL TRANSCEIVER

The HomeLink® Universal Transceiver,

after it is programmed, can be used to

activate the programmed device. To op-

erate, simply press and release the appro-

priate programmed HomeLink® Universal

Transceiver button. The amber indicator

light will illuminate while the signal is

being transmitted.
For convenience, the hand-held transmit-

ter of the device may also be used at any

time.

PROGRAMMING TROUBLESHOOT-

ING

If the HomeLink® does not quickly learn

the hand-held transmitter information:

.

replace the hand-held transmitter

batteries with new batteries.

.

position the hand-held transmitter

with its battery area facing away from

the HomeLink® surface.

.

press and hold both the HomeLink®

and hand-held transmitter buttons

without interruption.

.

position the hand-held transmitter 1-3

in (26-76 mm) away from the

HomeLink® surface. Hold the transmit-

ter in that position for up to 15

seconds. If HomeLink® is not pro-

grammed within that time, try holding

the transmitter in another position -

keeping the indicator light in view at

all times.

If you have any questions or are having

difficulty programming your HomeLink®

buttons, refer to the HomeLink® web site

at: www.homelink.com/nissan or 1-800-

355-3515.

CLEARING THE PROGRAMMED IN-

FORMATION

The following procedure clears the pro-

grammed information from both buttons.

Individual buttons cannot be cleared.

However, individual buttons can be re-

programmed, see “Reprogramming a sin-

gle HomeLink® button” (P.2-86).

To clear all programming

1. Press and hold the two outer

HomeLink® buttons until the indicator

light begins to flash in approximately

10 seconds. Do not hold for longer

than 20 seconds.

2. Release both buttons.
HomeLink® is now in the programming

mode and can be programmed at any

time beginning with “Programming

HomeLink®” - Step 1.

REPROGRAMMING A SINGLE

HomeLink® BUTTON

To reprogram a HomeLink® Universal

Transceiver button, complete the follow-

ing.
1. Press and hold the desired HomeLink®

button.

Do not

release the button.

2. The indicator light will begin to flash

after 20 seconds. Without releasing

the HomeLink® button, proceed with

-------------------------------------------------------------------------------------------------------------------------------------------------------------

“Programming HomeLink®” - Step 1.

For questions or comments, contact

HomeLink® at: www.homelink.com/

nissan or 1-800-355-3515.
The HomeLink® Universal Transceiver

button has now been reprogrammed.

The new device can be activated by

pushing the HomeLink® button that was

just programmed. This procedure will not

affect any other programmed HomeLink®

buttons.

IF YOUR VEHICLE IS STOLEN

If your vehicle is stolen, you should

change the codes of any non-rolling code

device that has been programmed into

HomeLink®. Consult the Owner’s Manual

of each device or call the manufacturer or

dealer of those devices for additional

information.

When your vehicle is recovered, you will

need to reprogram the HomeLink® Uni-

versal Transceiver with your new trans-

mitter information.
FCC Notice:
For USA:
This device complies with Part 15 of the

FCC Rules. Operation is subject to the

following two conditions: (1) This device

may not cause harmful interference,

and (2) this device must accept any

interference received, including inter-

ference that may cause undesired op-

eration.
NOTE:
Changes or modifications not expressly

approved by the party responsible for

compliance could void the user’s

authority to operate the equipment.
For Canada:
This device complies with Industry Ca-

nada licence-exempt RSS standard(s).

Operation is subject to the following

two conditions: (1) this device may not

cause interference, and (2) this device

must accept any interference, including

interference that may cause undesired

operation of the device.

The HomeLink® Universal Transceiver

provides a convenient way to consolidate

the functions of up to three individual

hand-held transmitters into one built-in

device.
HomeLink® Universal Transceiver:

.

Will operate most Radio Frequency

(RF) devices such as garage doors,

gates, home and office lighting, entry

door locks and security systems.

.

Is powered by your vehicle’s battery.

No separate batteries are required. If

the vehicle’s battery is discharged or is

disconnected, HomeLink® will retain

all programming.

When the HomeLink® Universal Trans-

ceiver is programmed, retain the origi-

nal transmitter for future programming

procedures (Example: new vehicle pur-

chases). Upon sale of the vehicle, the

programmed HomeLink® Universal

Transceiver buttons should be erased

for security purposes. For additional

information, refer to “Programming

HomeLink®” (P.2-88).

WARNING

.

Do not use the HomeLink® Uni-

versal Transceiver with any gar-

age door opener that lacks safety

Instruments and controls

2-87

HomeLink® UNIVERSAL TRANSCEIVER

(Type B) (if so equipped)

-------------------------------------------------------------------------------------------------------------------------------------------------------------

2-88

Instruments and controls

stop and reverse features as re-

quired by federal safety stan-

dards. (These standards became

effective for opener models man-

ufactured after April 1, 1982). A

garage door opener which cannot

detect an object in the path of a

closing garage door and then

automatically stop and reverse,

does not meet current federal

safety standards. Using a garage

door opener without these fea-

tures increases the risk of serious

injury or death.

.

During the programming proce-

dure your garage door or security

gate will open and close (if the

transmitter is within range). Make

sure that people or objects are

clear of the garage door, gate,

etc. that you are programming.

.

Your vehicle’s engine should be

turned off while programming

the HomeLink® Universal Trans-

ceiver. Do not breathe exhaust

gases; they contain colorless

and odorless carbon monoxide.

Carbon monoxide is dangerous. It

can cause unconsciousness or

death.

NOTE:
If your vehicle is equipped with Intelli-

gent Rear View Mirror, you may have to

complete additional programming to

enable Two-Way Communication. The

mirror can provide the status of your

garage door (open/close).

PROGRAMMING HomeLink®

The following steps show generic instruc-

tions how to program a HomeLink®

button. If you have any questions or are

having difficulty programming your

HomeLink® buttons, refer to the

HomeLink® web site at: www.homelink.

com/nissan or call 1-800-355-3515.

NOTE:
It is also recommended that a new

battery be placed in the hand-held

transmitter of the device being pro-

grammed to HomeLink® for quicker

programming and accurate transmis-

sion of the radio-frequency.

WAC0378X

HomeLink® buttons (1-3)
Indicator light (appears above each

HomeLink® button)
Status display (where the current condi-

tion of the HomeLink® is displayed)

-------------------------------------------------------------------------------------------------------------------------------------------------------------

WAC0381X

1. Press and release the HomeLink®

button that you would like to pro-

gram. The HomeLink® indicator light

will flash in orange slowly and “TRAIN-

ING” is displayed on the lower right of

the mirror (if not, refer to “Clearing the

programmed information” (P.2-92).).

2. Position the hand-held transmitter

(garage door opener remote) 1-3

inches (2-8 cm) away from the

HomeLink® button that you would

light to program.

NOTE:

Some hand-held transmitter (gar-

age door opener remotes) may ac-

tually train better at a distance of 6-

12 inches (15-20 cm). Keep this in

mind if you have difficulty with the

programming process.

3. While the HomeLink® indicator light is

flashing in orange, press and hold the

hand-held transmitter button. Con-

tinue pressing the hand-held trans-

mitter button until the HomeLink®

indicator light changes from orange

to green and “TRAINED” is displayed on

the lower right of the mirror. You may

now release the hand-held transmit-

ter button.

NOTE:

Some devices to be programmed

may require you to replace the Step

3 with the cycling procedure noted

in “Programming HomeLink® for Ca-

nadian customers and gate open-

ers” (P.2-91).

4.

Wait until your garage door has

stopped moving

before completing

the next steps.

5. Press the HomeLink® button and ob-

serve the indicator light.

.

If the indicator light remains con-

stant green, your device should

operate when the HomeLink® but-

ton is pressed. At this point, if your

device operates, programming is

complete.

.

If the indicator light rapidly flashes

in green, firmly press,

hold for two

s e c o n d s

a n d r e l e a s e t h e

HomeLink® button up to three

times to complete the program-

ming process.

Do not press the

HomeLink® button rapidly

. At this

point if your device operates, pro-

gramming is complete. If the device

does not operate or operates but

no door status indicator with Two-

Way Communication

*1

, continue

with the next step of the program-

ming instructions.

6. At the garage door opener motor

(security gate motor, etc.), locate the

“Learn” or “Set” button. This can usual-

ly be found where the hanging anten-

na wire is attached to the motor-head

unit (see the device’s manual to iden-

tify this button.). The name and color

of the button may vary by manufac-

turer.

NOTE:

A ladder and/or second person may

simplify the following steps. Do not

stand on your vehicle to perform the

next steps.

Instruments and controls

2-89

-------------------------------------------------------------------------------------------------------------------------------------------------------------

2-90

Instruments and controls

WAC0258X

Example

7. Firmly press and release the “Learn” or

“Set” button until the indicator illumi-

nates. Once the button is pressed, you

have approximately 30 seconds to

initiate the next step.

8. Return to the vehicle and firmly press,

hold for two seconds and release the

HomeLink® button up to three times.

Do not press the HomeLink® button

rapidly.

At this point programming is

complete and your device should

operate when the HomeLink® button

is pressed and released.

9. If you have any questions or are

having difficulty programming your

HomeLink® buttons, refer to the

HomeLink® web site at: www.

homelink.com/nissan or call 1-800-

355-3515.

*1: Programming Two-Way Communica-

tion

To check if your garage door opener is

compatible with this feature, refer to the

homelink.com/compatible/two-way-

communication website. If your garage

door opener has this functionality,

HomeLink® mirror garage door status

indicators may appear after completion

of programming.

NOTE:
It is possible for the HomeLink® to stop

working with the garage door system

shortly after initial programming if the

Two-Way Communication program-

ming is not completed. If this is the

case, following the steps below will

restore door operation.

1. In your vehicle, press and hold the

trained HomeLink® button for 2 sec-

onds, then release. Confirm that the

garage door is moving. When the

garage door stops, you will have one

minute to complete the following

steps:

NOTE:

A ladder and/or second person may

simplify the following steps. Do not

stand on your vehicle to perform the

next steps.

2. On your garage door opener in your

garage, locate the “Learn” or “Set”

button (usually near where the hang-

ing antenna wire is attached to the

garage door opener). If there is diffi-

culty locating this button, refer to the

device’s owner’s manual.

3. Press and release the “Learn” or “Set”

button.

4. A light on your garage door opener

ma y fl a sh, a nd yo u r two -wa y

HomeLink® indicators in your vehicle

may flash, confirming completion of

the process.

5. Pressing the trained HomeLink® but-

ton will now activate your garage

door. The status indicators will show

when the door is moving.

6. Your two-way enrollment is now com-

plete.

-------------------------------------------------------------------------------------------------------------------------------------------------------------

USING THE GARAGE DOOR TWO-

WAY COMMUNICATION

HomeLink® has the function of commu-

nicating with garage door opener sys-

tems. If your garage door openers are

c o m p a t i b l e w i t h H o m e L i n k ® , t h e

HomeLink® can:

.

receive and display “closing” or “open-

ing” status from your garage door

opener.

.

recall and display the garage door

being “closed” or “opened”.

HomeLink® can receive the status from a

garage door opener at a range up to 820

ft (250 m), but it varies depending on the

environment. You may need to reduce

vehicle speed to successfully receive the

garage door opener communication.

WAC0379X

Using two-way communication

Press and hold the HomeLink® buttons (1

and 2) simultaneously for 2 seconds to

recall and display the last recorded gar-

age door status communicated to

HomeLink®. HomeLink® will display the

last recorded status for 3 seconds.
If two-way communication programming

is successful, HomeLink® will display the

status of your garage door opener with

the status indicator

, which changes

depending on the status. The garage

door opener status indicator shows the

garage door opener status as follows:

Flashing in orange – Closing

Flashing in orange – Opening
Illuminating in green – Closed
Illuminating in green – Opened

The status indicator stops to flash after

an open/close signal is received or no

signal is received within 30 seconds from

the garage door opener.

PROGRAMMING HomeLink® FOR

CANADIAN CUSTOMERS AND GATE

OPENERS

Canadian radio-frequency laws require

transmitter signals to “time-out” (or quit)

after several seconds of transmission –

which may not be long enough for

HomeLink® to pick up the signal during

programming. Similar to this Canadian

law, some U.S. gate operators are de-

signed to “time-out” in the same manner.
If you live in Canada or you are having

difficulties programming a gate operator

or garage door opener by using the

“Programming HomeLink®” procedures,

replace “Programming HomeLink®” Step

3 with the following:

NOTE:
When programming a garage door

opener, etc., unplug the device during

the “cycling” process to prevent possi-

ble damage to the device components.

Step 3: While the HomeLink® indicator

Instruments and controls

2-91

-------------------------------------------------------------------------------------------------------------------------------------------------------------


Content      ..     9      10      11      12     ..