Nissan Versa (2022 year). Manual in english - page 20
The high-mounted stop light must be
ALUMINUM ALLOY WHEELS (if so
TIRE DRESSINGS
properly reinstalled before driving your
equipped)
NISSAN does not recommend the use of
vehicle.
Wash the wheels regularly with a sponge
tire dressings. Tire manufacturers apply a
Use glass cleaner to remove smoke and
coating to the tires to help reduce discolor-
dampened in a mild soap solution, espe-
dust film from the glass surfaces. It is nor-
ation of the rubber. If a tire dressing is ap-
cially during winter months in areas where
mal for glass to become coated with a film
plied to the tires, it may react with the coat-
road salt is used. If not removed, road salt
after the vehicle is parked in the hot sun.
ing and form a compound. This compound
can discolor the wheels.
Glass cleaner and a soft cloth will easily
may come off the tire while driving and
remove this film.
stain the vehicle paint.
CAUTION
If you choose to use a tire dressing, take the
CAUTION
Follow the directions below to avoid
following precautions:
staining or discoloring the wheels:
When cleaning the inside of the win-
•
Use a water-based tire dressing. The
• Do not use a cleaner that uses strong
dows, do not use sharp-edged tools,
coating on the tire dissolves more easily
acid or alkali contents to clean the
abrasive cleaners or chlorine-based
than with an oil-based tire dressing.
wheels.
disinfectant cleaners. They could dam-
•
Apply a light coat of tire dressing to help
• Do not apply wheel cleaners to the
age the electrical conductors, radio an-
prevent it from entering the tire tread/
tenna elements or rear window de-
wheels when they are hot. The wheel
grooves (where it would be difficult to
temperature should be the same as
froster elements.
remove).
ambient temperature.
•
Wipe off excess tire dressing using a dry
• Rinse the wheel to completely re-
towel. Make sure the tire dressing is com-
move the cleaner within 15 minutes
pletely
removed from the tire
after the cleaner is applied.
tread/grooves.
CHROME PARTS
•
Allow the tire dressing to dry as recom-
mended by the tire dressing
Clean all chrome parts regularly with a
manufacturer.
non-abrasive chrome polish to maintain
the finish.
7-4
Appearance and care
CLEANING INTERIOR
Occasionally remove loose dust from the
AIR FRESHENERS
CAUTION
interior trim, plastic parts and seats using a
Most air fresheners use a solvent that
vacuum cleaner or soft bristled brush. Wipe
•
Never use benzine, thinner or any
could affect the vehicle interior. If you use
the vinyl and leather (if so equipped) sur-
similar material.
an air freshener, take the following
faces with a clean, soft cloth dampened in
•
Small dirt particles can be abrasive
precautions:
mild soap solution, then wipe clean with a
and damaging to leather
(if so
• Hanging-type air fresheners can cause
dry, soft cloth.
equipped) surfaces and should be re-
permanent discoloration when they con-
Regular care and cleaning is required in
moved promptly. Do not use saddle
tact vehicle interior surfaces. Place the air
order to maintain the appearance of the
soap, car waxes, polishes, oils, clean-
freshener in a location that allows it to
leather (if so equipped).
ing fluids, solvents, detergents or
hang free and not contact an interior
ammonia-based cleaners as they
Before using any fabric protector, read the
surface.
may damage the leather’s natural
manufacturer's recommendations. Some
• Liquid-type air fresheners typically clip on
finish.
fabric protectors contain chemicals that
the vents. These products can cause im-
•
Never use fabric protectors unless
may stain or bleach the seat material.
mediate damage and discoloration
recommended by the manufacturer.
when spilled on interior surfaces.
Use a cloth dampened only with water to
•
Do not use glass or plastic cleaner on
clean the meter and gauge lens.
Carefully read and follow the manufactur-
meter or gauge lens covers. It may
er's instructions before using the air
damage the lens cover.
WARNING
fresheners.
•
Never use chloride solutions for
Do not use water or acidic cleaners (hot
cleaning aluminum decoratives (if so
steam cleaners) on the seat. This can
equipped), damage may occur.
damage the seat or occupant classifi-
cation sensor. This can also affect the
operation of the air bag system and re-
sult in serious personal injury.
Appearance and care
7-5

• Properly position the mats in the
Floor mat installation
floorwell using the floor mat posi-
Your vehicle is equipped with floor mat po-
tioning hook. For additional informa-
sitioning hook(s). The number and shape of
tion, see "Floor mat installation"
the floor mat positioning hooks for each
(P. 7-6).
seating position varies depending on the
• Make sure the floor mat does not in-
vehicle.
terfere with pedal operation.
When installing Genuine NISSAN floor mats,
• Periodically check the floor mats to
follow the installation instructions provided
make sure they are properly
with the mat and the following:
installed.
1.
With the ignition switch placed in the OFF
• After cleaning the vehicle interior,
position, the shift lever in P (Park) posi-
check the floor mats to make sure
tion
(Continuously Variable Transmis-
they are properly installed.
sion models) or the shift lever in the N
LAI2105
The use of Genuine NISSAN floor mats can
(Neutral) position (manual transmission
extend the life of your vehicle carpet and
models) and with the parking brake fully
FLOOR MATS (if so equipped)
make it easier to clean the interior. Mats
applied, position the floor mat in the
WARNING
should be maintained with regular clean-
floorwell so that the floor mat grommet
ing and replaced if they become exces-
holes are aligned with the hook(s).
To avoid potential pedal interference
sively worn.
that may result in a collision, injury or
2.
Secure the grommet holes into the
death:
hook(s) and ensure that the floor mat is
• NEVER place a floor mat on top of
properly positioned.
another floor mat in the driver front
position or install them upside down
or backwards.
• Use only Genuine NISSAN floor mats,
or equivalent floor mats, that are
specifically designed for use in your
vehicle model and model year.
7-6
Appearance and care

3. Make sure the floor mat does not inter-
WARNING
fere with pedal operation. With the igni-
tion switch still in the OFF position, the
Do not allow wet seat belts to roll up in
shift lever in the P (Park) position (Con-
the retractor. NEVER use bleach, dye or
tinuously Variable Transmission models)
chemical solvents to clean the seat
or the shift lever in the N (Neutral) posi-
belts, since these materials may se-
tion (manual transmission models) and
verely weaken the seat belt webbing.
with the parking brake applied, fully ap-
ply and release all pedals. The floor mat
must not interfere with pedal operation
or prevent the pedal from returning to
its normal position.
It is recommended that you visit a NISSAN
dealer for details about installing the floor
LAI2106
mats in your vehicle.
Positioning hooks
The illustration shows the location of the
floor mat positioning hooks.
SEAT BELTS
The seat belts can be cleaned by wiping
them with a sponge dampened in a mild
soap solution. Allow the belts to dry com-
pletely in the shade before using them. For
additional information, see “Seat belt main-
tenance” (P. 1-17).
Appearance and care
7-7
CORROSION PROTECTION
MOST COMMON FACTORS
Temperature
CAUTION
CONTRIBUTING TO VEHICLE
High temperatures accelerate the rate of
• NEVER remove dirt, sand or other de-
CORROSION
corrosion to those parts which are not well
bris from the passenger compart-
ventilated.
Most vehicle corrosion is caused by:
ment by washing it out with a hose.
• The accumulation of moisture-retaining
Remove dirt with a vacuum cleaner
Air pollution
dirt and debris in body panel sections,
or broom.
cavities, and other areas.
Industrial pollution, the presence of salt in
• Never allow water or other liquids to
• Damage to paint and other protective
the air in coastal areas, or heavy road salt
come in contact with electronic com-
use accelerates the corrosion process.
coatings caused by gravel and stone
ponents inside the vehicle as this
chips or minor traffic collisions.
Road salt also accelerates the disintegra-
may damage them.
tion of paint surfaces.
Chemicals used for road surface de-icing
ENVIRONMENTAL FACTORS
PROTECT YOUR VEHICLE FROM
are extremely corrosive. They accelerate
INFLUENCE THE RATE OF
CORROSION
corrosion and deterioration of underbody
CORROSION
components such as the exhaust system,
• Wash and wax your vehicle often to keep
fuel and brake lines, brake cables, floor pan
the vehicle clean.
Moisture
and fenders.
• Always check for minor damage to the
Accumulation of sand, dirt and water on
paint and repair it as soon as possible.
In winter, the underbody must be
the vehicle body underside can accelerate
cleaned periodically.
• Keep drain holes at the bottom of the
corrosion. Wet floor coverings will not dry
doors open to avoid water accumulation.
For additional protection against rust and
completely inside the vehicle and should
• Check the underbody for accumulation
corrosion, which may be required in some
be removed for drying to avoid floor panel
of sand, dirt or salt. If present, wash with
areas, it is recommended that you consult
corrosion.
water as soon as possible.
a NISSAN dealer.
Relative humidity
Corrosion will be accelerated in areas of
high relative humidity, especially those ar-
eas where the temperatures stay above
freezing and where atmospheric pollution
exists and road salt is used.
7-8
Appearance and care
8
Do-it-yourself
Maintenance precautions
8-2
In-cabin microfilter
8-16
Engine compartment check locations
8-3
Windshield wiper blades
8-16
Engine cooling system
8-4
Cleaning
8-16
Checking engine coolant level
8-5
Replacing
8-17
Changing engine coolant
8-5
Brakes
8-18
Engine oil
8-6
Fuses
8-18
Checking engine oil level
8-6
Engine compartment
8-19
Changing engine oil and oil filter
8-7
Passenger compartment
8-20
Continuously Variable Transmission (CVT)
Battery replacement
8-21
fluid (if so equipped)
8-9
NISSAN jackknife key (if so equipped)
8-21
Brake and clutch (if so equipped) fluid
8-9
NISSAN Intelligent Key® (if so equipped)
8-22
Brake fluid
8-10
Lights
8-24
Clutch (if so equipped) fluid
8-10
Headlights
8-24
Windshield-washer fluid
8-10
Fog lights (if so equipped)
8-25
Windshield-washer fluid reservoir
8-10
Exterior and interior lights
8-25
Battery
8-12
Wheels and tires
8-27
Jump starting
8-13
Tire pressure
8-27
Variable voltage control system
8-14
Tire labeling
8-32
Types of tires
8-35
Drive belt
8-14
Tire chains
8-36
Spark plugs
8-15
Changing wheels and tires
8-37
Replacing spark plugs
8-15
Air cleaner
8-16
MAINTENANCE PRECAUTIONS
When performing any inspection or main-
•
If you must run the engine in an en-
•
Avoid contact with used engine oil
tenance work on your vehicle, always take
closed space such as a garage, be
and coolant. Improperly disposed
care to prevent serious accidental injury to
sure there is proper ventilation for
engine oil, engine coolant and/or
yourself or damage to the vehicle. The fol-
exhaust gases to escape.
other vehicle fluids can damage the
lowing are general precautions which
•
Never get under the vehicle while it is
environment. Always conform to lo-
should be closely observed.
supported only by a jack. If it is nec-
cal regulations for disposal of vehicle
essary to work under the vehicle,
fluid.
WARNING
support it with safety stands.
•
Never leave the engine or the trans-
•
Keep smoking materials, flame and
•
Park the vehicle on a level surface,
mission related component harness
sparks away from the fuel tank and
connector disconnected while the ig-
apply the parking brake securely and
block the wheels to prevent the ve-
battery.
nition switch is in the ON position.
hicle from moving. For manual trans-
•
Because the fuel lines on gasoline
•
Never connect or disconnect the bat-
mission models, move the shift lever
engine models are under high pres-
tery or any transistorized compo-
sure even when the engine is off, it is
to N (Neutral). For CVT models, move
nent while the ignition switch is in
recommended that you visit a
the shift lever to P (Park).
the ON position.
NISSAN dealer for service of the fuel
•
Be sure the ignition switch is in the
filter or fuel lines.
This “Do-it-yourself ” section gives instruc-
OFF or LOCK position when perform-
•
Your vehicle is equipped with an au-
tions regarding only those items which are
ing any parts replacement or repairs.
tomatic engine cooling fan. It may
relatively easy for an owner to perform.
•
If you must work with the engine run-
come on at any time without
A Genuine NISSAN service manual is also
ning, keep your hands, clothing, hair
warning, even if the ignition switch is
available. For additional information, see
and tools away from moving fans,
in the OFF position and the engine is
“Owner's Manual/Service Manual order in-
belts and any other moving parts.
not running. To avoid injury, always
formation” (P. 10-23).
•
It is advisable to secure or remove
disconnect the negative battery
cable before working near the fan.
You should be aware that incomplete or
any loose clothing and remove any
jewelry, such as rings, watches, etc.
improper servicing may result in operating
difficulties or excessive emissions, and
before working on your vehicle.
CAUTION
could affect warranty coverage. If in doubt
•
Always wear eye protection when-
•
Do not work under the hood while
about any servicing, it is recommended
ever you work on your vehicle.
the engine is hot. Turn the engine off
that you have it done by a NISSAN dealer.
and wait until it cools down.
8-2
Do-it-yourself
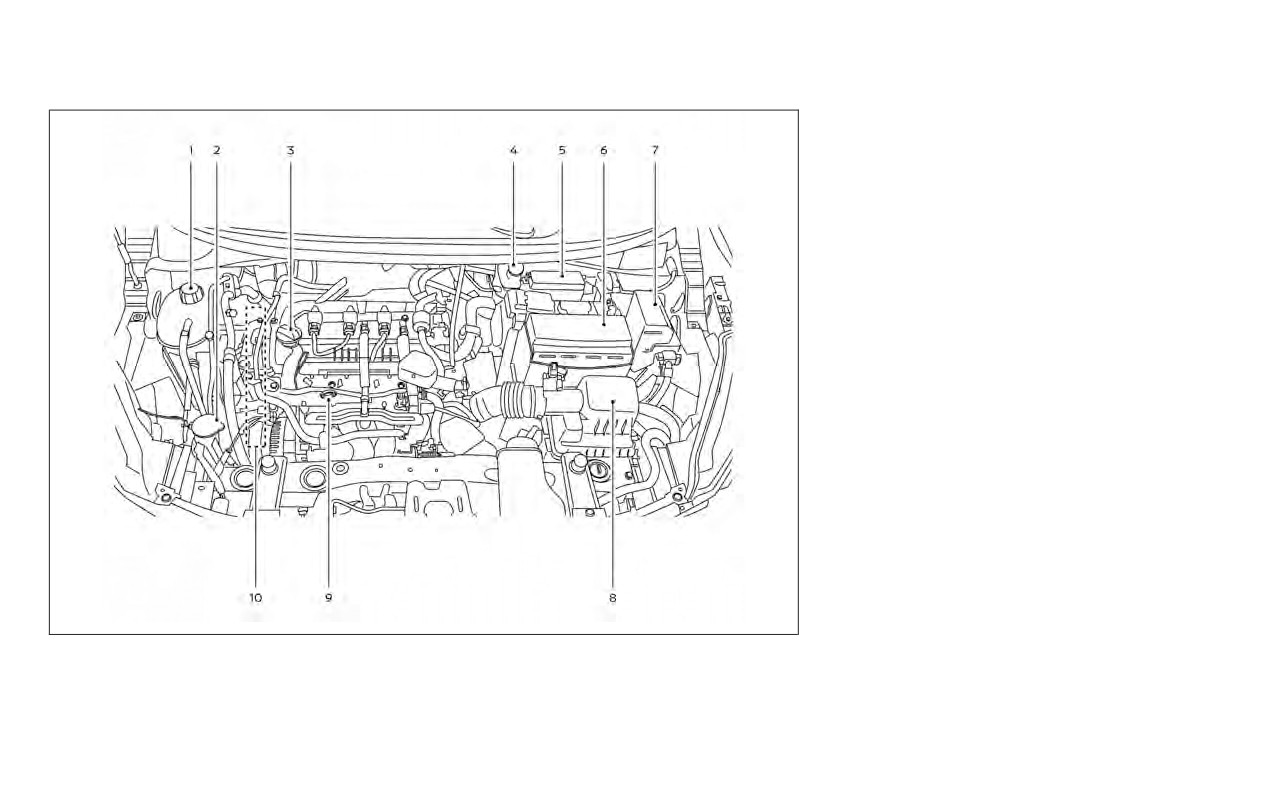
ENGINE COMPARTMENT CHECK
LOCATIONS
1.6L 4 cylinder (HR16DE engine model)
1.
Engine coolant reservoir
2.
Windshield-washer fluid reservoir
3.
Engine oil filler cap
4.
Brake and clutch (if so equipped) fluid
reservoir
5.
Fuse/Fusible link box
6.
Battery
7.
Fuse box
8.
Air cleaner
9.
Engine oil dipstick
10.
Drive belt location
NOTE:
Your vehicle may not be equipped with
an engine cover.
LDI3658
Do-it-yourself
8-3
ENGINE COOLING SYSTEM
The engine cooling system is filled at the
CAUTION
•
The life expectancy of the factory-fill
factory with a pre-diluted mixture of 50%
coolant is 105,000 miles (168,000 km)
Genuine NISSAN Long Life Antifreeze/
•
Never use any cooling system addi-
or 7 years. Mixing any other type of
Coolant (blue) and 50% water to provide
tives such as radiator sealer. Addi-
coolant other than Genuine NISSAN
year-round antifreeze and coolant protec-
tives may clog the cooling system
Long Life Antifreeze/Coolant (blue)
tion. The antifreeze solution contains rust
and cause damage to the engine,
(or equivalent coolant), including
and corrosion inhibitors. Additional engine
transmission and/or cooling system.
Genuine Nissan Long Life Antifreeze/
cooling system additives are not
•
When adding or replacing coolant, be
Coolant (Green) or the use of non-
necessary.
sure to use only Genuine NISSAN
distilled water may reduce the life ex-
Long Life Antifreeze/Coolant (blue)
pectancy of the factory-fill coolant.
WARNING
or equivalent. Genuine NISSAN Long
For additional information, refer to
Life Antifreeze/Coolant (blue) is pre-
the "Maintenance and
schedules"
•
Never remove the coolant reservoir
diluted to provide antifreeze protec-
section of this manual.
cap when the engine is hot. Wait until
tion to -34° F (-37° C). If additional
the engine and radiator cool down.
freeze protection is needed due to
Serious burns could be caused by
weather where you operate your ve-
high pressure fluid escaping from the
hicle, add Genuine NISSAN Long Life
radiator. For additional information
Antifreeze/Coolant
(blue) concen-
on precautions, see “If your vehicle
trate following the directions on the
overheats” (P. 6-10).
container. If an equivalent coolant
•
The coolant reservoir is equipped
other than Genuine NISSAN Long Life
with a pressure type coolant reser-
Antifreeze/Coolant (blue) is used, fol-
voir cap. To prevent engine damage,
low the coolant manufacturer’s in-
use only a Genuine NISSAN coolant
structions to maintain minimum an-
reservoir cap.
tifreeze protection to -34° F (-37° C).
The use of other types of coolant so-
lutions other than Genuine NISSAN
Long Life Antifreeze/Coolant (blue)
or equivalent may damage the en-
gine cooling system.
8-4
Do-it-yourself

ditional information, refer to the "Mainte-
• Avoid direct skin contact with used
nance and schedules" section of this
coolant. If skin contact is made, wash
manual.
thoroughly with soap or hand
If the cooling system frequently requires
cleaner as soon as possible.
coolant, it is recommended that you visit
• Keep coolant out of the reach of chil-
a NISSAN dealer for this service.
dren and pets.
For additional information on the location
Engine coolant must be disposed of prop-
of the engine coolant reservoir, see “Engine
erly. Check your local regulations.
compartment check locations” (P. 8-3).
CHANGING ENGINE COOLANT
A NISSAN dealer can change the engine
coolant. The service procedure can be
found in the NISSAN Service Manual.
LDI3221
Improper servicing can result in reduced
CHECKING ENGINE COOLANT
heater performance and engine
LEVEL
overheating.
Check the coolant level in the reservoir
when the engine is cold. If the coolant
WARNING
B , add coolant
A .
• To avoid the danger of being scalded,
never change the coolant when the
This vehicle contains Genuine NISSAN Long
engine is hot.
Life Antifreeze/Coolant (blue). The life ex-
• Never remove the coolant reservoir
pectancy of the factory-fill coolant is
cap when the engine is hot. Serious
105,000 miles (168,000 km) or 7 years. Mixing
burns could be caused by high pres-
any other type of coolant or the use of
sure fluid escaping from the coolant
non-distilled water will reduce the life ex-
reservoir.
pectancy of the factory-fill coolant. For ad-
Do-it-yourself
8-5

ENGINE OIL
It is normal to add some engine oil be-
tween oil maintenance intervals de-
pending on the severity of operating
conditions or depending on the property
of the engine oil used. More engine oil is
consumed by frequent acceleration/
deceleration especially when the engine
rpm is high. Consumption is likely to be
higher when the engine is new. If the rate
of oil consumption, after driving for
3,000 miles (5,000 km), is more than 0.5
liter per 600 miles (1,000 km), consult a
NISSAN dealer.
LDI3222
LDI0371
CAUTION
CHECKING ENGINE OIL LEVEL
5.
Remove the dipstick again and check
Oil level should be checked regularly.
the oil level. It should be between the H
Operating the engine with an insuffi-
1. Park the vehicle on a level surface and
B . This is the
apply the parking brake.
cient amount of oil can damage the en-
normal operating oil level range. If the oil
gine, and such damage is not covered
2. Start the engine and let it idle until it
A , re-
by warranty.
reaches operating temperature.
move the oil filler cap and pour recom-
mended oil through the opening. Do not
3. Turn off the engine. Wait more than 10
C .
minutes for the oil to drain back into
the oil pan.
6.
Recheck oil level with the dipstick.
4. Remove the dipstick and wipe it clean.
Reinsert it all the way.
8-6
Do-it-yourself

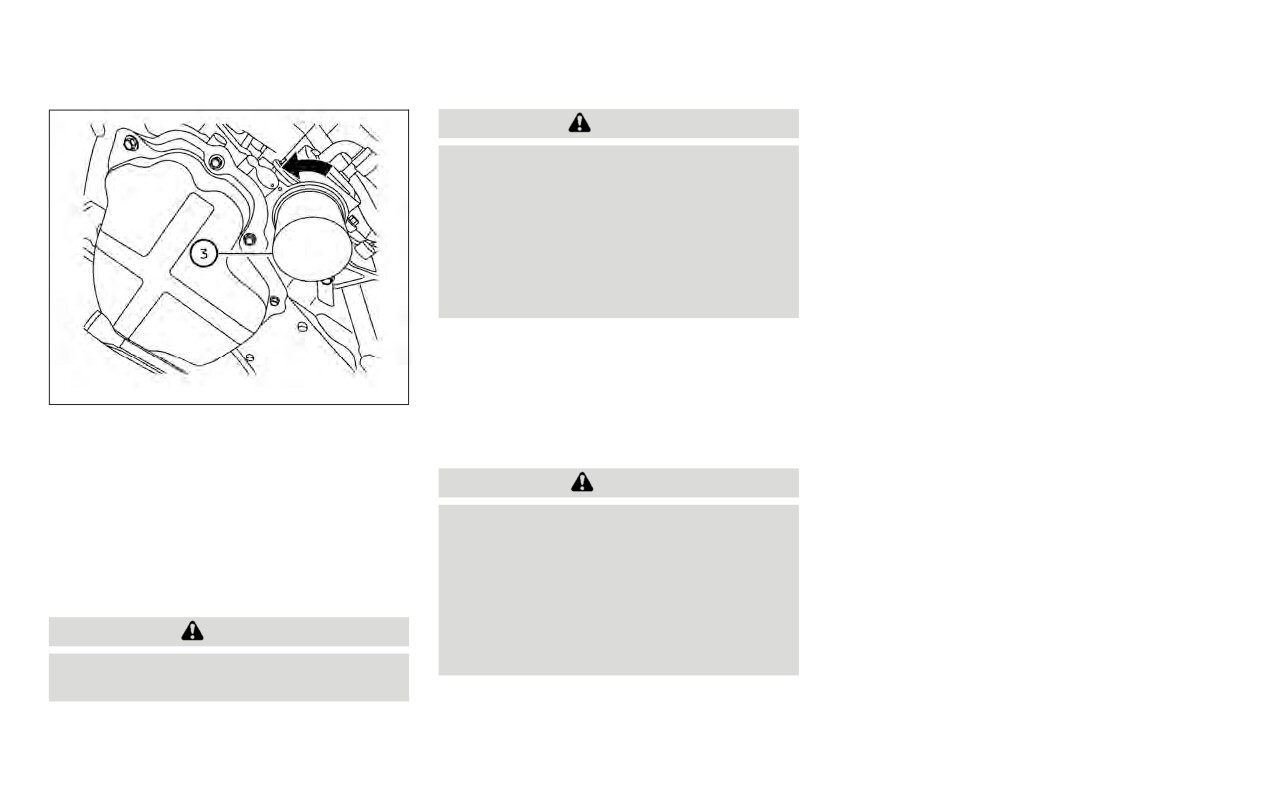
CHANGING ENGINE OIL AND OIL
FILTER
For additional information on engine oil
and oil filter change, refer to the instruc-
tions outlined in this section.
Vehicle set-up
1. Park the vehicle on a level surface and
apply the parking brake.
2. Run the engine until it reaches operating
temperature.
3. Turn the engine off and wait for
15
minutes.
LDI3434
LDI3435
1
Oil filler cap
2
Oil drain plug
4. Raise and support the vehicle using a
suitable floor jack and safety jack
stands.
• Place the safety jack stands under the
vehicle jack-up points.
• A suitable adapter should be attached to
the jack stand saddle.
CAUTION
Make sure the correct lifting and sup-
port points are used to avoid vehicle
damage.
Do-it-yourself
8-7
7. Screw in the oil filter clockwise until a
WARNING
slight resistance is felt, then tighten addi-
•
Prolonged and repeated contact with
tionally more than 2/3 turn.
used engine oil may cause skin cancer.
Oil filter tightening torque:
•
Try to avoid direct skin contact with
11 to 15 ft-lb (14.7 to 20.6 N·m)
used oil. If skin contact is made, wash
8. Clean and re-install the drain plug with a
thoroughly with soap or hand
new washer. Securely tighten the drain
cleaner as soon as possible.
plug with a wrench. Do not use exces-
•
Keep used engine oil out of reach of
sive force.
children.
Drain plug tightening torque:
4.
Loosen the oil filter with an oil filter
22 to 29 ft-lb (29.4 to 39.2 N·m)
wrench by turning it counterclockwise.
Remove the oil filter by turning it by
9. Refill the engine with the recommended
LDI3437
hand.
oil through the oil filler opening, and in-
stall the oil filler cap securely.
3
Oil filter
5.
Wipe the engine oil filter mounting sur-
For additional information about drain and
Engine oil and filter
face with a clean rag.
refill capacity, see “Recommended fluids/
1. Place a large drain pan under the drain
lubricants and capacities”
(P.
10-2). The
CAUTION
plug and oil filter.
drain and refill capacity depends on the oil
Be sure to remove any old gasket ma-
temperature and drain time. Use these
2. Remove the oil filler cap.
terial remaining on the sealing surface
specifications for reference only. Always
3. Remove the drain plug with a wrench by
of the engine. Failure to do so could
use the dipstick to determine the proper
turning it counterclockwise and com-
lead to an oil leak and engine damage.
amount of oil in the engine.
pletely drain the oil.
• The dipstick must be inserted in
10. Start the engine and check for leakage
place to prevent oil spillage from the
around the drain plug and the oil filter.
CAUTION
dipstick hole when filling the engine
Correct as required. Turn the engine off
Be careful not to burn yourself, as the
with oil.
and wait more than 15 minutes. Check
engine oil is hot.
the oil level with the dipstick. Add en-
6. Coat the gasket on the new filter with
gine oil if necessary.
clean engine oil.
8-8
Do-it-yourself

CONTINUOUSLY VARIABLE
BRAKE AND CLUTCH (if so equipped)
TRANSMISSION (CVT) FLUID (if so
FLUID
equipped)
After the operation
For additional information on brake fluid
CAUTION
specification, see “Recommended fluids/
1. Lower the vehicle carefully to the ground.
•
NISSAN recommends using Genuine
lubricants and capacities” (P. 10-2).
2. Reset oil and oil filter maintenance re-
NISSAN CVT Fluid NS-3 (or equiva-
minder (if so equipped). For additional
lent) ONLY in NISSAN CVTs. Do not mix
WARNING
information, see
“Vehicle information
with other fluids.
•
Use only new fluid from a sealed con-
display” (P. 2-24)
•
Do not use Automatic Transmission
tainer. Old, inferior or contaminated
•
Dispose of waste oil and filter properly.
Fluid (ATF) or manual transmission
fluid may damage the brake and
• Check your local regulations.
fluid in a NISSAN CVT, as it may dam-
clutch (if so equipped) systems. The
age the CVT. Damage caused by the
use of improper fluids can damage
use of fluids other than as recom-
the brake and clutch system and af-
mended is not covered under
fect the vehicle’s stopping ability.
NISSAN's New Vehicle Limited War-
•
Clean the filler cap before removing.
ranty outlined in your Warranty Infor-
mation Booklet.
•
Brake and clutch fluid is poisonous
and should be stored carefully in
•
Using fluids that are not equivalent
marked containers out of reach of
to Genuine NISSAN CVT Fluid NS-3
children.
may also damage the CVT. Damage
caused by the use of fluids other than
as recommended is not covered un-
CAUTION
der NISSAN's New Vehicle Limited
Warranty outlined in your Warranty
Do not spill the fluid on any painted sur-
Information Booklet.
faces. This will damage the paint. If fluid
is spilled, immediately wash the sur-
When checking or replacement of CVT fluid
face with water.
is required, it is recommended that you visit
a NISSAN dealer for servicing.
Do-it-yourself
8-9

WINDSHIELD-WASHER FLUID
LDI3438
LDI3438
LDI3223
BRAKE FLUID
CLUTCH (if so equipped) FLUID
WINDSHIELD-WASHER FLUID
Check the brake fluid level in the reservoir. If
Check the fluid level in the reservoir. The
RESERVOIR
B ,orthe
brake fluid reservoir is shared with the
Add a washer solvent to the windshield-
brake warning light comes on, add
clutch hydraulic system for manual trans-
washer fluid reservoir for better cleaning. In
Genuine NISSAN Brake Fluid or equivalent
missions. If the level is below the MIN line
the winter season, add a windshield-
A . If fluid
B , or the brake warning light comes on,
washer antifreeze. Follow the manufactur-
must be added frequently, the system
add Genuine NISSAN Brake Fluid or equiva-
er's instructions for the mixture ratio.
should be checked. It is recommended
A .If fluid
Refill the reservoir more frequently when
that you visit a NISSAN dealer for this
must be added frequently, it is recom-
driving conditions require an increased
service.
mended that you visit a NISSAN dealer for
amount of windshield-washer fluid.
servicing.
Recommended fluid is Genuine NISSAN
Windshield-Washer Fluid Concentrate
Cleaner & Antifreeze or equivalent.
8-10
Do-it-yourself
CAUTION
•
Do not substitute engine antifreeze
coolant for windshield-washer solu-
tion. This may result in damage to the
paint.
•
Do not fill the windshield-washer
fluid reservoir with washer fluid con-
centrates at full strength. Some
methyl alcohol based washer fluid
concentrates may permanently stain
the grille if spilled while filling the
windshield-washer fluid reservoir.
•
Pre-mix windshield-washer fluid
concentrates with water to the
manufacturer's recommended lev-
els before pouring the fluid into the
windshield-washer fluid reservoir.
Do not use the windshield-washer
fluid reservoir to mix the washer fluid
concentrate and water.
Do-it-yourself
8-11

BATTERY
Caution symbols for battery
WARNING
No smoking, No exposed flames, No
Do not expose the battery to electrical sparks, flames or smoking. Hydrogen gas generated by the
1
Sparks
battery is explosive. Explosive gases can cause blindness or injury.
Handle the battery cautiously. Always wear eye protection glasses to protect against explosion or
2
Shield eyes
battery acid.
3
Keep away from children
Never allow children to handle the battery. Keep the battery out of the reach of children.
Do not allow battery fluid to contact your skin, eyes, fabrics, or painted surfaces. Sulfuric acid can
cause blindness or severe burns. After touching a battery or battery cap, do not touch or rub your
4
Battery acid
eyes. Thoroughly wash your hands. If the acid contacts your eyes, skin or clothing, immediately
flush with water for at least 15 minutes and seek medical attention. Battery fluid is acid. If the bat-
tery fluid gets into your eyes or onto your skin, it could cause loss of your eyesight or burns.
5
Note operating instructions
Before handling the battery, read this instruction carefully to ensure correct and safe handling.
6
Explosive gas
Hydrogen gas generated by battery fluid is explosive. Explosive gases can cause blindness or injury.
8-12
Do-it-yourself
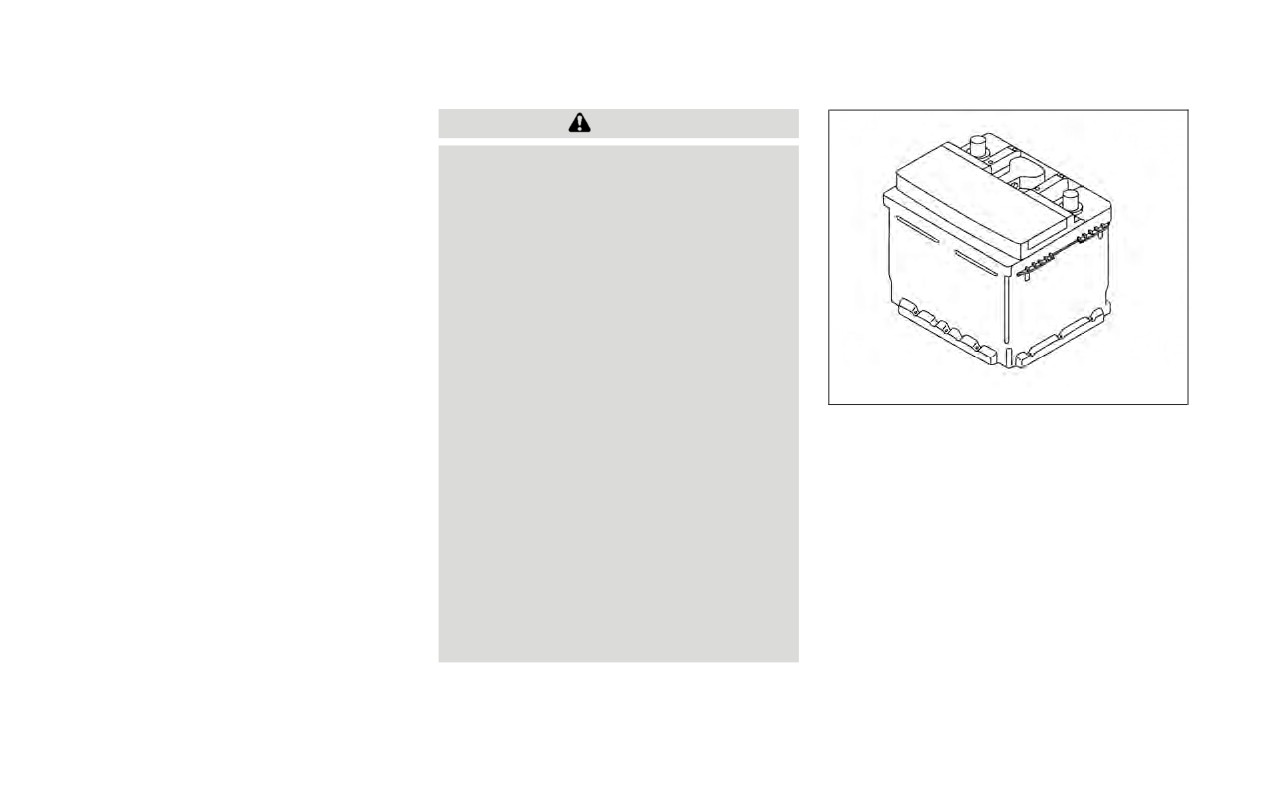
• If the battery is labeled “do not open” it is
WARNING
maintenance free and battery fluid
should not be checked. It is recom-
•
Do not expose the battery to flames,
mended that you visit a NISSAN dealer or
an electrical spark or a cigarette. Hy-
a qualified specialist workshop to con-
drogen gas generated by the battery
firm the battery’s performance.
is explosive. Explosive gases can
• Keep the battery surface clean and dry.
cause blindness or injury. Do not al-
Clean the battery with a solution of bak-
low battery fluid to contact your skin,
ing soda and water.
eyes, fabrics or painted surfaces. Sul-
furic acid can cause blindness or in-
• Make certain the terminal connections
jury. After touching a battery or bat-
are clean and securely tightened.
tery cap, do not touch or rub your
• If the vehicle is not to be used for 30 days
eyes. Thoroughly wash your hands. If
or longer, disconnect the negative (-) bat-
the acid contacts your eyes, skin or
tery terminal cable to prevent discharge.
clothing, immediately flush with wa-
LDI3302
NOTE:
ter for at least 15 minutes and seek
NOTE:
medical attention.
Care should be taken to avoid situations
•
When working on or near a battery,
Do not try to open the top of the battery.
that can lead to potential battery dis-
always wear suitable eye protection
charge and potential no-start conditions
This battery is not equipped with remov-
and remove all jewelry.
able vent caps.
such as:
•
Battery posts, terminals and related
1. Installation or extended use of elec-
JUMP STARTING
accessories contain lead and lead
tronic accessories that consume bat-
compounds. Wash hands after
If jump starting is necessary, see “Jump
tery power when the engine is not
handling.
starting” (P. 6-8). If the engine does not start
running (Phone chargers, GPS, DVD
•
Keep battery out of the reach of
by jump starting, the battery may have to
players, etc.)
children.
be replaced. It is recommended that you
2. Vehicle is not driven regularly and/or
•
Do not tip the battery.
visit a NISSAN dealer for this service.
only driven short distances.
In these cases, the battery may need to
be charged to maintain battery health.
Do-it-yourself
8-13

VARIABLE VOLTAGE CONTROL
DRIVE BELT
SYSTEM
Your vehicle is equipped with a variable
voltage control system. This system mea-
sures the amount of electrical discharge
from the battery and controls voltage gen-
erated by the generator.
A is located near the
battery along the negative battery cable. If
you add electrical accessories to your ve-
hicle, be sure to ground them to a suitable
body ground such as the frame or engine
block area.
LDI3246
LDI3028
1.
Automatic tensioner pulley
CAUTION
2.
Generator pulley
3.
Water pump pulley
• Do not ground accessories directly to
4.
Air conditioner compressor pulley
the battery terminal. Doing so will
5.
Crankshaft pulley
bypass the variable voltage control
system and the vehicle battery may
WARNING
not charge completely.
Be sure the ignition switch is placed in
• Use electrical accessories with the
the OFF or LOCK position before servic-
engine running to avoid discharging
ing drive belt. The engine could rotate
the vehicle battery.
unexpectedly.
8-14
Do-it-yourself

SPARK PLUGS
1.
Visually inspect the belt for signs of un-
WARNING
usual wear, cuts, or fraying. If the belt is in
poor condition, have it replaced or ad-
Be sure the engine and ignition switch
justed. It is recommended that you visit a
are off and that the parking brake is
NISSAN dealer for this service.
engaged securely.
2.
Have the
belt
checked
regularly
for
condition.
CAUTION
Be sure to use the correct socket to re-
move the spark plugs. An incorrect
socket can damage the spark plugs.
If replacement is required, it is recom-
mended that you visit a NISSAN dealer for
SDI1895
this service.
REPLACING SPARK PLUGS
Iridium-tipped spark plugs
It is not necessary to replace
iridium-
A spark plugs as frequently as con-
ventional type spark plugs because they
last much longer. Follow the maintenance
log shown in the “Maintenance and sched-
ules” section of this manual. Do not service
iridium-tipped spark plugs by cleaning or
regapping.
• Always replace spark plugs with rec-
ommended or equivalent ones.
Do-it-yourself
8-15

AIR CLEANER
WINDSHIELD WIPER BLADES
To remove the filter from the air cleaner,
CLEANING
A and pull the
If your windshield is not clear after using
cover upward.
the windshield-washer or if a wiper blade
The viscous paper type filter element
chatters when running, wax or other mate-
should not be cleaned and reused. Replace
rial may be on the blade or windshield.
the air filter according to the maintenance
Clean the outside of the windshield with a
log shown in the “Maintenance and sched-
washer fluid or a mild detergent. Your wind-
ules” section of this manual.
shield is clean if beads do not form when
When replacing the air filter, wipe the inside
rinsing with clear water.
of the air cleaner housing and the cover
Clean each blade by wiping it with a cloth
with a damp cloth.
soaked in a washer fluid or a mild deter-
NOTE:
gent. Then rinse the blades with clear wa-
After installing a new air cleaner filter,
ter. If your windshield is still not clear after
LDI3439
cleaning the blades and using the wiper,
make sure the air cleaner cover is
seated in the housing and latch the
install new windshield wiper blades.
WARNING
A .
•
Operating
the engine with
the air
CAUTION
cleaner filter off can cause you or oth-
IN-CABIN MICROFILTER
Worn windshield wiper blades can
ers to be burned. The air cleaner filter
The in-cabin microfilter restricts the entry
damage the windshield and impair
not only cleans the intake air, it also
of airborne dust and pollen particles and
stops the flame if the engine backfires.
driver vision.
reduces some objectionable outside
If the air cleaner is not installed and the
odors. The filter is located behind the glove
engine backfires, you could be burned.
box. For additional information, refer to the
Never drive with the air cleaner filter off.
"Maintenance and schedules" section of
Be cautious working on the engine
this manual for change intervals.
when the air cleaner is off.
•
Never pour fuel into the throttle body
If replacement is required, it is recom-
or attempt to start the engine with
mended that you visit a NISSAN dealer for
the air cleaner removed. Doing so
this service.
could result in serious injury.
8-16
Do-it-yourself