Nissan Frontier D40. Manual - part 600


  Index      Nissan     Nissan Frontier D40 (2010 year) - Service and Repair Manual


Search            


Content   ..  598  599  600  601   ..


Nissan Frontier D40. Manual - part 600


EM-132

< ON-VEHICLE MAINTENANCE >

[VQ40DE]

CAMSHAFT VALVE CLEARANCE

CAMSHAFT VALVE CLEARANCE

Valve Clearance

INFOID:0000000005274323

INSPECTION

NOTE:
Perform the following inspection after removal, installation or replacement of camshaft or valve-related parts,
or if there are unusual engine conditions due to changes in valve clearance over time (starting, idling, and/or
noise).
1.

Remove the engine room cover. Refer to 

EM-138, "Removal and Installation"

.

2.

Remove the air cleaner and air duct assembly. Refer to 

EM-139, "Exploded View"

.

3.

Remove rocker covers (RH and LH banks). Refer to 

EM-155, "Removal and Installation"

.

4.

Measure the valve clearance as follows:

a.

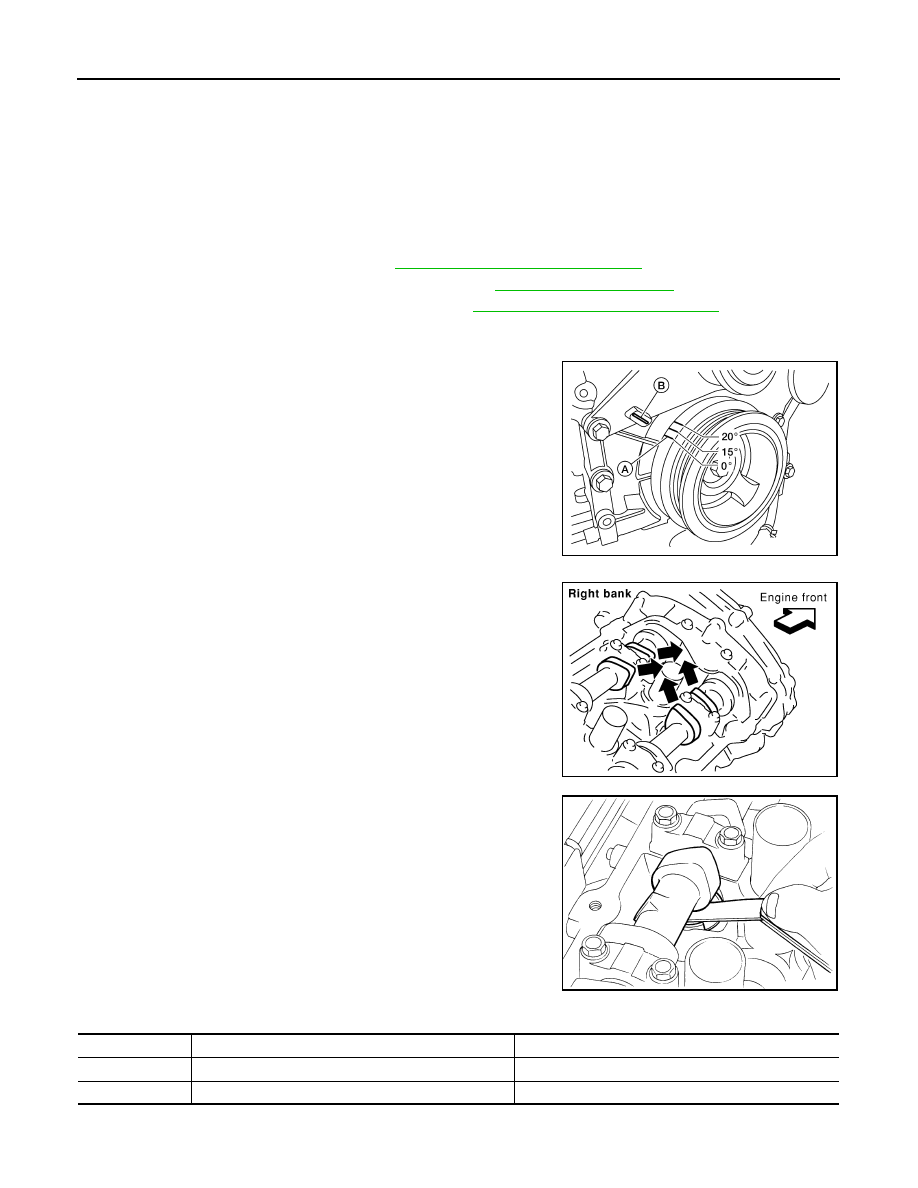
Set No. 1 cylinder at TDC of its compression stroke.
• Rotate crankshaft pulley clockwise to align timing mark (A)

(grooved line without color) with timing indicator (B).

• Make sure that intake and exhaust cam noses on No. 1 cylin-

der (engine front side of RH bank) are located as shown.

• If not, rotate crankshaft one revolution (360

°

) and align as

shown.

b.

Use feeler gauge, measure the clearance between valve lifter
and camshaft.

Valve clearance:

Unit: mm (in)

*: Approximately 80

°

C (176

°

F)

AWBIA0719ZZ

SEM418G

SEM139D

Cold

Hot * (reference data)

Intake

0.26 - 0.34 (0.010 - 0.013)

0.304 - 0.416 (0.012 - 0.016)

Exhaust

0.29 - 0.37 (0.011 - 0.015)

0.308 - 0.432 (0.012 - 0.017)

CAMSHAFT VALVE CLEARANCE

EM-133

< ON-VEHICLE MAINTENANCE >

[VQ40DE]

C

D

E

F

G

H

I

J

K

L

M

A

EM

N

P

O

• Measure the valve clearances at locations marked “

×

” as

shown in the table below (locations indicated in the illustration)
with feeler gauge.

• No. 1 cylinder at compression TDC

c.

Rotate crankshaft by 240

°

 clockwise (when viewed from engine

front) to align No. 3 cylinder at TDC of its compression stroke.
NOTE:
Crankshaft pulley bolt flange has a stamped line every 60

°

. They

can be used as a guide to rotation angle.

• Measure the valve clearances at locations marked “

×

” as

shown in the table below (locations indicated in the illustration)
with feeler gauge.

• No. 3 cylinder at compression TDC

Measuring position (RH bank)

No. 1 CYL.

No. 3 CYL.

No. 5 CYL.

No. 1 cylinder at 

compression TDC

EXH

×

INT

×

Measuring position (LH bank)

No. 2 CYL.

No. 4 CYL.

No. 6 CYL.

No. 1 cylinder at 

compression TDC

INT

×


EXH

×


PBIC2054E

PBIC2916E

Measuring position (RH bank)

No. 1 CYL.

No. 3 CYL.

No. 5 CYL.

No. 3 cylinder at 

compression TDC

EXH

×

INT

×

Measuring position (LH bank)

No. 2 CYL.

No. 4 CYL.

No. 6 CYL.

No. 3 cylinder at 

compression TDC

INT

×


EXH


×

PBIC2055E

EM-134

< ON-VEHICLE MAINTENANCE >

[VQ40DE]

CAMSHAFT VALVE CLEARANCE

d.

Rotate crankshaft by 240

°

 clockwise (when viewed from engine

front) to align No. 5 cylinder at TDC of compression stroke. 

• Measure the valve clearances at locations marked “

×

” as

shown in the table below (locations indicated in the illustration)
with feeler gauge.

• No. 5 cylinder at compression TDC

5.

For the measured value out of the standard, perform adjustment. 

ADJUSTMENT

• Perform adjustment depending on selected head thickness of valve lifter.
1.

Measure the valve clearance. 

2.

Remove camshaft. Refer to 

EM-187, "Removal and Installation"

.

3.

Remove valve lifters at the locations that are out of the standard.

4.

Measure the center thickness of removed valve lifters with
micrometer.

5.

Use the equation below to calculate valve lifter thickness for replacement.

PBIC2916E

Measuring position (RH bank)

No. 1 CYL.

No. 3 CYL.

No. 5 CYL.

No. 5 cylinder at 

compression TDC

EXH

×

INT

×

Measuring position (LH bank)

No. 2 CYL.

No. 4 CYL.

No. 6 CYL.

No. 5 cylinder at 

compression TDC

INT

×


EXH


×

PBIC2056E

KBIA0057E

CAMSHAFT VALVE CLEARANCE

EM-135

< ON-VEHICLE MAINTENANCE >

[VQ40DE]

C

D

E

F

G

H

I

J

K

L

M

A

EM

N

P

O

• Thickness of new valve lifter can be identified by stamp marks

on the reverse side (inside the cylinder).

Intake

Available thickness of valve lifter: 27 sizes with range 7.88 to 8.40 mm (0.3102 to 0.3307 in) in steps of
0.02 mm (0.0008 in) (when manufactured at factory). Refer to 

EM-242, "Standard and Limit"

.

Exhaust

Available thickness of valve lifter: 25 sizes with range 7.88 to 8.36 mm (0.3102 to 0.3291 in) in steps of
0.02 mm (0.0008 in) (when manufactured at factory). Refer to 

EM-242, "Standard and Limit"

.

CAUTION:

Install identification letter at the end and top, “U” and “N”, at each of proper positions. (Be care-
ful of mis-installation between intake and exhaust.)

6.

Install selected valve lifter.

7.

Install camshaft. Refer to 

EM-187, "Removal and Installation"

.

8.

Manually turn crankshaft pulley a few turns. 

9.

Make sure that the valve clearances for cold engine are within the specifications by referring to the speci-
fied values.

10. Installation of the remaining components is in the reverse order of removal.

11. Start the engine, and check for unusual noise and vibration.

Valve lifter thickness calculation:

t = t

1

+ (C

1

– C

2

)

t

= Valve lifter thickness to be replaced

t

1

= Removed valve lifter thickness

C

1

= Measured valve clearance

C

2

= Standard valve clearance:

Intake

: 0.30 mm (0.012 in)*

Exhaust

: 0.33 mm (0.013 in)*

*: Approximately 20

°

C (68

°

F)

KBIA0119E

Stamp mark

Thickness

788U

7.88 mm (0.3102 in)

790U

7.90 mm (0.3110 in)

·

·

·

·

840U

8.40 mm (0.3307 in)

Stamp mark

Thickness

N788

7.88 mm (0.3102 in)

N790

7.90 mm (0.3110 in)

·

·

·

·

N836

8.36 mm (0.3291 in)


Content   ..  598  599  600  601   ..