Nissan Terrano model r20 series 2004. Manual - part 284


  Index      Nissan     Nissan Terrano model r20 series 2004 - Service and Repair Manual


Search            


Content   ..  282  283  284  285   ..


Nissan Terrano model r20 series 2004. Manual - part 284


Removal and Installation

Removal

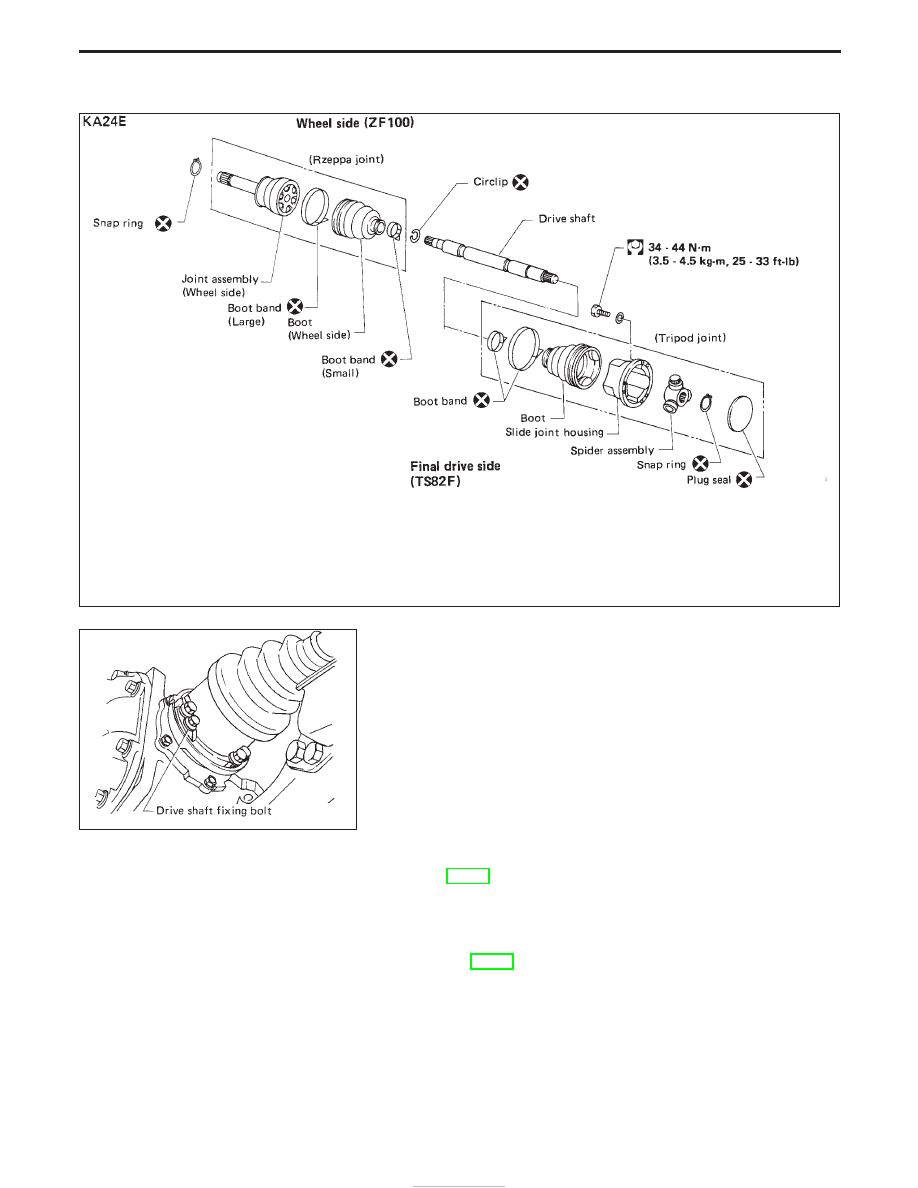
1. Remove bolts fixing drive shaft to final drive.

2. Remove

free-running

hub

assembly

with

brake

pedal

depressed. Refer to “FRONT AXLE — Auto-lock Free-running
Hub”, FA-14.

I

Remove brake caliper assembly without disconnecting brake
hydraulic line.

Make sure that brake hose is not twisted.

I

Remove tie-rod ball joint. Refer to “FRONT AXLE — Knuckle
Spindle”, FA-20.

SFA874

SFA236

FRONT AXLE — Drive Shaft

FA-22

3. Remove nuts fixing lower ball joint on lower link.
Support lower link with jack.

4. Remove upper ball joint fixing bolt.

5. Remove shock absorber lower bolt.

6. Remove drive shaft with knuckle.
Cover drive shaft boot with a suitable protector.

7. Separate drive shaft from knuckle by slightly tapping it.

SFA843

SFA842

SFA864

SFA878

SFA879

FRONT AXLE — Drive Shaft

Removal (Cont’d)

FA-23

Disassembly

FINAL DRIVE SIDE

— TS82F type —

1. Remove plug seal from slide joint housing by lightly tapping

around slide joint housing.

2. Remove boot bands.

3. Move boot and slide joint housing toward wheel side, and put

matching marks.

4. Pry off snap ring.

5. Detach spider assembly with press.

SFA880

SFA881

SFA963

SFA964

SFA392

FRONT AXLE — Drive Shaft

FA-24

6. Draw out boot.
Cover drive shaft serration with tape so as not to damage the
boot.

WHEEL SIDE (ZF100)

CAUTION:

This type of joint on the wheel side cannot be disassembled.

I

Before separating joint assembly, put matching marks on drive
shaft and joint assembly.

I

Separate joint assembly with suitable tool.

Be careful not to damage threads on drive shaft.

I

Remove boot bands.

Inspection

Thoroughly clean all parts, in cleaning solvent, and dry with com-
pressed air. Check parts for evidence of deformation or other dam-
age.

DRIVE SHAFT

Replace drive shaft if it is twisted or cracked.

BOOT

Check boot for fatigue, cracks, or wear. Replace boot with new boot
bands.

JOINT ASSEMBLY (TS82F) (FINAL DRIVE SIDE)

I

Replace any parts of double offset joint which show signs of
scorching, rust, wear or excessive play.

I

Check serration for deformation. Replace if necessary.

I

Check slide joint housing for any damage. Replace if neces-
sary.

JOINT ASSEMBLY (ZF100) (WHEEL SIDE)

Replace joint assembly if it is deformed or damaged.

Assembly

I

After drive shaft has been assembled, ensure that it moves
smoothly over its entire range without binding.

I

Use NISSAN GENUINE GREASE or equivalent after every
overhaul.

SFA799

SFA455

FRONT AXLE — Drive Shaft

Disassembly (Cont’d)

FA-25


Content   ..  282  283  284  285   ..