Nissan Terrano model r20 series 2004. Manual - part 18


  Index      Nissan     Nissan Terrano model r20 series 2004 - Service and Repair Manual


Search            


Content   ..  16  17  18  19   ..


Nissan Terrano model r20 series 2004. Manual - part 18


Checking Tightening Torque

Checking should be performed while engine is cold.

MANIFOLD BOLTS AND NUTS

Intake and exhaust manifolds:

Intake

: 25 - 28 N

m (2.5 - 2.9 kg-m, 18 - 20 ft-lb)

Exhaust

: 40 - 44 N

m (4.0 - 4.5 kg-m, 29 - 32 ft-lb)

Adjusting Intake and Exhaust Valve Clearance

Refer to EM section.
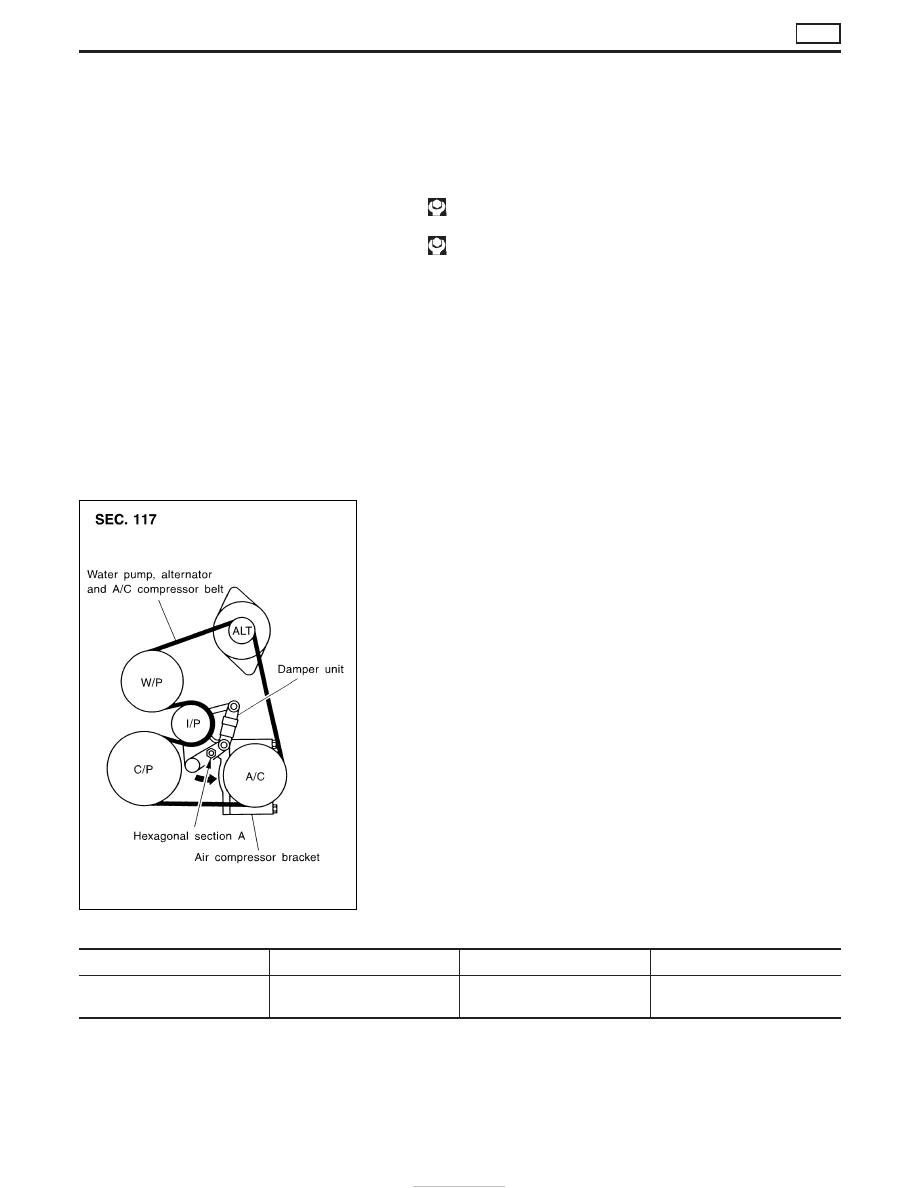
Checking Drive Belt

I

Because an auto tensioner adjustment mechanism is
provided, it is not necessary to check or adjust the tension
of accessory belt.

1. Inspect for cracks, fraying, wear or oil adhesion. Replace if

necessary.

The belts should not touch the bottom of the pulley groove.
2. Check the damper unit of the auto tensioner for oil leaks.

Part

Belt specifications

Tension

Belt deflection

Water pump, alternator, air con-
ditioner compressor belt

V-ribbed belt (7 ribs)

Automatic adjustment by auto

tensioner

Automatic adjustment by auto

tensioner

JMA088D

ENGINE MAINTENANCE

ZD

MA-28

Removal

WATER PUMP, ALTERNATOR AND AIR CONDITIONER
BELT

1. Remove radiator shroud.
2. Contract and hold the auto tensioner using the following proce-

dure.

a. Securely hold the 19 mm (0.75 in) hexagonal portion A of auto

tensioner with a closed wrench.

I

Preferably use a tool with a handhold of 500 mm (19.69 in) or
more in length.

I

No bolts or nuts are required to be loosened during the opera-
tion.

b. Turn the hexagonal portion A in the direction shown by the

arrow to contract the damper unit of the auto tensioner.

CAUTION:

I

Because the tensioner has a high tension, it shall be
securely held and turned with a closed wrench.

I

Because the hexagonal portion A of the tensioner is made
of aluminum and may be damaged by sudden input, turn
it slowly according to the contraction of the damper unit.

3. Remove the belt from the alternator pulley first, and then

remove it from the other pulleys.

I

If the tensioner is not held firmly, your finger may get caught
between the belt and the pulleys. Confirm the holding of the
tensioner, and then hold the belt side in the place away from
the pulleys to attach or remove the belt, paying attention to
prevent your finger from being caught.

CAUTION:

I

When handling the belt, pay attention to prevent the oil or
coolant from adhering to the belt.

I

Do not distort or bend the belt intensively.

Installation

I

Install the belt in the reverse order of removal.

I

After installation of the belt, confirm that the belt engages the
pulleys securely.

I

Depending on the engagement between the belt and the idler
pulley, noise (belt noise) may be heard when the engine is
started just after installation. This noise will stop with time.

Changing Engine Oil

WARNING:

I

Be careful not to burn yourself, as engine oil is hot.

I

Prolonged and repeated contact with used engine oil may
cause skin cancer; try to avoid direct skin contact with
used oil. If skin contact is made, wash thoroughly with
soap or hand cleaner as soon as possible.

1. Warm up engine, and check for oil leakage from engine com-

ponents.

2. Remove drain plug and oil filler cap.

SMA101D

ENGINE MAINTENANCE

ZD

MA-29

3. Drain oil and fill with new engine oil.

Oil grade:

API CF4 or ACEA B3-96.98 or ACEA B3/E3-96.98

Viscosity:

See “RECOMMENDED FLUIDS AND
LUBRICANTS”, MA-1009.

Refill oil capacity (approximate):

Without oil filter change

5.2


(4-5/8 Imp qt)

With oil filter change

5.7


(5 Imp qt)

CAUTION:

I

Be sure to clean and install oil pan drain plug with washer.

Drain plug:

: 54 - 58 N

m (5.5 - 6.0 kg-m, 40 - 43 ft-lb)

I

The refill capacity changes depending on the oil tempera-
ture and drain time; use these valves as a reference and be
certain to check with the dipstick when changing the oil.

4. Check oil level.
5. Start engine. Check area around drain plug and oil filter for any

sign of oil leakage.

6. Run engine for a few minutes, then turn it off. After 10 minutes

check oil level.

Changing Engine Oil Filter

REMOVAL

1. Insert a suitable tool with a 12.7 mm square (1/2 inch square)

such as an extension bar and ratchet handle into the filter body,
and loosen the body by approximately 4 turns.

WARNING:

Be careful not to burn yourself, as the engine and engine oil
are hot.

SMA102D

JMA103D

JMA104D

ENGINE MAINTENANCE

ZD

Changing Engine Oil (Cont’d)

MA-30

2. Set the

G

mark of the filter body to the top position and dis-

charge the oil.

I

Receive the oil discharged from the drain hose in a tray.

I

About 500 cc (17.6 Imp fl oz) of oil will be discharged in about
3 minutes.

I

The oil is discharged from the oil catcher to under the vehicle
through the drain hose.

3. Remove the filter body, and then remove the oil filter element.

CAUTION:

I

If the engine oil gets on the engine or vehicle, thoroughly
wipe it off.

I

Thoroughly wipe off the oil remaining in the oil catcher.
(This is to prevent misidentifying oil leaking from the oil
catcher as oil leaking from the engine.)

4. Remove the O-ring from the filter body.

I

Press the O-ring in any direction with your finger, and pull on
the portion of the O-ring separated from the filter body to
remove it.

CAUTION:

Because wire and screwdrivers may cause damage to the fil-
ter body, do not use such tools.

INSTALLATION

1. Thoroughly remove foreign matter adhering to the inside of fil-

ter body and O-ring mounting areas (of the body and oil cooler).

2. Install the oil filter element and O-ring to the filter body.

I

Securely press the oil filter element into the filter body.

3. Install the filter body.

: 20 - 24 N

m (2.0 - 2.5 kg-m, 15 - 18 ft-lb)

4. After warming up the engine, check that no engine oil leaks.

Changing Engine Coolant

WARNING:

To avoid the danger of being scalded, never change the cool-
ant when the engine is hot.
—DRAINING ENGINE COOLANT—
1. Move heater TEMP control knob all the way to HOT.
2. Remove undercover and disconnect lower radiator hose to

drain coolant.

3. Remove radiator filler cap.

JMA105D

JMA106D

YMA015

ENGINE MAINTENANCE

ZD

Changing Engine Oil Filter (Cont’d)

MA-31


Content   ..  16  17  18  19   ..