Nissan Terrano model r20 series 2004. Manual - part 16


  Index      Nissan     Nissan Terrano model r20 series 2004 - Service and Repair Manual


Search            


Content   ..  14  15  16  17   ..


Nissan Terrano model r20 series 2004. Manual - part 16


Retightening Manifold Bolts and Nuts

MANIFOLD BOLTS AND NUTS

Intake:

: 17 - 23 N

m (1.7 - 2.3 kg-m, 12 - 17 ft-lb)

Exhaust:

: 31 - 38 N

m (3.2 - 3.9 kg-m, 22 - 28 ft-lb)

Retightening should be performed while engine is cold
[approximately 20°C (68°F)].

Adjusting Intake and Exhaust Valve Clearance

Adjustment should be made while engine is warm but not
running.
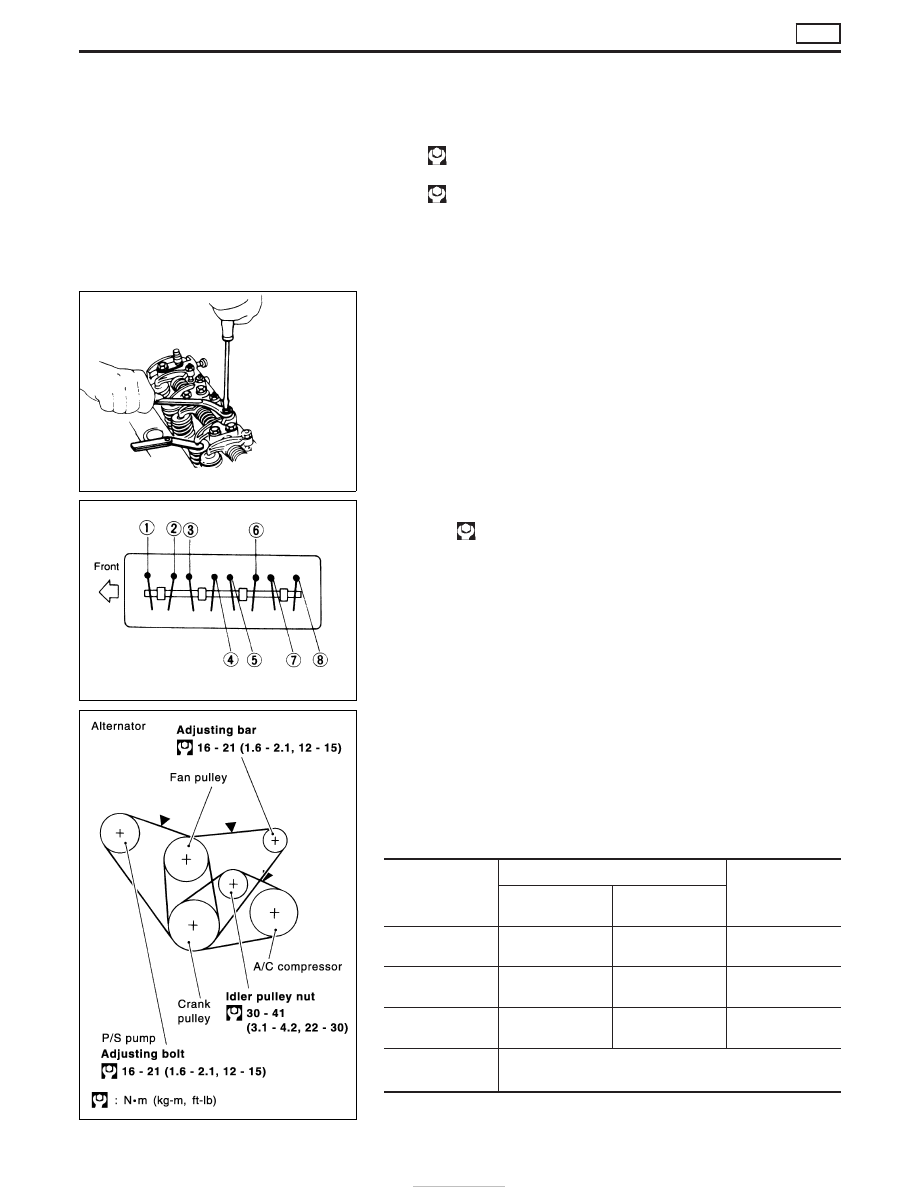
1. Set No. 1 cylinder in top dead center on its compression stroke,

and adjust valve clearance

q

1

,

q

2

,

q

3

and

q

6

.

2. Set No. 4 cylinder in top dead center on its compression stroke,

and adjust valve clearance

q

4

,

q

5

,

q

7

and

q

8

.

Valve clearance:

Intake

q

1

,

q

3

,

q

5

and

q

7

0.25 mm (0.0098 in)

Exhaust

q

2

,

q

4

,

q

6

and

q

8

0.25 mm (0.0098 in)

Adjusting screw lock nuts:

: 15 - 20 N

m (1.5 - 2.0 kg-m, 11 - 14 ft-lb)

Drive Belt Inspection

1. Inspect for cracks, fraying, wear or oil adhesion. Replace if

necessary.

The belts should not touch the bottom of the pulley groove.
2. Check drive belt deflection by pushing on the belt midway

between pulleys. (

H

)

3. Adjust if belt deflections exceed the limit.

Unit: mm (in)

Drive belts

Used belt deflection

Deflection of new

belt

Limit

Deflection after

adjustment

Alternator

20 (0.79)

11 - 13

(0.43 - 0.51)

9 - 11

(0.35 - 0.43)

Air conditioner
compressor

12 (0.47)

6 - 7.5

(0.236 - 0.295)

5 - 6.5

(0.197 - 0.256)

Power steering oil
pump

15 (0.59)

8 - 9.5

(0.315 - 0.374)

7 - 8.5

(0.276 - 0.335)

Applied pushing
force

98 N (10 kg, 22 lb)

Check drive belt deflections when engine is cold.
If engine is hot, check deflections after 30 minutes or more.

SMA795

SMA785B

YMA007

ENGINE MAINTENANCE

TD

MA-20

Changing Engine Oil

WARNING:

I

Be careful not to burn yourself, as the engine oil is hot.

I

Prolonged and repeated contact with used engine oil may
cause skin cancer; try to avoid direct skin contact with
used oil. If skin contact is made, wash thoroughly with
soap or hand cleaner as soon as possible.

1. Warm up engine, and check for oil leakage from engine com-

ponents.

2. Stop engine.
3. Remove dipstick, oil filler cap and drain plug.
4. Drain oil.
5. Install drain plug.

CAUTION:

I

Be sure to clean drain plug and install with new washer.

Drain plug:

: 29 - 39 N

m(3.0 - 4.0 kg-m, 21 - 29 ft-lb)

6. Fill slowly with new oil whilst not exceeding the maximum level.

Oil specification and viscosity:

I

See “RECOMMENDED FLUIDS AND LUBRICANTS” (MA-
17).

Oil capacity (Approximately):

Unit:


(Imp qt)

Drain and refill

With oil filter change

6.2 (5-1/2)

Without oil filter change

5.5 (4-7/8)

CAUTION:

I

The refill capacity depends on the oil temperature and
drain time. Use these specifications for reference only.
Always use the dipstick to determine when the proper
amount of oil is in the engine.

7. Install dipstick and filler cap.
8. Start engine. Check area around drain plug and oil filter for any

sign of oil leakage.

9. Run engine for a few minutes, then turn it off. After several

minutes check oil level again.

10. If necessary, add oil whilst not exceeding the maximum level.

Changing Oil Filter

1. Remove oil filter with a suitable wrench.

WARNING:

Be careful not to burn yourself as engine and oil is hot.

SMA787B

NMA054

NMA068

ENGINE MAINTENANCE

TD

MA-21

2. Before installing new oil filter, clan the oil filter mounting surface

on cylinder block and coat the rubber seal of the oil filter with
a little engine oil.

3. Install oil filter.

When installing oil filter, screw it in until a slight resistance is
felt, then tighten an additional 2/3 turn or more.

4. Add engine oil.
Refer to Changing Engine Oil.

Changing Engine Coolant

WARNING:

To avoid the danger of being scalded, never attempt to change
the coolant when the engine is hot.
1. Set heater “TEMP” control lever all the way to “HOT” position.
2. Remove radiator cap and engine under cover.
3. Disconnect lower radiator hose to drain coolant.

Remove reservoir tank, drain coolant, then clean reservoir tank.
Re-install tank temporarily.

4. Remove cylinder block drain plug located at left rear of cylin-

der block.

5. Drain coolant and then tighten drain plug securely.

I

Apply sealant to the thread of drain

: 30 - 40 N

m (3.1 - 4.1 kg-m, 22.1 - 29.5 ft-lb)

6. Connect lower radiator hose.
7. Fill radiator and reservoir tank with water. Re-install radiator

cap and warm up engine.

8. Stop engine and wait until cools down.
9. Drain water.
10. Repeat step 2 through step 9 two or three times, until clear

water begins to drain from radiator.

11. Fill radiator with coolant up to the specified level.

Follow instructions attached to anti-freeze container for mixing
ratio of anti-freeze to water.

Coolant capacity (with reservoir tank):

10.0


(8-3/4 Imp qt)

Slowly pour coolant through coolant filler neck to allow air in
system to escape.

SMA010

SMA860B

SMA401B

SMA164C

SMA182B

ENGINE MAINTENANCE

TD

Changing Oil Filter (Cont’d)

MA-22

12. Fill reservoir tank up to “MAX” level, and re-install radiator cap.
13. Run the engine at approximately 2,000 rpm for about one

minute.

14. Stop engine and cool it down, then refill the radiator and the

reservoir tank up to the specified level.

Checking Cooling System

CHECKING HOSES

Check hoses for proper attachment, leaks, cracks, damage, loose
connections, chafing and deterioration.

CHECKING RADIATOR CAP

Apply pressure to radiator cap by means of a cap tester to see if it
is satisfactory.

Radiator cap relief pressure:

78 - 98 kPa
(0.78 - 0.98 bar, 0.8 - 1.0 kg/cm

2

, 11 - 14 psi)

CHECKING COOLING SYSTEM FOR LEAKS

Apply pressure to the cooling system by means of a tester to check
for leakage.

Testing pressure:

157 kPa (1.57 bar, 1.6 kg/cm

2

, 23 psi)

CAUTION:

Higher than the specified pressure may cause radiator dam-
age.

Checking and Replacing fuel filter and Draining
Water

Be careful not to spill fuel in engine compartment. Place a rag
to absorb fuel.

REPLACING FUEL FILTER

1. Remove fuel filter sensor and drain fuel.

YMA008

SLC613

SMA990A

NMA009

ENGINE MAINTENANCE

TD

Changing Engine Coolant (Cont’d)

MA-23


Content   ..  14  15  16  17   ..