Nissan Titan. Manual - part 129


  Index      Nissan     Nissan Titan (2014 year) - Service and Repair Manual


Search            


Content   ..  127  128  129  130   ..


Nissan Titan. Manual - part 129


DLN-88

< PREPARATION >

[TRANSFER: TX15B]

PREPARATION

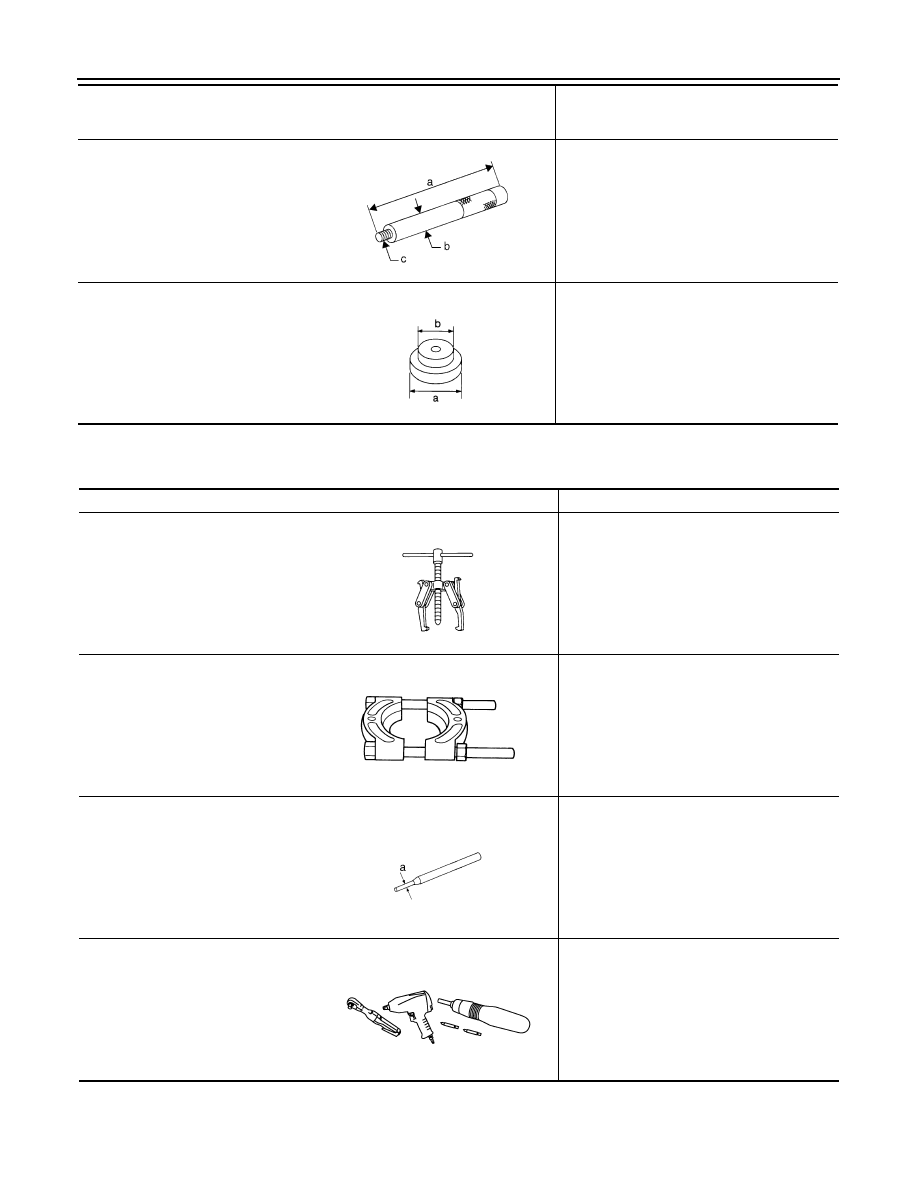
Commercial Service Tool

INFOID:0000000009886030

ST35325000
(

)

Drift bar

• Removing metal bushing
a: 215 mm (8.46 in)
b: 25 mm (0.98 in) dia.
c: M12 

× 1.5P

ST35300000
(

)

Drift

• Removing carrier bearing
• Installing metal bushing
• Removing front bearing
a: 59 mm (2.32 in) dia.
b: 45 mm (1.77 in) dia.

Tool number
(Kent-Moore No.)
Tool name

Description

NT663

NT073

Tool name

Description

Puller

• Removing companion flange
• Removing mainshaft rear bearing

Puller

• Removing mainshaft rear bearing

Pin punch

• Removing retaining pin
a: 6 mm (0.24 in) dia.

Power tool

• Loosening nuts, screws and bolts

NT077

ZZB0823D

NT410

PIIB1407E

TRANSFER FLUID

DLN-89

< PERIODIC MAINTENANCE >

[TRANSFER: TX15B]

C

E

F

G

H

I

J

K

L

M

A

B

DLN

N

O

P

PERIODIC MAINTENANCE

TRANSFER FLUID

Replacement

INFOID:0000000009886031

CAUTION:

If using the vehicle for towing, the transfer fluid must be replaced as specified. Refer to 

MA-9, "FOR

NORTH AMERICA : Introduction of Periodic Maintenance"

 (United States and Canada), 

MA-12, "FOR

MEXICO : Introduction of Periodic Maintenance"

 (Mexico).

DRAINING

1. Stop engine.
2. Remove the drain plug and gasket and drain the fluid.
3. Install the drain plug with a new gasket to the transfer. Tighten

drain plug to the specified torque. Refer to 

TM-217, "Compo-

nent"

.

CAUTION:

Do not reuse gasket.

FILLING

1. Remove the filler plug and gasket.
2. Fill the transfer with new fluid until the fluid level reaches the

specified limit near the filler plug hole.

CAUTION:

Carefully fill fluid. (Fill up for approx. 3 minutes.)

3. Leave the vehicle for 3 minutes, and check fluid level again.
4. Install the filler plug with a new gasket to the transfer. Tighten filler plug to the specified torque. Refer to

TM-217, "Component"

.

CAUTION:

Do not reuse gasket.

Inspection

INFOID:0000000009886032

CAUTION:

If using the vehicle for towing, the transfer fluid must be replaced as specified. Refer to 

MA-9, "FOR

NORTH AMERICA : Introduction of Periodic Maintenance"

 (United States and Canada) or 

MA-12, "FOR

MEXICO : Introduction of Periodic Maintenance"

 (Mexico).

FLUID LEAKAGE AND FLUID LEVEL

1. Make sure that fluid is not leaking from the transfer assembly or around it.

SDIA3286E

Fluid grade and capacity : Refer to 

MA-15, "FOR 

NORTH AMERICA : Fluids 
and Lubricants"

 (United 

States), 

MA-16, "FOR MEXI-

CO : Fluids and Lubricants"


(Mexico).

SDIA3287E

DLN-90

< PERIODIC MAINTENANCE >

[TRANSFER: TX15B]

TRANSFER FLUID

2. Check fluid level from the filler plug hole as shown.

CAUTION:

Do not start engine while checking fluid level.

3. Install the filler plug with a new gasket to the transfer. Tighten

filler plug to the specified torque. Refer to 

DLN-89, "Inspection"

.

CAUTION:

Do not reuse gasket.

SDIA3287E

TRANSFER CONTROL UNIT

DLN-91

< REMOVAL AND INSTALLATION >

[TRANSFER: TX15B]

C

E

F

G

H

I

J

K

L

M

A

B

DLN

N

O

P

REMOVAL AND INSTALLATION

TRANSFER CONTROL UNIT

Removal and Installation

INFOID:0000000009886033

REMOVAL

1. Switch 4WD shift switch to 2WD and set transfer assembly to 2WD.

CAUTION:

When removing transfer control unit, transfer state must be at 2WD.

2. Turn the ignition switch OFF and disconnect negative battery terminal.
3. Remove the lower instrument panel RH. Refer to 

IP-16, "Removal and Installation"

.

4. Disconnect the two transfer control unit harness connectors.
5. Remove the transfer control unit bolts (

).

6. Remove the transfer control unit.

INSTALLATION

Installation is in the reverse order of removal.

• When installing the transfer control unit, tighten bolts to the specified torque.

• After the installation, check 4WD shift indicator pattern. If NG, adjust position between transfer assembly and

transfer control unit. Refer to 

DLN-82, "Precaution for Transfer Assembly and Transfer Control Unit Replace-

ment"

.

BDIA0014E

Transfer control unit bolts : 5.1 N·m (0.52 kg-m, 45 in-lb)


Content   ..  127  128  129  130   ..