Nissan Titan A60. Manual - part 985
 

  Index      Nissan     Nissan Titan A60 (2011 year) - Service and Repair Manual


Search            


Content   ..  983  984  985  986   ..


Nissan Titan A60. Manual - part 985


WCS

POWER SUPPLY AND GROUND CIRCUIT

WCS-15

< DTC/CIRCUIT DIAGNOSIS >

C

D

E

F

G

H

I

J

K

L

M

B

A

O

P

YES

>> Inspection End.

NO

>> Check ground harness.

BCM (BODY CONTROL MODULE)
BCM (BODY CONTROL MODULE) : Diagnosis Procedure

INFOID:0000000006625909

Regarding Wiring Diagram information, refer to 

BCS-46, "Wiring Diagram"

.

1.

 CHECK FUSES AND FUSIBLE LINK

Check that the following fuses and fusible link are not blown.

Is the fuse blown?

YES

>> Replace the blown fuse or fusible link after repairing the affected circuit.

NO

>> GO TO 2

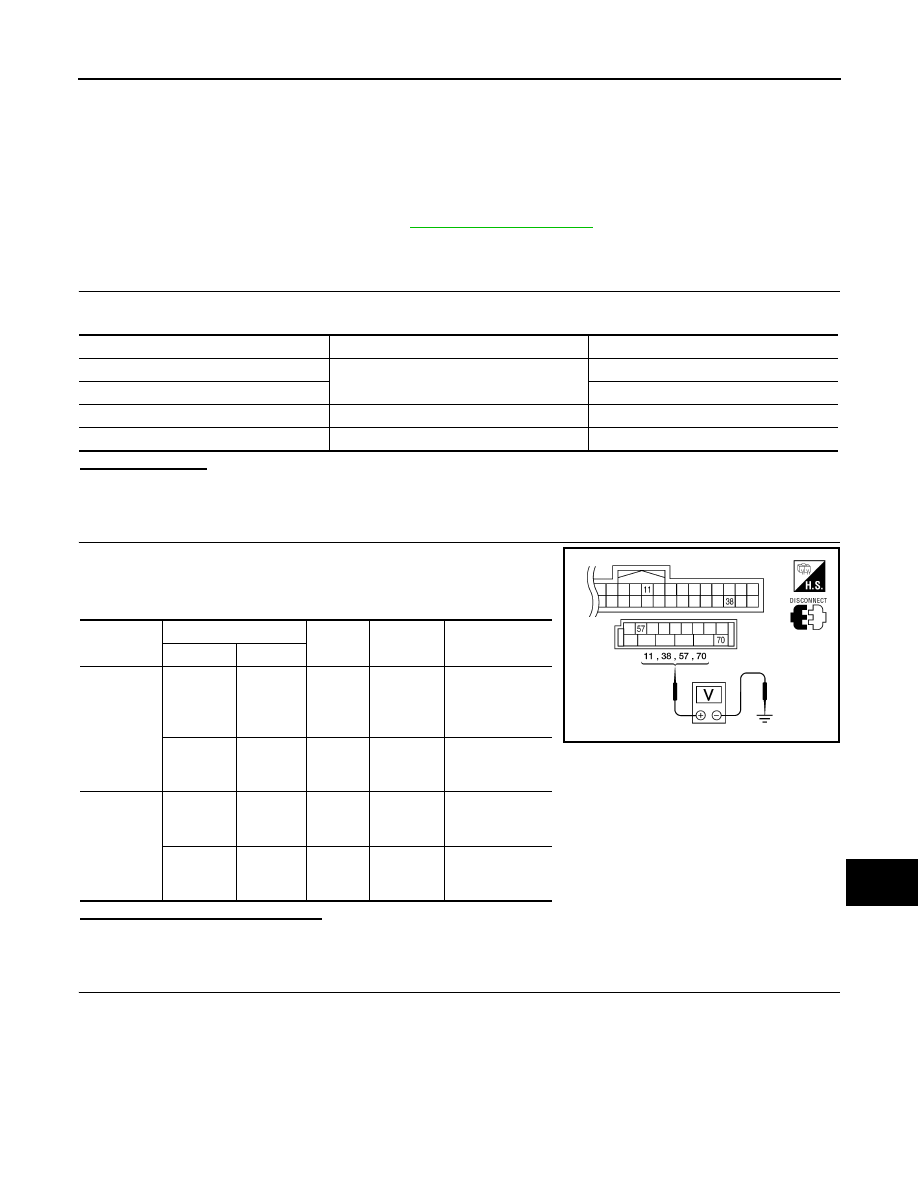
2.

 CHECK POWER SUPPLY CIRCUIT

1. Turn ignition switch OFF.

2. Disconnect BCM.

3. Check voltage between BCM harness connector and ground.

Is the measurement value normal?

YES

>> GO TO 3

NO

>> Repair or replace harness.

3.

 CHECK GROUND CIRCUIT

Terminal No.

Signal name

Fuses and fusible link No.

57

Battery power supply

22 (15A)

70

F (50A)

11

Ignition ACC or ON

4 (10A)

38

Ignition ON or START

59 (10A)

Connector

Terminals 

Power

source

Condition

Voltage (V) (Ap-

prox.)

(+)

(-)

M18

11

Ground

ACC 

power 

supply

Ignition 

switch 

ACC or 

ON

Battery voltage

38

Ground

Ignition 

power 

supply

Ignition 

switch ON 

or START

Battery voltage

M20

57

Ground

Battery 

power 

supply

Ignition 

switch 

OFF

Battery voltage

70

Ground

Battery 

power 

supply

Ignition 

switch 

OFF

Battery voltage

LIIA2415E

WCS-16

< DTC/CIRCUIT DIAGNOSIS >

POWER SUPPLY AND GROUND CIRCUIT

Check continuity between BCM harness connector and ground.

Does continuity exist?

YES

>> Inspection End.

NO

>> Repair or replace harness.

BCM

Ground

Continuity

Connector

Terminal

M20

67

Yes

LIIA0915E

WCS

METER BUZZER CIRCUIT

WCS-17

< DTC/CIRCUIT DIAGNOSIS >

C

D

E

F

G

H

I

J

K

L

M

B

A

O

P

METER BUZZER CIRCUIT

Description

INFOID:0000000006166404

• The buzzer for warning chime system is installed in the combination meter.

• The combination meter sounds the alarm buzzer based on the signals transmitted from various units.

Component Function Check

INFOID:0000000006166405

1.

CHECK OPERATION OF METER BUZZER

1. Select “BUZZER” of “BCM” on CONSULT-III.

2. Perform “LIGHT WARN ALM” of “ACTIVE TEST”.
Does meter buzzer activate?

YES

>> Inspection End.

NO

>> Replace combination meter. Refer to 

MWI-93, "Removal and Installation"

.

Diagnosis Procedure

INFOID:0000000006166406

Regarding Wiring Diagram information, refer to 

MWI-65, "Wiring Diagram"

.

1.

CHECK POWER SUPPLY OF COMBINATION METER

Check power supply of combination meter. Refer to 

MWI-33, "COMBINATION METER : Diagnosis Proce-

dure"

.

Is the inspection result normal?

YES

>> Inspection End.

NO

>> Repair power supply circuit of combination meter.

WCS-18

< DTC/CIRCUIT DIAGNOSIS >

SEAT BELT BUCKLE SWITCH SIGNAL CIRCUIT

SEAT BELT BUCKLE SWITCH SIGNAL CIRCUIT

Description

INFOID:0000000006166407

Transmits a seat belt buckle switch signal to the combination meter.

Component Function Check

INFOID:0000000006166408

1.

CHECK COMBINATION METER INPUT SIGNAL

Select “DATA MONITOR” for “METER/M&A” and check the “SEAT BELT W/L” monitor value.

Is the inspection result normal?

YES

>> Inspection End.

NO

>> Refer to 

WCS-18, "Diagnosis Procedure"

.

Diagnosis Procedure

INFOID:0000000006166409

Regarding Wiring Diagram information, refer to 

WCS-38, "Wiring Diagram"

.

1.

CHECK COMBINATION METER INPUT SIGNAL

1. Turn ignition switch ON.

2. Check voltage between combination meter harness connector M24 terminal 27 and ground.

Is the inspection result normal?

YES

>> Replace combination meter. Refer to 

MWI-93, "Removal and Installation"

.

NO

>> GO TO 2

2.

CHECK SEAT BELT BUCKLE SWITCH CIRCUIT

1. Turn ignition switch OFF.

2. Disconnect combination meter connector and seat belt buckle switch LH connector.

3. Check continuity between combination meter harness connector M24 terminal 27 and seat belt buckle

switch LH harness connector B12 terminal 1.

4. Check continuity between combination meter harness connector M24 terminal 27 and ground.

Is the inspection result normal?

YES

>> GO TO 3

NO

>> Repair harness or connector.

3.

CHECK SEAT BELT BUCKLE SWITCH GROUND CIRCUIT

Check continuity between seat belt buckle switch LH harness connector B12 terminal 2 and ground.

Is the inspection result normal?

SEAT BELT W/L
When seat belt is fastened

: OFF

When seat belt is unfastened : ON

27 - Ground
When driver seat belt is fastened

: Approx. 12V

When driver seat belt is unfastened : Approx. 0V

27 - 1

: Continuity should exist.

27 - Ground

: Continuity should not exist.

2 - Ground

: Continuity should exist.


Content   ..  983  984  985  986   ..