Nissan Titan A60. Manual - part 869


  Index      Nissan     Nissan Titan A60 (2011 year) - Service and Repair Manual


Search            


Content   ..  867  868  869  870   ..


Nissan Titan A60. Manual - part 869


DIAGNOSIS SENSOR UNIT

SR-15

< REMOVAL AND INSTALLATION >

C

D

E

F

G

I

J

K

L

M

A

B

SR

N

O

P

DIAGNOSIS SENSOR UNIT

Removal and Installation

INFOID:0000000006163323

REMOVAL

CAUTION:

• Before servicing the SRS, turn the ignition switch off, disconnect both battery terminals and wait at

least three minutes.

• Do not use old bolts; replace with new bolts.

• Check diagnosis sensor unit bracket to make sure it is free of deformities, dents, cracks or rust. If it

shows any visible signs of damage, replace with new one.

• Replace diagnosis sensor unit if it has been dropped or sustained an impact.

• Never use air tools or electric tools for servicing.

• When replacing the air bag diagnosis sensor unit, always check with the parts department for he lat-

est parts information. Installing an incorrect air bag diagnosis sensor unit may or may not cause the

air bag warning lamp to illuminate and may cause incorrect deployment of the supplemental air bags

and seat belt pre-tensioner in a collision resulting in serious personal injury or death.

1. Always check the air bag diagnosis sensor unit ECU discriminated number (identification number) using

CONSULT-III.

2. Disconnect the negative and positive battery terminals, then wait at least three minutes.
3. Disconnect the harness connectors for the following SRS components: 

SR-11, "Removal and Installation"

(Side curtain air bag module), 

SE-44, "Disassembly and Assembly"

 (Side air bag module), 

SB-4,

"Removal and Installation of Front Seat Belt"

 (Seat belt pre-tensioner).

4. Remove center console. Refer to 

IP-19, "Removal and Installation"

.

5. Disconnect diagnosis sensor unit harness connectors.
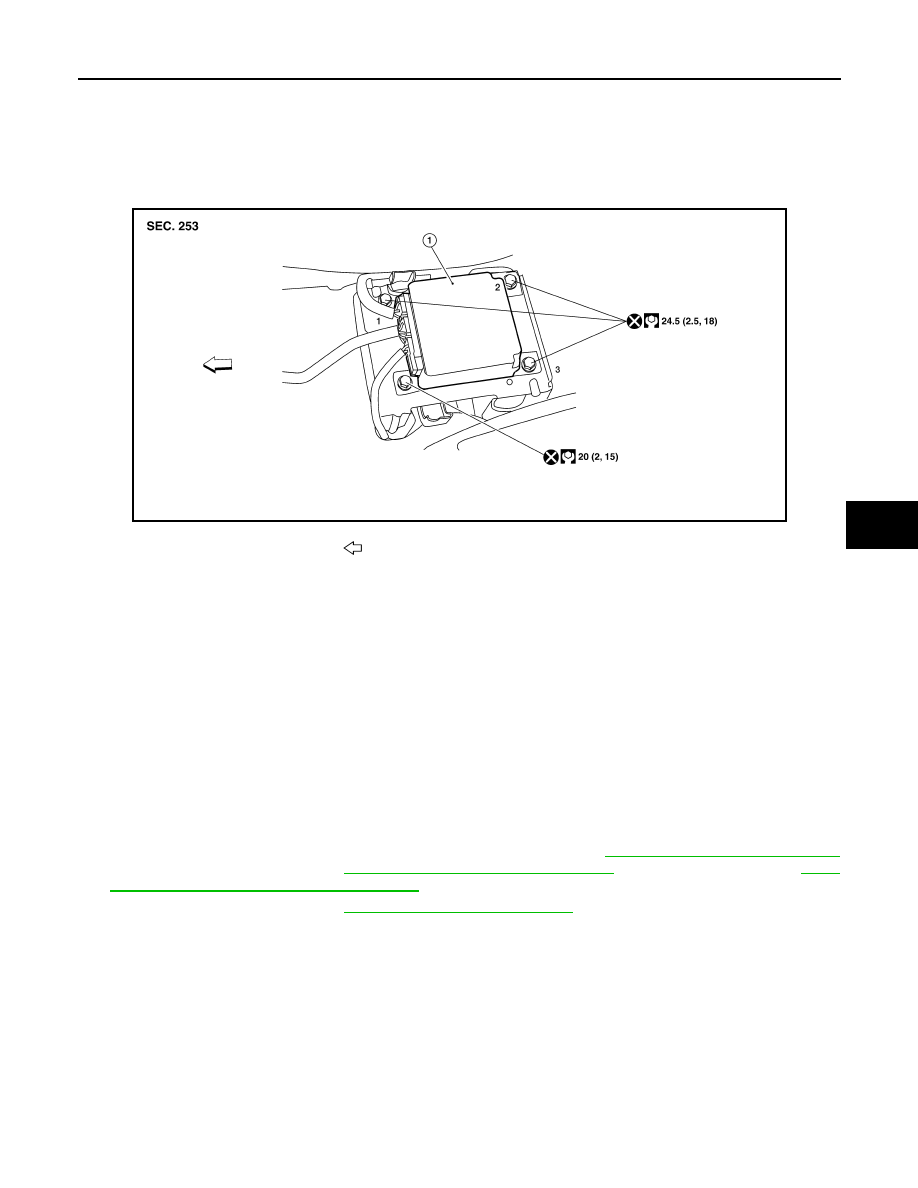
6. Remove bolts from the diagnosis sensor unit.

CAUTION:

• Do not use old bolts; replace with new bolts.

• Check diagnosis sensor unit bracket to ensure it is free of deformities, dents, cracks or rust. If it

shows any visible signs of damage, replace with new one.

• Replace diagnosis sensor unit if it has been dropped or sustained an impact.

INSTALLATION

Installation is in the reverse order of removal.

• Always follow the tightening sequence shown.

AWHIA0159ZZ

1.

Diagnosis sensor unit

Vehicle front

SR-16

< REMOVAL AND INSTALLATION >

DIAGNOSIS SENSOR UNIT

• After the work is completed, perform self-diagnosis to check that no malfunction is detected. Refer to 

SRC-

13, "SRS Operation Check"

.

CAUTION:

• The diagnosis sensor unit must always be installed with the arrow mark "

" pointing toward the

front of the vehicle for proper operation.

• When installing diagnosis sensor unit bolt, use proper tightening sequence.

• Never damage the harness while installing.

• If malfunction is detected by the air bag warning lamp after repair or replacement of the malfunction-

ing parts, reset the memory using self-diagnosis or CONSULT-III. Refer to 

SRC-15, "Self-Diagnosis

Function (Without CONSULT-III)"

.

• After the work is completed, check that no system malfunction is detected by air bag warning lamp.

• After replacing the air bag diagnosis sensor unit, confirm using CONSULT-III that the ECU discrimi-

nated number (identification number) of the new replacement air bag diagnosis sensor unit matches

the ECU discriminated number (identification number) of the replaced (old) air bag diagnosis sensor

unit.

NOTE:

If the ECU discriminated number of the new replacement air bag diagnosis sensor unit differs from the ECU

discriminated number of the replaced air bag diagnosis sensor unit, reconfirm the parts information and verify

that the correct air bag diagnosis sensor unit was installed.

OCCUPANT CLASSIFICATION SYSTEM CONTROL UNIT

SR-17

< REMOVAL AND INSTALLATION >

C

D

E

F

G

I

J

K

L

M

A

B

SR

N

O

P

OCCUPANT CLASSIFICATION SYSTEM CONTROL UNIT

Removal and Installation

INFOID:0000000006163324

The occupant classification system control unit, occupant classification (pressure) sensor, and bladder are an

integral part of the front passenger seat cushion and are replaced as an assembly. Refer to 

SE-30, "Removal

and Installation For Front Seat"

 to remove the seat, and 

SE-44, "Disassembly and Assembly"

 to replace the

seat cushion.

SR-18

< REMOVAL AND INSTALLATION >

COLLISION DIAGNOSIS

COLLISION DIAGNOSIS

For Frontal Collision

INFOID:0000000006163325

FOR FRONTAL COLLISION: When SRS is activated in a collision

CAUTION:

Due to varying models and option levels, not all parts listed in the chart below apply to all vehicles.

WORK PROCEDURE

1. Before performing any of the following steps, ensure that all vehicle body and structural repairs have been

completed. 

2. Replace the diagnosis sensor unit.

3. Remove the front air bag modules, crash zone sensor assembly, bracket and seat belt pre-tensioner

assemblies.

4. Check the SRS components using the table below:

Replace any SRS components showing visible signs of damage. (dents, cracks and deformation, etc.)

5. Install new front air bag modules, crash zone sensor assembly, bracket and seat belt pre-tensioner

assemblies.

6. Perform self-diagnosis using CONSULT-III or air bag warning lamp. Refer to 

SRC-15, "Self-Diagnosis

Function (Without CONSULT-III)"

 for details.

Ensure entire SRS operates properly. 

7. After the work is completed, perform self-diagnosis to check that no malfunction is detected. Refer to

SRC-13, "SRS Operation Check"

.

SRS INSPECTION (FOR FRONTAL COLLISION)

Part

Inspection

Driver air bag module

If the driver air bag has deployed:
REPLACE
Install with new fasteners.

Front passenger air bag module 
(if equipped)

If the front passenger air bag has deployed:
REPLACE
Install with new fasteners.

Crash zone sensor

If any of the front air bags or seat belt pre-tensioners* have been activated:
REPLACE the crash zone sensor and bracket with new fasteners.
*: Confirm seat belt pre-tensioner activation using CONSULT-III only.

Seat belt pre-tensioner assem-
blies
(All applicable locations: buckle, 
retractor, lap outer)

If either the driver or passenger seat belt pre-tensioner* has been activated:
REPLACE all seat belt pre-tensioner assemblies with new fasteners.
*: Confirm seat belt pre-tensioner activation using CONSULT-III only.

Diagnosis sensor unit

If any of the SRS components have been activated:
REPLACE the diagnosis sensor unit.
Install with new fasteners.

Steering wheel

1.

Visually check steering wheel for deformities.

2.

Check harness (built into steering wheel) and connectors for damage, and terminals for de-
formities.

3.

Install driver air bag module into the steering wheel to check fit and alignment with the wheel.

4.

Check steering wheel for excessive free play.

5.

If no damage is found, reinstall.

6.

If damaged—REPLACE.

Spiral cable

If the driver front air bag has deployed:
REPLACE the spiral cable.

Occupant classification system 
(Passenger seat)

1.

Remove passenger seat assembly.

2.

Check control unit case for dents, cracks of deformities.

3.

Check connectors and pressure sensor tube for damage, and terminals for deformities.

4.

Check seat frame and cushion pan for dents or deformities.

5.

If no damage is found, reinstall seat with new fasteners.

6.

If damaged — REPLACE seat cushion assembly with new fasteners.


Content   ..  867  868  869  870   ..