Nissan Titan A60. Manual - part 839


  Index      Nissan     Nissan Titan A60 (2011 year) - Service and Repair Manual


Search            


Content   ..  837  838  839  840   ..


Nissan Titan A60. Manual - part 839


FRONT SEAT

SE-45

< UNIT DISASSEMBLY AND ASSEMBLY >

C

D

E

F

G

H

I

K

L

M

A

B

SE

N

O

P

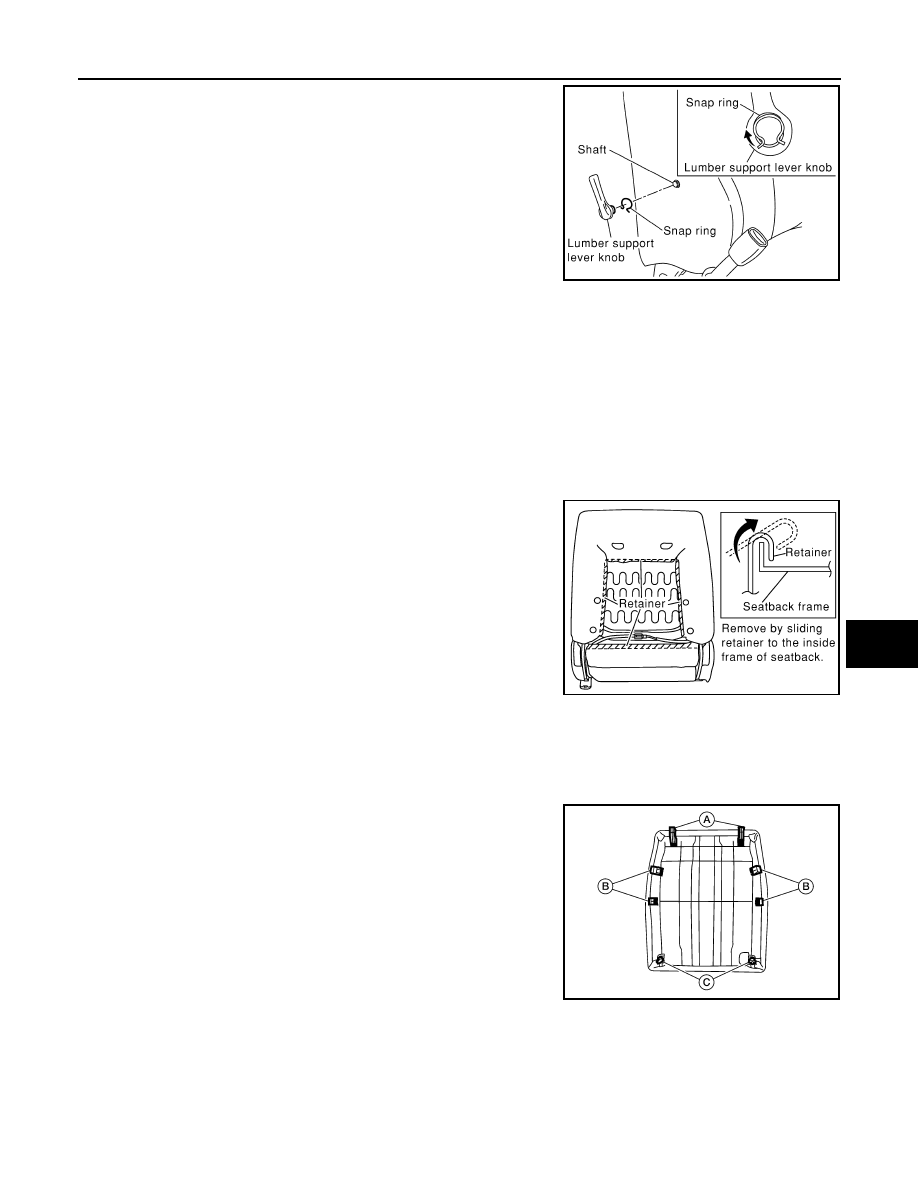
5. Remove the snap ring and the lumbar support lever knob.

6.

CAUTION:

On the passenger seat during installation, the wire harness clips must be installed in the holes

they were originally in. 

Do not add additional clips.

Disconnect the seatback heater harness. Remove the seatback trim and pad assembly. Remove the hog

ring to separate the seatback trim from the pad and the heater unit.

Removal of seatback assembly

1. Remove the seatback board.

2. Remove the retainer. 
3. Remove the side air bag harness connector from the seat cush-

ion.

4. Remove the seatback bolts (two for each side) and seatback

assembly.

Installation of seatback assembly

• Installation is in the reverse order of removal.

SEATBACK BOARD - SOFT SEATBACK

Removal

1. The seatback board is attached to the seat frame with the follow-

ing:

• 2 top tabs (A) 

• 4 side tabs (B)

• 2 bottom clips (C) (must be replaced)

2. Move seat to forward position.

PIIA1156E

SIIA0113E

ALIIA0394ZZ

SE-46

< UNIT DISASSEMBLY AND ASSEMBLY >

FRONT SEAT

3. Hold the seatback board as shown and pull the top of the seat-

back board away from the seat back frame.

4. Pull the middle part of the seatback board to disengage the side

tabs (B) from the seatback frame.

5. Pull the lower part of the seatback board to disengage the bot-

tom clips from the seatback frame.

Installation

Installation is in the reverse order of removal.

SEATBACK BOARD - HARD SEATBACK

Removal

1. The seatback board is attached to the seat frame with the follow-

ing:

• 2 top tabs (A) 

• 2 side tabs (B)

• 2 bottom clips (C) (must be replaced)

2. Move seat to forward position.

3. Hold the seatback board as shown and pull the bottom of the

seatback board away from the seat back frame.

ALIIA0368ZZ

ALIIA0367ZZ

ALIIA0395ZZ

ALIIA0370ZZ

FRONT SEAT

SE-47

< UNIT DISASSEMBLY AND ASSEMBLY >

C

D

E

F

G

H

I

K

L

M

A

B

SE

N

O

P

4. Pull the middle part of the seatback board to disengage the side

tabs (B) from the seatback frame.

5. Lift the upper part of the seatback board to disengage the top

tabs from the seatback frame.

Installation

Installation is in the reverse order of removal.

 SEAT CUSHION TRIM AND PAD

CAUTION:

• Front passenger seat is equipped with Occupant Classification System sensor and control module.

Do not disassemble front passenger seat cushion assembly or remove trim as this will affect the

Occupant Classification System calibration.

• Always replace passenger seat cushion as an assembly.

• When removed, the passenger seat cushion must always be placed pan side UP to prevent damage.

• During installation, the wire harness clips must be installed in the holes they were originally in. 

Do not add additional clips.

• The Occupant Classification System control module can only be replaced as part of the seat cushion

assembly.

NOTE:

If the vehicle has been involved in a collision the seat must be inspected for damage. Refer to 

SR-18, "For

Frontal Collision"

.

1. Remove the power seat switch knobs and power seat switch

escutcheon (or recline knobs on manual seat).

2. Remove the front seat cushion finisher (inner).

3. Remove the power seat switch screws (or lift knobs on manual seats).

ALIIA0371ZZ

LIIA0681E

LIIA0285E

SE-48

< UNIT DISASSEMBLY AND ASSEMBLY >

FRONT SEAT

4. Remove four bolts and the seat cushion assembly.

5. Remove the retainer on the seat cushion frame, then remove the harness connector for the seat heater.
6. On the drivers seat only, after removing the seat cushion trim and pad, remove the hog rings to separate

the trim cover from the pad and seat cushion heater unit.

SIIA0503E


Content   ..  837  838  839  840   ..