Nissan Titan A60. Manual - part 835


  Index      Nissan     Nissan Titan A60 (2011 year) - Service and Repair Manual


Search            


Content   ..  833  834  835  836   ..


Nissan Titan A60. Manual - part 835


FRONT SEAT

SE-29

< REMOVAL AND INSTALLATION >

C

D

E

F

G

H

I

K

L

M

A

B

SE

N

O

P

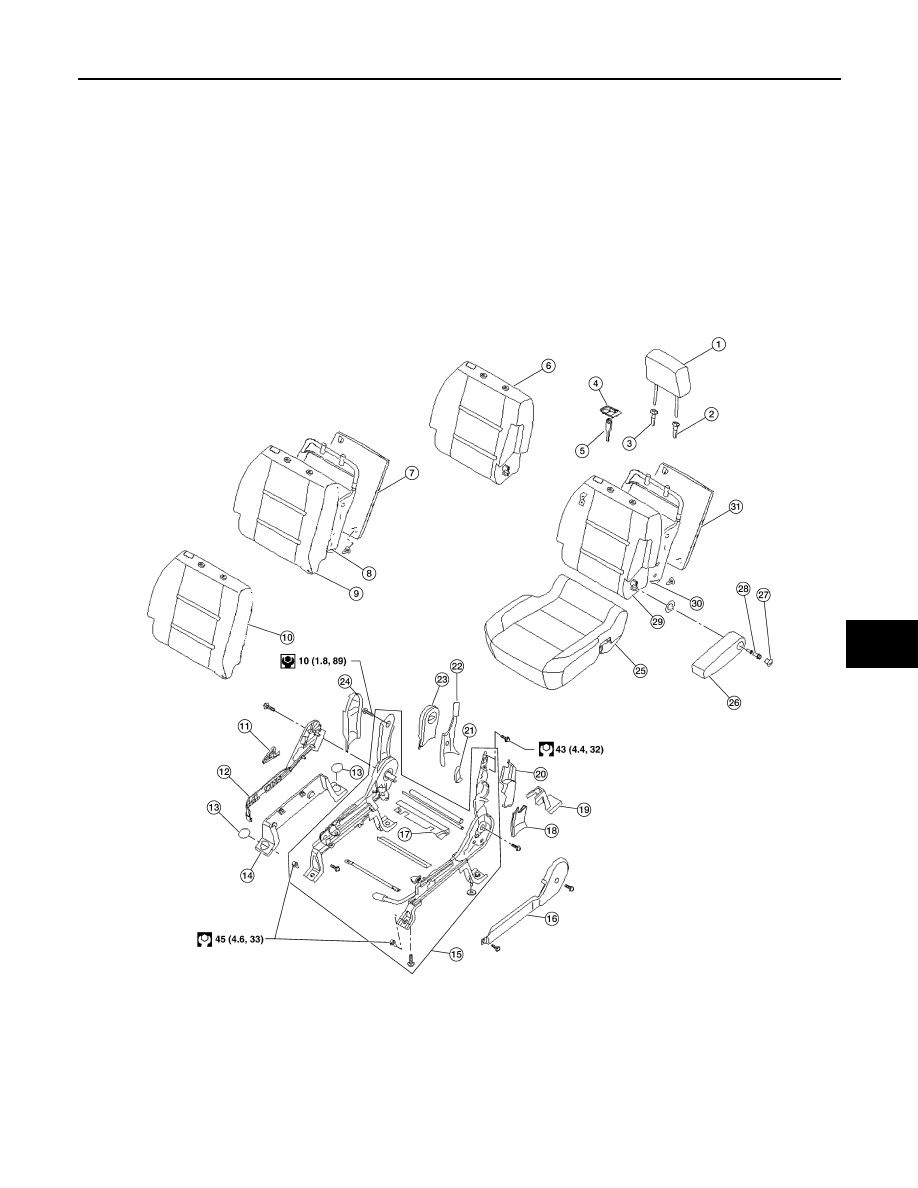
Manual Passenger Seat

16. Outer pedestal finisher

17. Power seat frame assembly

18. Seat cushion front finisher

19. Seat cushion inner finisher

20. Seat wiring harness

21. Wire harness cover

22. Inner recliner cover

23. RH inner leg cover

24. Seat latch cover

25. Inner reclining cover

26. Outer reclining cover

27. Outboard reclining arm inner cover

28. Inboard reclining arm inner cover

29. Reclining rod

30. Armrest assembly (if equipped)

31. Armrest cap (if equipped)

32. Armrest bolt (if equipped)

33. Seatback board

AWJIA0479GB

SE-30

< REMOVAL AND INSTALLATION >

FRONT SEAT

Removal and Installation For Front Seat

INFOID:0000000006163209

REMOVAL

CAUTION:

• When removing or installing the seat trim, handle it carefully to keep dirt out and avoid damage.

• Before removing the front seat, turn the ignition switch off, disconnect both battery cables and wait

at least 3 minutes.

• When checking the power seat circuit for continuity using a circuit tester, do not confuse its connec-

tor with the side air bag module connector. Such an error may cause the air bag to deploy.

• Do not drop, tilt, or bump the side air bag module while installing the seat. Always handle it with

care.

• After front side air bag module inflates, front seatback assembly must be replaced.

• Front passenger seat is equipped with Occupant Classification System sensor and control module.

Do not disassemble front passenger seat cushion assembly or remove trim as this will affect the

Occupant Classification System calibration.

• Always replace passenger seat cushion as an assembly.
1. Slide the seat until the four seat to body bolts are visible and a tool can be inserted.

NOTE:

• If disassembling the seat after removal, set the front/rear cushion lifters to the top position.

2. Disconnect both battery cables and wait at least 3 minutes.
3. Disconnect the side air bag module harness connector (if equipped).
4. Remove the bolt and leg covers.
5. Remove the four seat to body bolts.
6. Disconnect the power seat harness connectors and remove the seat from the vehicle.

NOTE:

When removing and installing the seat, use shop cloths to protect the vehicle from damage.

INSTALLATION

Installation is in the reverse order of removal.

    Removal and Installation For Seat Slide/Recline Switch (Passenger Seat)

INFOID:0000000006751677

REMOVAL

1. Remove the passenger seat. Refer to 

SE-30, "Removal and Installation For Front Seat"

2. Place the seat, back side down, on a work bench 

1.

Headrest

2.

Headrest holder with multi position 
lock 

3.

Headrest holder

4.

Seat fold lever

5.

Seat fold handle and cable 

6.

Seatback assembly with armrest, 
with side airbag (if equipped)

7.

Seatback board without armrest, 
without airbag (if equipped)

8.

Seatback frame assembly without 
armrest, without airbag (if equipped)

9.

Seatback pad and cover without arm-
rest, without airbag (if equipped)

10. Seatback assembly without armrest, 

with side airbag (if equipped)

11. Seat recline lever 

12. Seat cushion outer finisher

13. Bolt cover

14. Outer pedestal finisher

15. Power seat frame assembly

16. Seat cushion inner finisher

17. Seat rear cover

18. Inner recliner cover

19. RH inner leg cover

20. Seat latch cover

21. Armrest cover (if equipped) 

22. Inboard reclining arm inner cover 

23. Outboard reclining arm outer cover

24. Outboard reclining arm outer cover 

25. Seat cushion assembly

26. Armrest assembly (if equipped)

27. Armrest cap (if equipped) 

28. Armrest bolt (if equipped)

29. Seatback pad and cover with arm-

rest, without airbag (if equipped)

30. Seatback frame assembly with arm-

rest, without airbag (if equipped) 

31. Seatback board with armrest, without 

airbag (if equipped)

FRONT SEAT

SE-31

< REMOVAL AND INSTALLATION >

C

D

E

F

G

H

I

K

L

M

A

B

SE

N

O

P

3. Unhook the under seat flap.

4. Remove the two seat switch knobs (1) and seat switch bezel (2).

5. Remove the four bolts securing the seat pan to the seat frame.

ALJIA0573ZZ

ALJIA0574ZZ

ALJIA0575ZZ

SE-32

< REMOVAL AND INSTALLATION >

FRONT SEAT

6. Disconnect the OCS electrical connector (1) and seat switch

electrical connector (2).

7. Detach the two seat switch harness clips (1) from the seat pan.

8. Remove outboard J-clip.

ALJIA0576ZZ

ALJIA0576ZZ

ALJIA0578ZZ


Content   ..  833  834  835  836   ..