Nissan Titan A60. Manual - part 149


  Index      Nissan     Nissan Titan A60 (2011 year) - Service and Repair Manual


Search            


Content   ..  147  148  149  150   ..


Nissan Titan A60. Manual - part 149


BRAKE TUBE AND HOSE

BR-23

< REMOVAL AND INSTALLATION >

C

D

E

G

H

I

J

K

L

M

A

B

BR

N

O

P

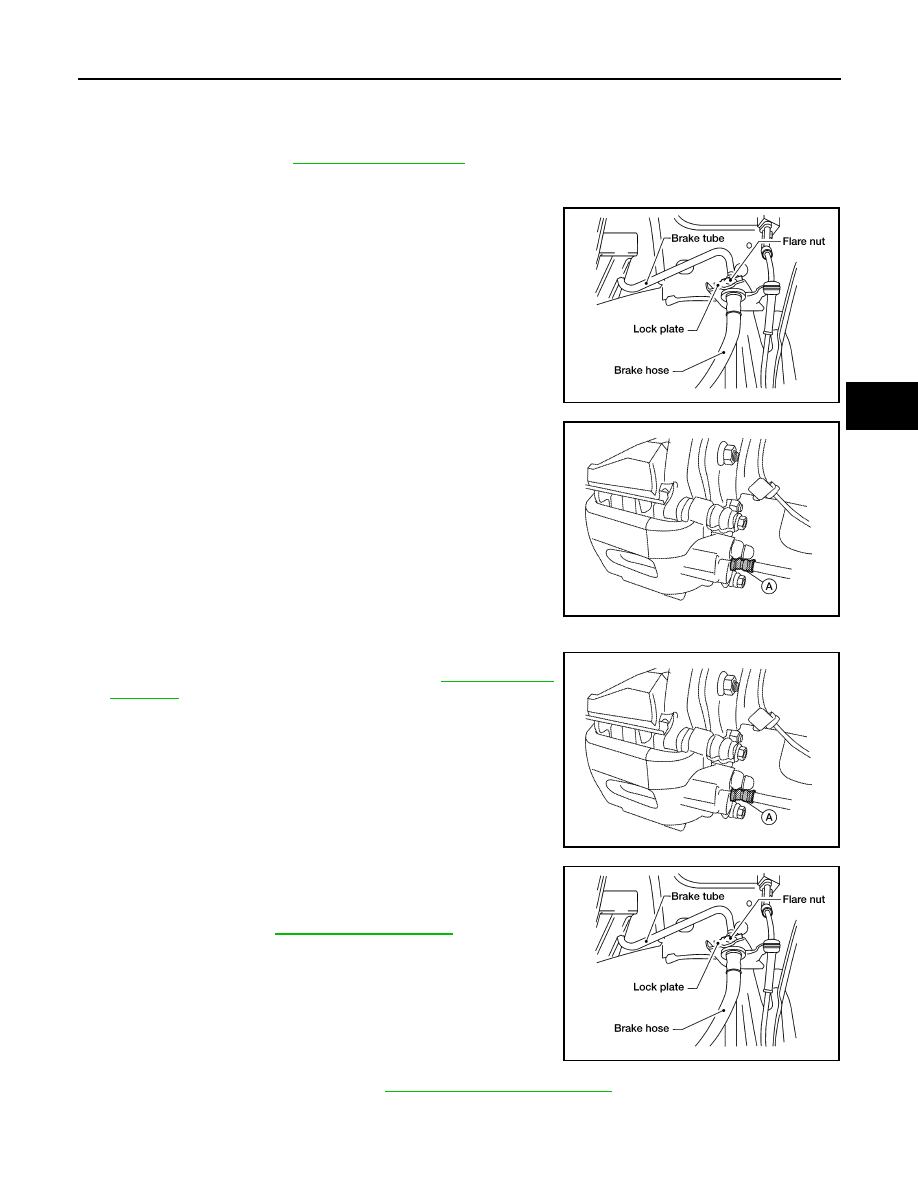
Removal and Installation of Rear Brake Piping and Brake Hose

INFOID:0000000006163286

REMOVAL

1. Drain brake fluid. Refer to 

BR-16, "Drain and Refill"

.

2. Using a flare nut wrench, remove brake tube from brake hose.

NOTE:

Cap or plug opening(s) to prevent fluid from spilling.

3. Remove lock plate and brake hose from bracket.

4. Remove brake hose connection (A) from cylinder body.

CAUTION:

Do not reuse copper washer.

NOTE:

Cap or plug opening(s) to prevent fluid from spilling.

INSTALLATION

1. Install brake hose connection (A) and new copper washer to cyl-

inder body and tighten to specification. Refer to 

BR-11, "Hydrau-

lic Circuit"

.

CAUTION:

Do not reuse copper washer.

2. Insert brake hose end through bracket, then secure it to bracket

with lock plate.

3. Install brake tube to brake hose, then tighten the flare nut using

a suitable tool. Refer to 

BR-11, "Hydraulic Circuit"

.

4. Refill brake fluid and bleed air. Refer to 

BR-16, "Bleeding Brake System"

.

LFIA0213E

ALFIA0152ZZ

ALFIA0152ZZ

LFIA0213E

BR-24

< REMOVAL AND INSTALLATION >

BRAKE TUBE AND HOSE

Inspection After Installation

INFOID:0000000006163287

CAUTION:

Brake tubes and hoses are important safety parts. Always disassemble the parts and retighten their fit-

tings, if a brake fluid leak is detected. Replace applicable part with a new one, if a damaged part is

detected.
1. Check brake lines (tubes and hoses), and connections for fluid leaks, damage, twist, deformation, contact

with other parts, and loose connections. Replace any parts as necessary. Refer to 

BR-21, "Hydraulic Cir-

cuit"

.

2. While depressing brake pedal under a force of 785 N (80 kg-f, 177 lb-f) with engine running for approxi-

mately 5 seconds, check each part for fluid leaks.

BRAKE MASTER CYLINDER

BR-25

< REMOVAL AND INSTALLATION >

C

D

E

G

H

I

J

K

L

M

A

B

BR

N

O

P

BRAKE MASTER CYLINDER

Exploded View

INFOID:0000000006163288

With VDC/TCS/ABS

CAUTION:

Be careful not to splash brake fluid on painted areas; it way cause paint damage. If brake fluid is

splashed on painted areas, wash it away with water immediately. 

Removal and Installation

INFOID:0000000006163289

REMOVAL

CAUTION:

• Be careful not to splash brake fluid on painted areas; it way cause paint damage. If brake fluid is

splashed on painted areas, wash it away with water immediately. 

• Before removing brake master cylinder, depress the brake pedal 5-6 times with the key OFF to

deplete vacuum in the booster.

1. Remove brake reservoir cap.
2. Disconnect harness connector for fluid level sensor, front and rear pressure sensors (if equipped).
3. Using a flare nut wrench, disconnect brake tube from master cylinder assembly.

NOTE:

Cap or plug opening(s) to prevent fluid from spilling.

4. Remove master cylinder assembly nuts and remove the master cylinder assembly.

AWFIA0415GB

1.

Reservoir cap

2.

Fluid level sensor

3.

Grommet

4.

Master cylinder sub-assembly

5.

Rear pressure sensor

6.

Front pressure sensor

7.

Seal

8.

Reservoir tank

B: Brake fluid

R: Rubber grease

BR-26

< REMOVAL AND INSTALLATION >

BRAKE MASTER CYLINDER

CAUTION:

Discard nuts, do not reuse.

INSTALLATION

Installation is in the reverse order of removal.

• Refill brake fluid and bleed air. Refer to 

BR-16, "Bleeding Brake System"

.

CAUTION:

• Be careful not to splash brake fluid on painted areas; it way cause paint damage. If brake fluid is

splashed on painted areas, wash it away with water immediately. 

• Refill with new brake fluid. Refer to 

MA-21, "FOR NORTH AMERICA : Fluids and Lubricants"

(United States and Canada), 

MA-22, "FOR MEXICO : Fluids and Lubricants"

 (Mexico).

• Do not reuse drained brake fluid.

• Adjust brake pedal. Refer to 

BR-13, "Inspection and Adjustment - Standard Pedal"

BR-14, "Inspection and

Adjustment - Adjustable Pedal"

.


Content   ..  147  148  149  150   ..