Nissan Quest E52. Manual - part 712


  Index      Nissan     Nissan Quest E52 (2011-2014 year) - Service and Repair Manual


Search            


Content   ..  710  711  712  713   ..


Nissan Quest E52. Manual - part 712


COOLER PIPE AND HOSE

HA-39

< REMOVAL AND INSTALLATION >

C

D

E

F

G

H

J

K

L

M

A

B

HA

N

O

P

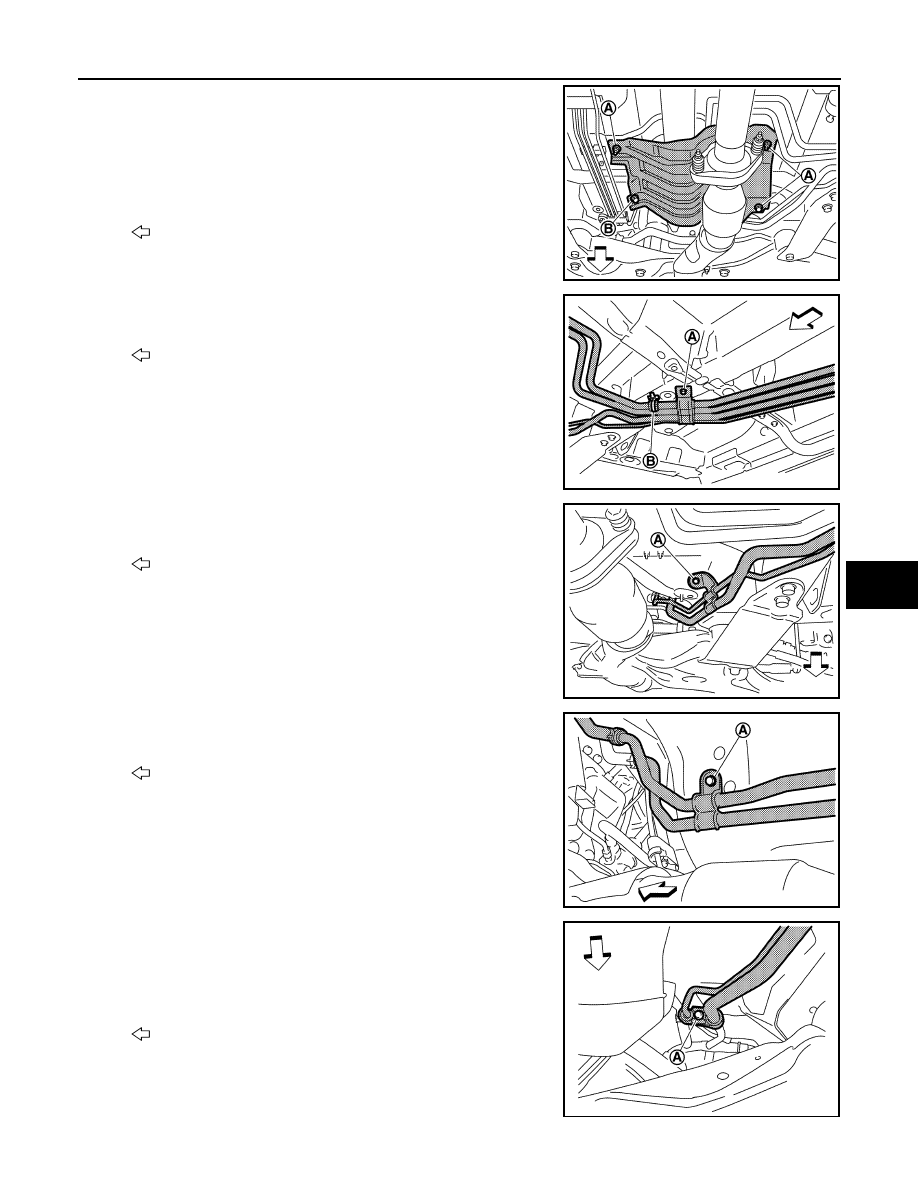
10. Remove mounting nuts (A) and bolt (B), and then remove heat

insulator.

CAUTION:

• Work when system is cool, as the exhaust system is hot

just after stopping the engine.

• Be careful not to cut hands on the edge of heat shield

plate.

11. Remove mounting bolt (A) and fixing clip (B) so that rear cooler

pipe assembly 1 can be moved freely to secure work space.

12. Remove mounting bolt (A) so that rear cooler pipe assembly 1

can be moved freely to secure work space.

13. Remove mounting bolt (A) so that rear cooler pipe assembly 1

can be moved freely to secure work space.

14. Remove mounting bolt (A), and then disconnect rear cooler pipe

assembly 1 from front cooler pipe assembly.

CAUTION:

Cap of wrap the joint of the A/C piping with suitable material
such as vinyl tape to avoid the entry of air.

: Vehicle front

JMIIA1193ZZ

: Vehicle front

JMIIA1859ZZ

: Vehicle front

JMIIA1858ZZ

: Vehicle front

JMIIA1857ZZ

: Vehicle front

JMIIA1817ZZ

HA-40

< REMOVAL AND INSTALLATION >

COOLER PIPE AND HOSE

15. Remove front cooler pipe assembly from underneath the vehi-

cle.

CAUTION:

Cap of wrap the joint of the A/C piping with suitable material
such as vinyl tape to avoid the entry of air.

INSTALLATION

Note the following items, and then install in the reverse order of removal.

CAUTION:

• Replace O-rings with new ones. Then apply compressor oil to them when installing.
• Check for leakages when recharging refrigerant. Refer to 

HA-18, "Leak Test"

.

REAR COOLER PIPE 1

REAR COOLER PIPE 1 : Removal and Installation

INFOID:0000000009651585

CAUTION:

Perform lubricant return operation before each refrigeration system disassembly. However, if a large
amount of refrigerant or lubricant is detected, never perform lubricant return operation. Refer to 

HA-

22, "Perform Lubricant Return Operation"

.

REMOVAL

1.

Use a refrigerant collecting equipment (for HFC-134a) to discharge the refrigerant. Refer to 

HA-20, "Recy-

cle Refrigerant"

.

2.

Drain engine coolant from cooling system. Refer to 

CO-8, "Draining"

.

3.

Remove mounting nuts (A) and bolt (B), and then remove heat
insulator.

CAUTION:

• Work when system is cool, as the exhaust system is hot

just after stopping the engine.

• Be careful not to cut hands on the edge of heat shield

plate.

4.

Remove exhaust front tube. Refer to 

EX-6, "Removal and Installation"

.

CAUTION:

Block the openings with tape to make sure that no foreign materials get inside engine.

5.

Remove rear cooler pipe assembly 1 mounting bolt (A).

: Vehicle front

JMIIA1860ZZ

: Vehicle front

JMIIA1193ZZ

: Vehicle front

JMIIA1857ZZ

COOLER PIPE AND HOSE

HA-41

< REMOVAL AND INSTALLATION >

C

D

E

F

G

H

J

K

L

M

A

B

HA

N

O

P

6.

Remove rear cooler pipe assembly 1 mounting bolt (A).

7.

Remove rear cooler pipe assembly 1 mounting bolt (A) and fix-
ing clip (B).

8.

Remove mounting bolt (A), and then disconnect rear cooler pipe
assembly 1 from front cooler pipe assembly.

CAUTION:

Cap of wrap the joint of the A/C piping with suitable material
such as vinyl tape to avoid the entry of air.

9.

Remove fixing clamps (A), and then disconnect heater hoses (1)
from rear cooler pipe assembly 1 (2).

10. Remove mounting bolt (A) and fixing clamps (B), and then dis-

connect rear cooler pipe assembly 1 (1) from rear cooler pipe
assembly 2 (2).

CAUTION:

Cap of wrap the joint of the A/C piping with suitable material
such as vinyl tape to avoid the entry of air.

: Vehicle front

JMIIA1858ZZ

: Vehicle front

JMIIA1859ZZ

: Vehicle front

JMIIA1817ZZ

: Vehicle front

JMIIA1818ZZ

: Vehicle front

JMIIA1820ZZ

HA-42

< REMOVAL AND INSTALLATION >

COOLER PIPE AND HOSE

11. Remove rear cooler pipe assembly 1 bracket mounting bolts and fixing clips, and then remove rear cooler

pipe assembly 1 from the vehicle. 

INSTALLATION

Note the following items, and then install in the reverse order of removal.

CAUTION:

• Replace O-rings with new ones. Then apply compressor oil to them when installing.
• Check for leakages when recharging refrigerant. Refer to 

HA-18, "Leak Test"

.

REAR COOLER PIPE 2

REAR COOLER PIPE 2 : Removal and Installation

INFOID:0000000009651586

CAUTION:

Perform lubricant return operation before each refrigeration system disassembly. However, if a large
amount of refrigerant or lubricant is detected, never perform lubricant return operation. Refer to 

HA-

22, "Perform Lubricant Return Operation"

.

REMOVAL

1.

Use a refrigerant collecting equipment (for HFC-134a) to discharge the refrigerant. Refer to 

HA-20, "Recy-

cle Refrigerant"

.

2.

Drain engine coolant from cooling system. Refer to 

CO-8, "Draining"

.

3.

Remove rear suspension member. Refer to 

RSU-19, "Removal and Installation"

.

4.

Remove mounting bolt (A) and fixing clamps (B), and then dis-
connect rear cooler pipe assembly 1 (1) from rear cooler pipe
assembly 2 (2).

CAUTION:

Cap of wrap the joint of the A/C piping with suitable material
such as vinyl tape to avoid the entry of air.

5.

Remove rear bumper closing. Refer to 

EXT-17, "REAR BUMPER CLOSING : Removal and Installation"

.

6.

Remove mounting bolt (A) and fixing clamps (B), and then dis-
connect rear cooler pipe assembly 2 from rear A/C unit assem-
bly. 

CAUTION:

Cap of wrap the joint of the A/C piping and rear A/C unit
assembly with suitable material such as vinyl tape to avoid
the entry of air.

7.

Remove rear cooler pipe assembly 2 mounting bolts and fixing clips, and then remove rear cooler pipe
assembly 2 from the vehicle.

INSTALLATION

Note the following items, and then install in the reverse order of removal.

CAUTION:

• Replace O-rings with new ones. Then apply compressor oil to them when installing.
• Check for leakages when recharging refrigerant. Refer to 

HA-18, "Leak Test"

.

: Vehicle front

JMIIA1820ZZ

JMIIA1197ZZ


Content   ..  710  711  712  713   ..