Nissan Cube. Manual - part 235


  Index      Nissan     Nissan Cube (2014 year) - Service and Repair Manual


Search            


Content   ..  233  234  235  236   ..


Nissan Cube. Manual - part 235


DLK-206

< REMOVAL AND INSTALLATION >

[WITH INTELLIGENT KEY SYSTEM]

BACK DOOR

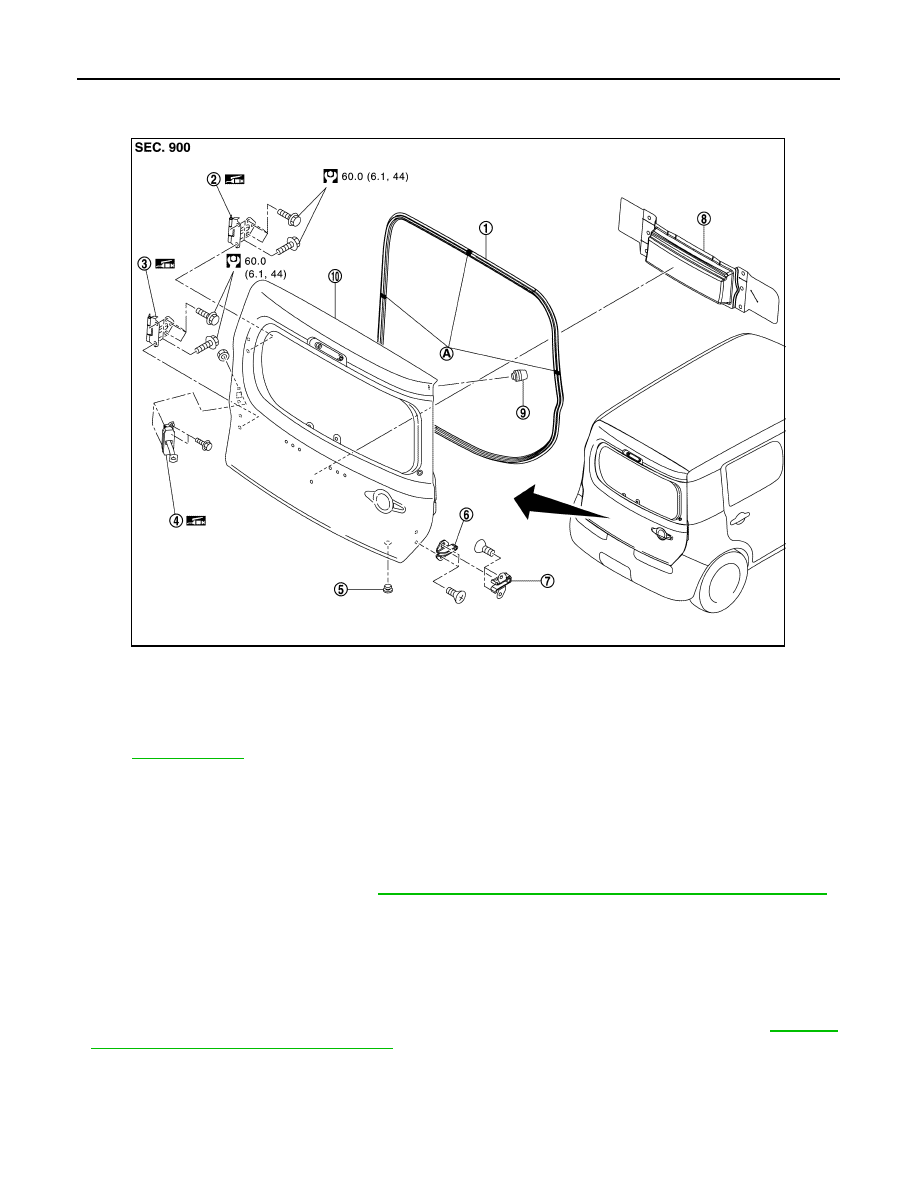
BACK DOOR HINGE : Exploded View

INFOID:0000000009950632

BACK DOOR HINGE : Removal and Installation

INFOID:0000000009950633

CAUTION:

Perform work with 2 workers, because of its heavy weight.

REMOVAL

1.

Remove back door assembly. Refer to 

DLK-201, "BACK DOOR ASSEMBLY : Removal and Installation"

2.

Remove back door hinge mounting bolts (body side), and then remove back door hinge.

INSTALLATION

Install in the reverse order of removal.

CAUTION:

• Check back door open/close operation after installation.
• Check back door hinge rotating part for poor lubrication. If necessary, apply body grease.
• When removing and installing back door assembly, perform the fitting adjustment. Refer to 

DLK-203,

"BACK DOOR ASSEMBLY : Adjustment"

.

• After installation, apply touch-up paint (the body color) onto the head of back door hinge mounting

nuts.

DOOR CHECK LINK

1.

Back door weather-strip

2.

Back door hinge (upper)

3.

Back door hinge (lower)

4.

Door check link

5.

Grommet

6.

Dovetail male

7.

Dovetail female

8.

Sealing screen

9.

Bumper rubber

10. Back door panel

A

: Center mark

Refer to 

GI-4, "Components"

 for symbols in the figure.

JMKIA6716GB

BACK DOOR

DLK-207

< REMOVAL AND INSTALLATION >

[WITH INTELLIGENT KEY SYSTEM]

C

D

E

F

G

H

I

J

L

M

A

B

DLK

N

O

P

DOOR CHECK LINK : Exploded View

INFOID:0000000009950634

DOOR CHECK LINK : Removal and Installation

INFOID:0000000009950635

REMOVAL

1.

Remove back door finisher lower. Refer to 

INT-27, "Removal and Installation"

.

2.

Remove sealing screen.
NOTE:
Cut the butyl-tape so that some part of the butyl-tape do not remain on the sealing screen, if the sealing
screen is reused.

3.

Remove mounting bolts of door check link on the vehicle.

4.

Remove mounting nuts of door check link on the back door panel. 

5.

Take door check link out from the hole of back door panel.

INSTALLATION

Install in the reverse order of removal.

CAUTION:

Check back door open/close operation after installation.

DOVETAIL

1.

Back door weather-strip

2.

Back door hinge (upper)

3.

Back door hinge (lower)

4.

Door check link

5.

Grommet

6.

Dovetail male

7.

Dovetail female

8.

Sealing screen

9.

Bumper rubber

10. Back door panel

A

: Center mark

Refer to 

GI-4, "Components"

 for symbols in the figure.

JMKIA6716GB

DLK-208

< REMOVAL AND INSTALLATION >

[WITH INTELLIGENT KEY SYSTEM]

BACK DOOR

DOVETAIL : Exploded View

INFOID:0000000009950636

DOVETAIL : Removal and Installation

INFOID:0000000009950637

REMOVAL

1.

Remove mounting bolts, and then remove dovetai (male).

2.

Remove mounting bolts, and then remove dovetai (female).

INSTALLATION

Install in the reverse order of removal.

CAUTION:

Check back door open/close operation after installation.

BACK DOOR WEATHER-STRIP

1.

Back door weather-strip

2.

Back door hinge (upper)

3.

Back door hinge (lower)

4.

Door check link

5.

Grommet

6.

Dovetail male

7.

Dovetail female

8.

Sealing screen

9.

Bumper rubber

10. Back door panel

A

: Center mark

Refer to 

GI-4, "Components"

 for symbols in the figure.

JMKIA6716GB

BACK DOOR

DLK-209

< REMOVAL AND INSTALLATION >

[WITH INTELLIGENT KEY SYSTEM]

C

D

E

F

G

H

I

J

L

M

A

B

DLK

N

O

P

BACK DOOR WEATHER-STRIP : Exploded View

INFOID:0000000009950638

BACK DOOR WEATHER-STRIP : Removal and Installation

INFOID:0000000009950639

REMOVAL

1.

Pull and remove engagement with body from weather-strip joint.

CAUTION:

Never pull strongly on weather-strip.

INSTALLATION

1.

Working from the upper section, align weather-strip center mark (A) with vehicle center mark (cutting posi-
tion) and install weather-strip onto the vehicle.

2.

Pull weather-strip gently to ensure that there is no loose section.
NOTE:
Make sure that weather-strip is fit tightly at each corner and luggage rear plate.

1.

Back door weather-strip

2.

Back door hinge (upper)

3.

Back door hinge (lower)

4.

Door check link

5.

Grommet

6.

Dovetail male

7.

Dovetail female

8.

Sealing screen

9.

Bumper rubber

10. Back door panel

A

: Center mark

Refer to 

GI-4, "Components"

 for symbols in the figure.

JMKIA6716GB


Content   ..  233  234  235  236   ..