Nissan Rogue. Manual - part 386


  Index      Nissan     Nissan Rogue (2015 year) - Service and Repair Manual


Search            


Content   ..  384  385  386  387   ..


Nissan Rogue. Manual - part 386


DLK-386

< REMOVAL AND INSTALLATION >

[WITHOUT INTELLIGENT KEY SYSTEM]

FRONT DOOR LOCK

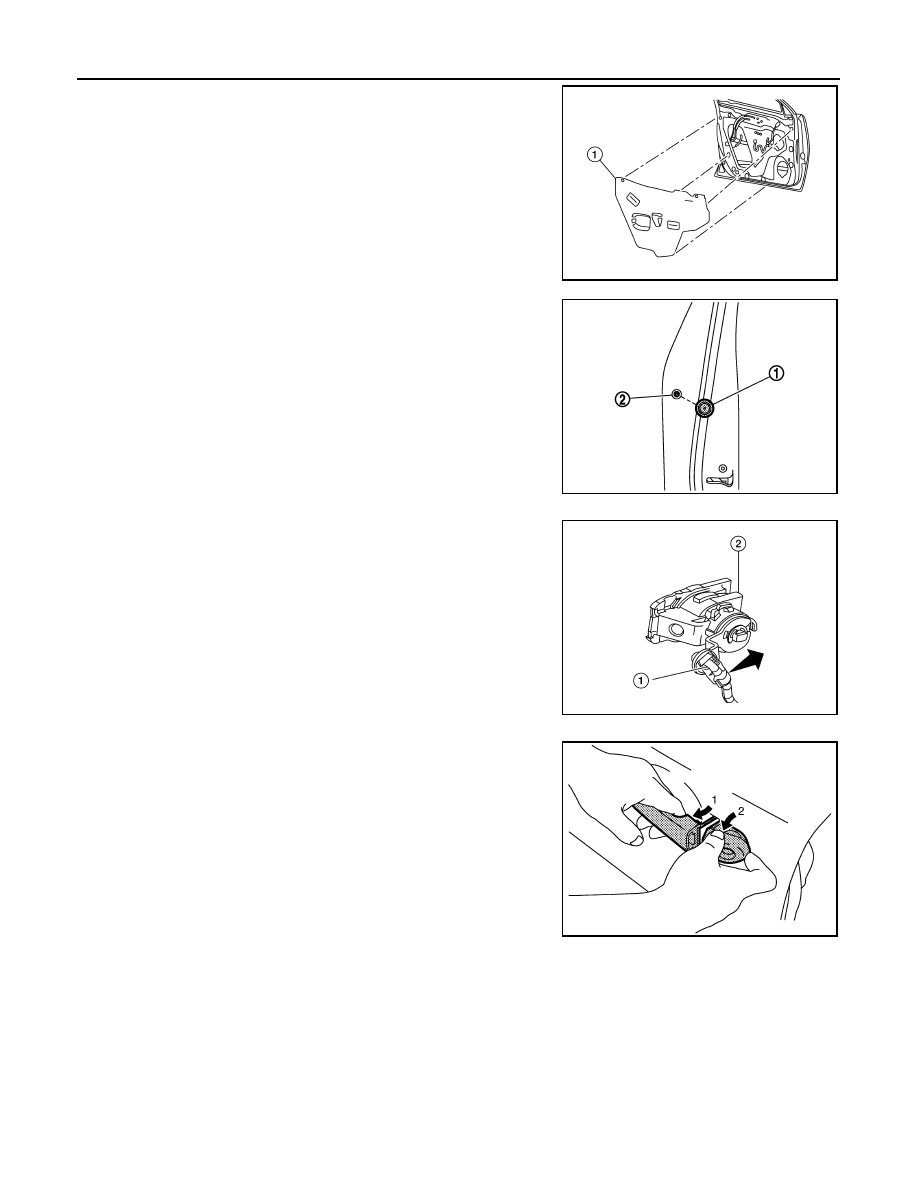
3. Remove front door vapor barrier (1).

NOTE:

LH side shown; RH similar.

4. Remove door side grommet (1), and remove bolt from grommet

hole (2).

5. Separate door key cylinder rod (LH only) (1) from door key cylin-

der assembly (LH only) (2).

6. While pulling (1) outside handle, remove (2) door key cylinder

assembly (LH side) or outside handle escutcheon (RH side).

ALKIA3488ZZ

JMKIA5888ZZ

ALKIA2487ZZ

ALKIA2487ZZ

JMKIA0560ZZ

2015 Rogue NAM

FRONT DOOR LOCK

DLK-387

< REMOVAL AND INSTALLATION >

[WITHOUT INTELLIGENT KEY SYSTEM]

C

D

E

F

G

H

I

J

L

M

A

B

DLK

N

O

P

7. While pulling outside handle (1), slide toward rear of vehicle to

remove outside handle.

8. Remove front gasket and rear gasket.
9. Slide outside handle bracket toward rear of vehicle to remove.

10. Disconnect outside handle cable (1) from outside handle bracket

(2) as shown.

INSTALLATION

Installation is in the reverse order of removal.

CAUTION:

• When installing door key cylinder rod (LH only), be sure to rotate door key cylinder rod holder until a

click is felt.

• After installation, check door lock cable is properly engaged to outside handle bracket.

• After installation, check door open/close and lock/unlock operation. 

AWKIA1997ZZ

JMKIA2652ZZ

ALKIA2489ZZ

2015 Rogue NAM

DLK-388

< REMOVAL AND INSTALLATION >

[WITHOUT INTELLIGENT KEY SYSTEM]

REAR DOOR LOCK

REAR DOOR LOCK

Exploded View

INFOID:0000000011279174

DOOR LOCK
DOOR LOCK : Removal and Installation

INFOID:0000000011279175

REMOVAL

1. Remove rear door finisher. Refer to 

INT-18, "Removal and Installation"

.

2. Remove vapor barrier.
3. Remove rear door lock bolts.
4. Disconnect the door lock cables.
5. Disconnect the harness connector from the rear door lock and remove.

INSTALLATION

Installation is in the reverse order of removal.

CAUTION:

• Do not reuse rear door lock bolts.

• Tighten bolts to specification. Refer to 

DLK-388, "Exploded View"

.

• After installation, check door lock cables are properly engaged to inside handle and outside handle.

• After installation, check door open/close and lock/unlock operation. 

INSIDE HANDLE
INSIDE HANDLE : Removal and Installation

INFOID:0000000011279176

REMOVAL

1.

Outside handle

2.

Outside handle escutcheon

3.

Rear gasket

4.

Rear door lock

5.

Cable clip

6.

Outside handle bracket

7.

Front gasket

8.

Inside handle

Front

AWKIA3225ZZ

2015 Rogue NAM

REAR DOOR LOCK

DLK-389

< REMOVAL AND INSTALLATION >

[WITHOUT INTELLIGENT KEY SYSTEM]

C

D

E

F

G

H

I

J

L

M

A

B

DLK

N

O

P

1. Remove rear door finisher. Refer to 

INT-18, "Removal and Installation"

.

2. Remove inside handle bolt (A).

3. Disconnect door lock cables from inside handle and remove.

INSTALLATION

Installation is in the reverse order of removal.

CAUTION:

• After installation, check door lock cables are properly engaged to inside handle.

• After installation, check door open/close and lock/unlock operation.

OUTSIDE HANDLE
OUTSIDE HANDLE : Removal and Installation

INFOID:0000000011279177

REMOVAL

1. Fully close rear door glass.
2. Remove rear door finisher. Refer to 

INT-18, "Removal and Installation"

.

3. Remove rear door vapor barrier (1).

NOTE:

LH side shown; RH similar.

4. Remove door side grommet and bolt from grommet hole.

ALKIA3499ZZ

ALKIA3481ZZ

JMKIA0025ZZ

2015 Rogue NAM


Content   ..  384  385  386  387   ..