Nissan Maxima. Manual - part 376


  Index      Nissan     Nissan Maxima (2009-2014 year) - Service and Repair Manual


Search            


Content   ..  374  375  376  377   ..


Nissan Maxima. Manual - part 376


DOOR LOCK

DLK-223

< REMOVAL AND INSTALLATION >

C

D

E

F

G

H

I

J

L

M

A

B

DLK

N

O

P

• When installing do not reuse front door lock assembly screw. Always replace screw with new ones

when removed.

• When installing door key cylinder rod on the LH front door, be sure to rotate door key cylinder rod

holder until a click is felt.

• Check front door lock cable is properly engaged to outside handle bracket.

• After installation, check front door open/close, lock/unlock operation. 

REAR DOOR LOCK
REAR DOOR LOCK : Exploded View

INFOID:0000000009471775

REAR DOOR LOCK : Removal and Installation

INFOID:0000000009471776

REMOVAL

1. Remove rear door finisher. Refer to 

INT-21, "Removal and Installation"

.

2. Remove sealing screen.
3. Fully close the rear door glass.
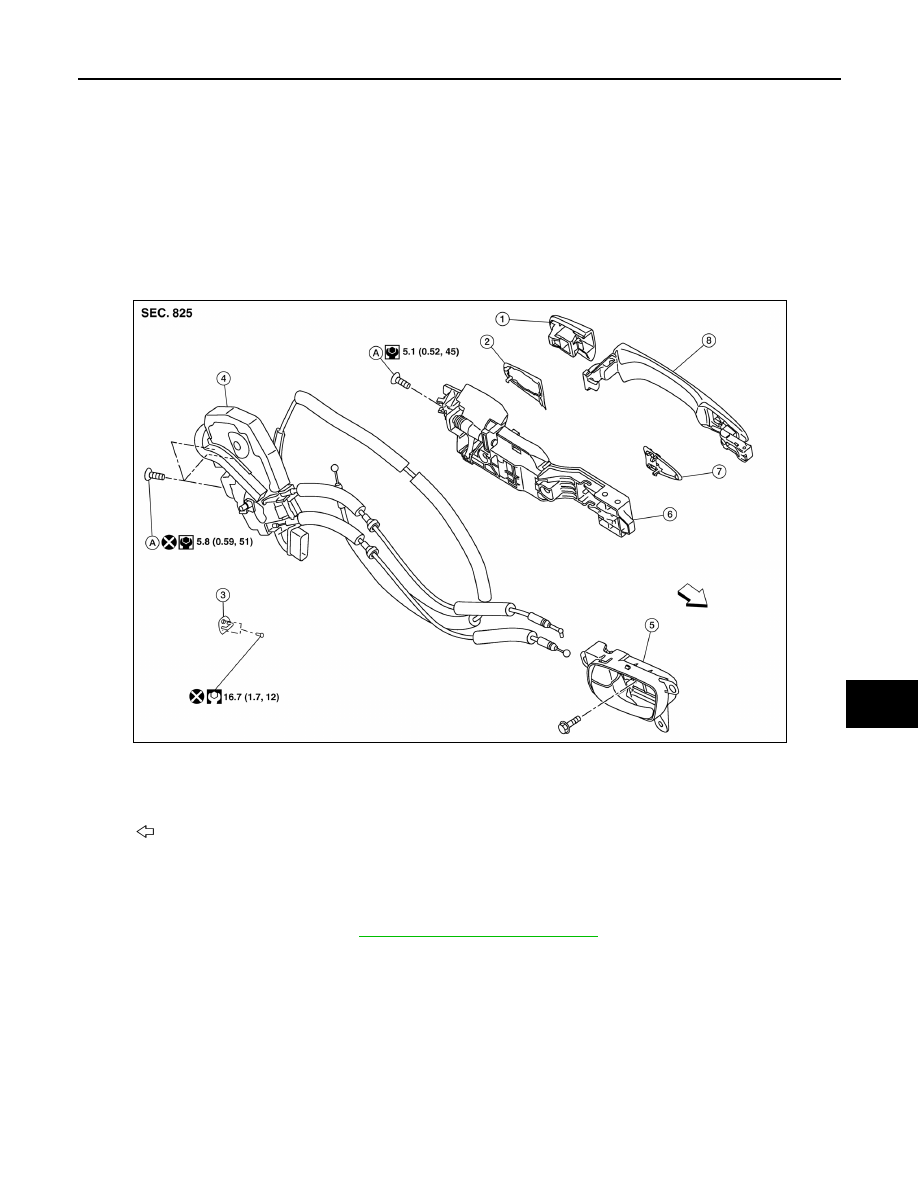
1.

Outside handle escutcheon

2.

Rear gasket

3.

Striker

4.

Rear door lock assembly

5.

Inside handle

6.

Outside handle bracket

7.

Front gasket

8.

Outside handle

A. Bolt

Front

AWKIA1810GB

DLK-224

< REMOVAL AND INSTALLATION >

DOOR LOCK

4. Remove door side grommet, and loosen bolt from grommet

hole.

5. While pulling outside handle (1), remove outside handle

escutcheon (2).

6. While pulling outside handle (1), slide toward rear of vehicle (2)

to remove outside handle.

7. Remove front gasket and rear gasket.
8. While pulling outside handle bracket, slide toward rear of vehicle

to remove outside handle bracket.

9. Separate the outside handle cable connection from the outside handle bracket.
10. Remove door lock bolts.
11. Remove door lock assembly.

INSTALLATION

Installation in the reverse order of removal.

CAUTION:

• When installing do not reuse rear door lock assembly screw. Always replace screw with new ones

when removed. 

• Check rear door lock cable is properly engaged to outside handle bracket.

JMKIA2095ZZ

JMKIA0560ZZ

PIIB5810E

JMKIA2303ZZ

DOOR LOCK

DLK-225

< REMOVAL AND INSTALLATION >

C

D

E

F

G

H

I

J

L

M

A

B

DLK

N

O

P

• After installation, check rear door open/close, lock/unlock operation. 

DLK-226

< REMOVAL AND INSTALLATION >

TRUNK LID

TRUNK LID

TRUNK LID ASSEMBLY
TRUNK LID ASSEMBLY : Removal and Installation

INFOID:0000000009471777

CAUTION:

• Use two people when removing or installing trunk lid assembly due to its heavy weight.

• Use protective tape or shop cloths to protect surrounding components from damage during removal

and installation of trunk lid assembly.

REMOVAL

1. Remove trunk lid finisher. Refer to 

INT-36, "Removal and Installation"

.

2. Disconnect the harness connectors in the trunk lid, remove the harness clips, and then pull the harness

out of the trunk lid.

3. Remove the nuts and the trunk lid assembly.

INSTALLATION

Installation is in the reverse order of removal.

CAUTION:

• After installation, check trunk lid open/close, lock/unlock operation.

• After installation, perform the trunk lid assembly adjustment procedure. Refer to 

DLK-227, "TRUNK

LID ASSEMBLY : Adjustment"

.


Content   ..  374  375  376  377   ..