Nissan Maxima. Manual - part 208


  Index      Nissan     Nissan Maxima (2009-2014 year) - Service and Repair Manual


Search            


Content   ..  206  207  208  209   ..


Nissan Maxima. Manual - part 208


AV-652

< REMOVAL AND INSTALLATION >

[COLOR DISPLAY - W/BOSE & NAVI]

AV CONTROL UNIT

REMOVAL AND INSTALLATION

AV CONTROL UNIT

Removal and Installation

INFOID:0000000009471531

AV CONTROL UNIT

Removal

CAUTION:

Before replacing AV control unit, perform “READ CONFIGURATION” to save current vehicle specifica-

tion. Refer to 

AV-337, "ADDITIONAL SERVICE WHEN REPLACING CONTROL UNIT : Special Repair

Requirement"

.

1. Disconnect the battery negative terminal. Refer to 

PG-67, "Removal and Installation (Battery)"

.

2. Remove cluster lid D. Refer to 

IP-18, "Removal and Installation"

.

3. Remove cluster lid C. Refer to 
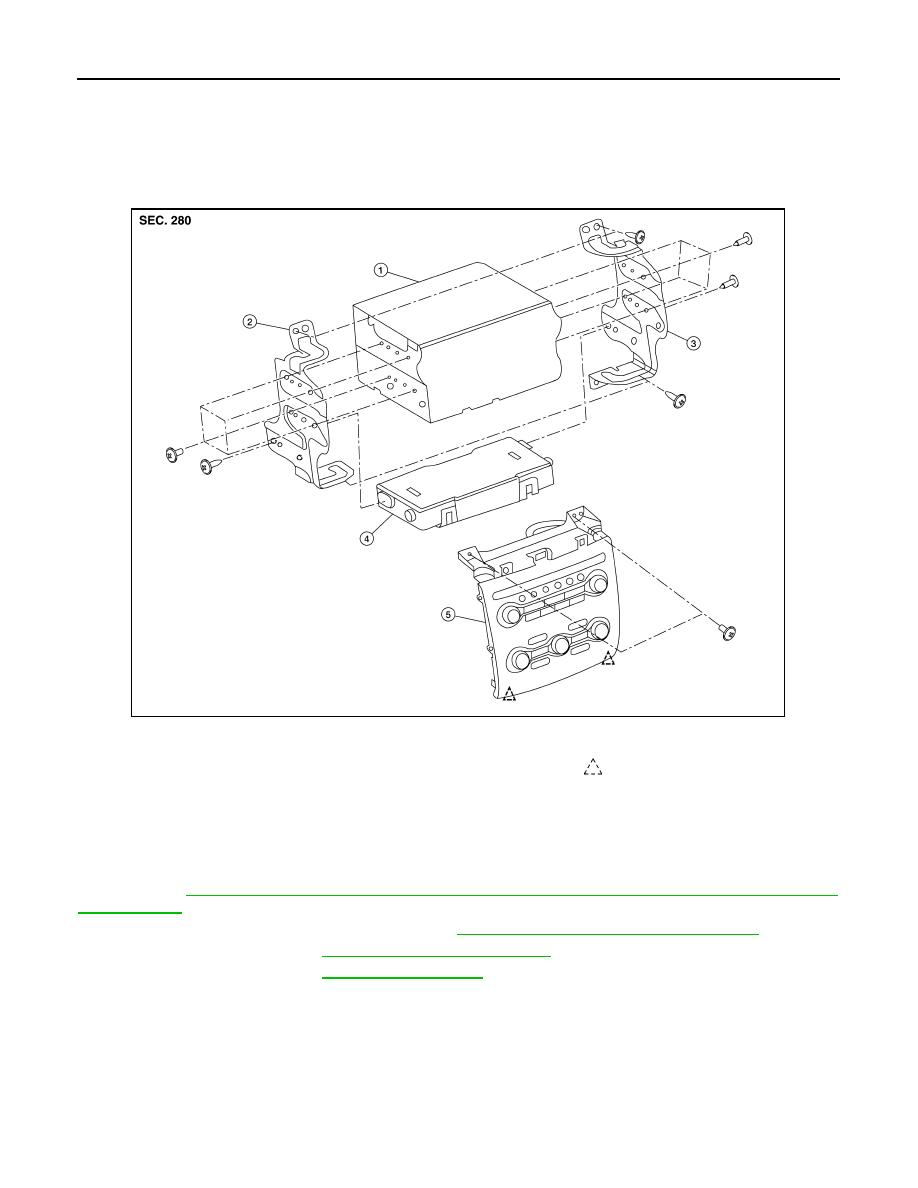
IP-10, "Exploded View"

.

1.

AV control unit

2.

AV control unit bracket (LH)

3.

AV control unit bracket (RH)

4.

A/C auto amp.

5.

Cluster lid C (with A/C and AV switch 
assembly attached)

Clip

AWNIA1926ZZ

AV

AV CONTROL UNIT

AV-653

< REMOVAL AND INSTALLATION >

[COLOR DISPLAY - W/BOSE & NAVI]

C

D

E

F

G

H

I

J

K

L

M

B

A

O

P

4. Remove the AV control unit screws (A), then pull out the AV con-

trol unit (1), disconnect the AV control unit connectors and

remove the AV control unit (1).

Installation

Installation is in the reverse order of removal.

CAUTION:

• When replacing AV control unit, perform “WRITE CONFIGURATION”. Refer to 

AV-337, "ADDITIONAL

SERVICE WHEN REPLACING CONTROL UNIT : Special Repair Requirement"

.

A/C AND AV SWITCH ASSEMBLY

Removal

1. Remove cluster lid D. Refer to 

IP-18, "Removal and Installation"

.

2. Remove cluster lid C. Refer to 

IP-10, "Exploded View"

.

3. Remove the A/C and AV switch assembly screws (A), then pull

out the A/C and AV switch assembly (1) from cluster lid C.

Installation

Installation is in the reverse order of removal.

ALNIA1131ZZ

ALNIA1215ZZ

AV-654

< REMOVAL AND INSTALLATION >

[COLOR DISPLAY - W/BOSE & NAVI]

MULTIFUNCTION SWITCH

MULTIFUNCTION SWITCH

Removal and Installation

INFOID:0000000009471532

REMOVAL

1. Remove cluster lid D. Refer to 

IP-18, "Removal and Installation"

.

2. Remove the four multifunction switch screws (A) and the multi-

function switch (2) from cluster lid D (1).

: Metal clip

INSTALLATION

Installation is in the reverse order of removal.

AWNIA1917ZZ

AV

AUDIO DISPLAY UNIT

AV-655

< REMOVAL AND INSTALLATION >

[COLOR DISPLAY - W/BOSE & NAVI]

C

D

E

F

G

H

I

J

K

L

M

B

A

O

P

AUDIO DISPLAY UNIT

Removal and Installation

INFOID:0000000009471533

REMOVAL

1. Remove cluster lid D. Refer to 

IP-18, "Removal and Installation"

.

2. Remove the audio display unit bracket screws (A).
3. Pull out the audio display unit and bracket assembly (1).
4. Disconnect the harness connectors from the audio display unit

and bracket assembly (1) and remove. 

1.

Audio display unit bracket

2.

Audio display unit

3.

Cluster lid D

4.

Multifunction switch

A.

Audio display unit bracket screws

B.

Audio display unit screws

Metal Clip

AWNIA1928ZZ

ALNIA1139ZZ


Content   ..  206  207  208  209   ..