Nissan Maxima. Manual - part 1178


  Index      Nissan     Nissan Maxima (2009-2014 year) - Service and Repair Manual


Search            


Content   ..  1176  1177  1178  1179   ..


Nissan Maxima. Manual - part 1178


TM-176

< REMOVAL AND INSTALLATION >

[CVT: RE0F09B]

PADDLE SHIFTER

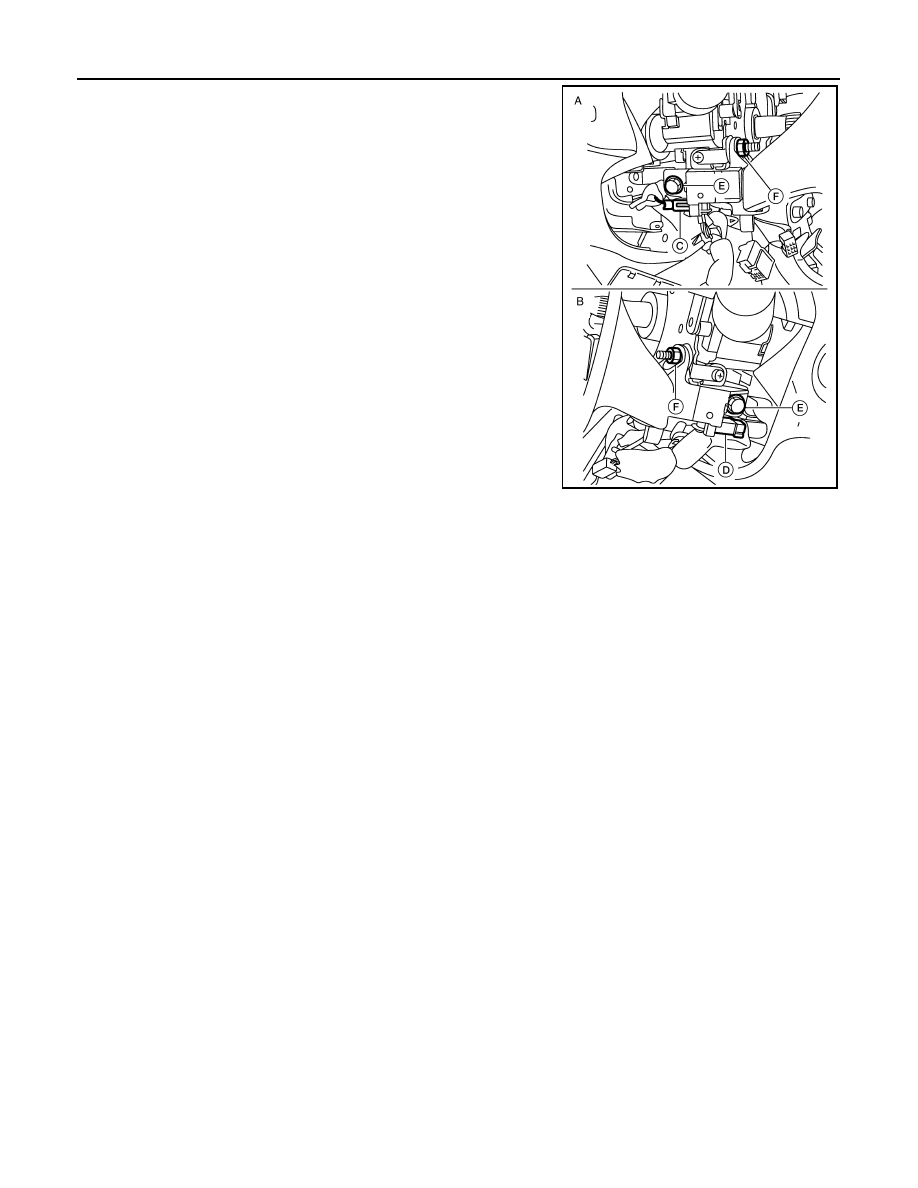
5. Remove the vehicle harness connector (C) and (D) from paddle

shifter.

6. Remove the paddle shifter bolts (E) and nuts (F).
7. Remove the paddle shifter from the steering column assembly.

INSTALLATION

Installation is in the reverse order of removal.

(A)

: Side of paddle shifter (shift-down) 

(B)

: Side of paddle shifter (shift-up)

AWDIA0563ZZ

OIL PAN

TM-177

< REMOVAL AND INSTALLATION >

[CVT: RE0F09B]

C

E

F

G

H

I

J

K

L

M

A

B

TM

N

O

P

OIL PAN

Exploded View

INFOID:0000000010114019

Removal and Installation

INFOID:0000000009469206

REMOVAL

1. Drain CVT fluid from CVT. Refer to 

TM-156, "Changing"

.

2. Remove O-ring from drain plug.
3. Remove oil pan bolts (

).

: Front

4. Remove oil pan.

1.

Transaxle assembly

2.

Oil pan bolt

3.

Drain plug

4.

O-ring

5.

Oil pan

6.

Oil pan gasket

7.

Magnet

Apply CVT Fluid NS-2

JPDIA0608GB

SCIA8135J

TM-178

< REMOVAL AND INSTALLATION >

[CVT: RE0F09B]

OIL PAN

5. Remove oil pan gasket (1) from oil pan (2).
6. Remove magnet (3) from oil pan.

INSTALLATION

Installation is in the reverse order of removal.

CAUTION:

• Completely remove all moisture, oil and old gasket, etc. from the oil pan gasket mating surface of

transaxle case and oil pan.

• Do not reuse oil pan gasket, O-ring and oil pan bolts.

• Apply CVT fluid to O-ring.

• Install the oil pan assembly to the transaxle case with the following procedure.

- Install the oil pan assembly to the transaxle case, and then temporarily tighten the oil pan bolts.

CAUTION:

Do not reuse oil pan bolts.

- Tighten the oil pan bolts in a criss cross pattern to the specified torque.

- Tighten the oil pan bolts again clockwise to the specified torque.

Inspection

INFOID:0000000010114020

Check foreign materials in oil pan to help determine causes of malfunction. If the CVT fluid is very dark, smells

burned, or contains foreign particles, frictional material (clutches) may need replacement. A tacky film that will

not wipe clean indicates varnish build up. Varnish can cause valves and clutches to stick and can inhibit pump

pressure.

INSPECTION AFTER INSTALLATION

Check for CVT fluid leakage and check CVT fluid level. Refer to 

TM-155, "Inspection"

.

SCIA8219J

CONTROL VALVE

TM-179

< REMOVAL AND INSTALLATION >

[CVT: RE0F09B]

C

E

F

G

H

I

J

K

L

M

A

B

TM

N

O

P

CONTROL VALVE

Exploded View

INFOID:0000000010114021

Removal and Installation

INFOID:0000000009469209

REMOVAL

1. Disconnect battery negative terminal. Refer to 

PG-67, "Removal and Installation (Battery)"

.

2. Remove the front fender protector side cover, Refer to 

EXT-24, "Removal and Installation"

.

3. Disconnect the CVT unit harness connector. Refer to 

TM-150, "Removal and Installation Procedure for

CVT Unit Connector"

.

4. Remove the oil pan. Refer to 

TM-177, "Removal and Installation"

.

5. Remove oil strainer.

1.

Transaxle assembly

2.

Control valve

3.

Snap ring

4.

Collar

5.

Manual plate

6.

Lock nut

7.

Lock nut

8.

Oil pan bolt

9.

O-ring

10. Drain plug

11. Oil pan

12. Oil pan gasket

13. Magnet

14. Lip seal

A.

O-ring
: NISSAN CVT Fluid NS-2

JPDIA0843GB


Content   ..  1176  1177  1178  1179   ..