Nissan Altima HL32 Hybrid. Manual - part 1148


  Index      Nissan     Nissan Altima HL32 Hybrid (2009 year) - Service and Repair Manual


Search            


Content   ..  1146  1147  1148 


Nissan Altima HL32 Hybrid. Manual - part 1148


FRONT WIPER

WW-91

< ON-VEHICLE REPAIR >

C

D

E

F

G

H

I

J

K

M

A

B

WW

N

O

P

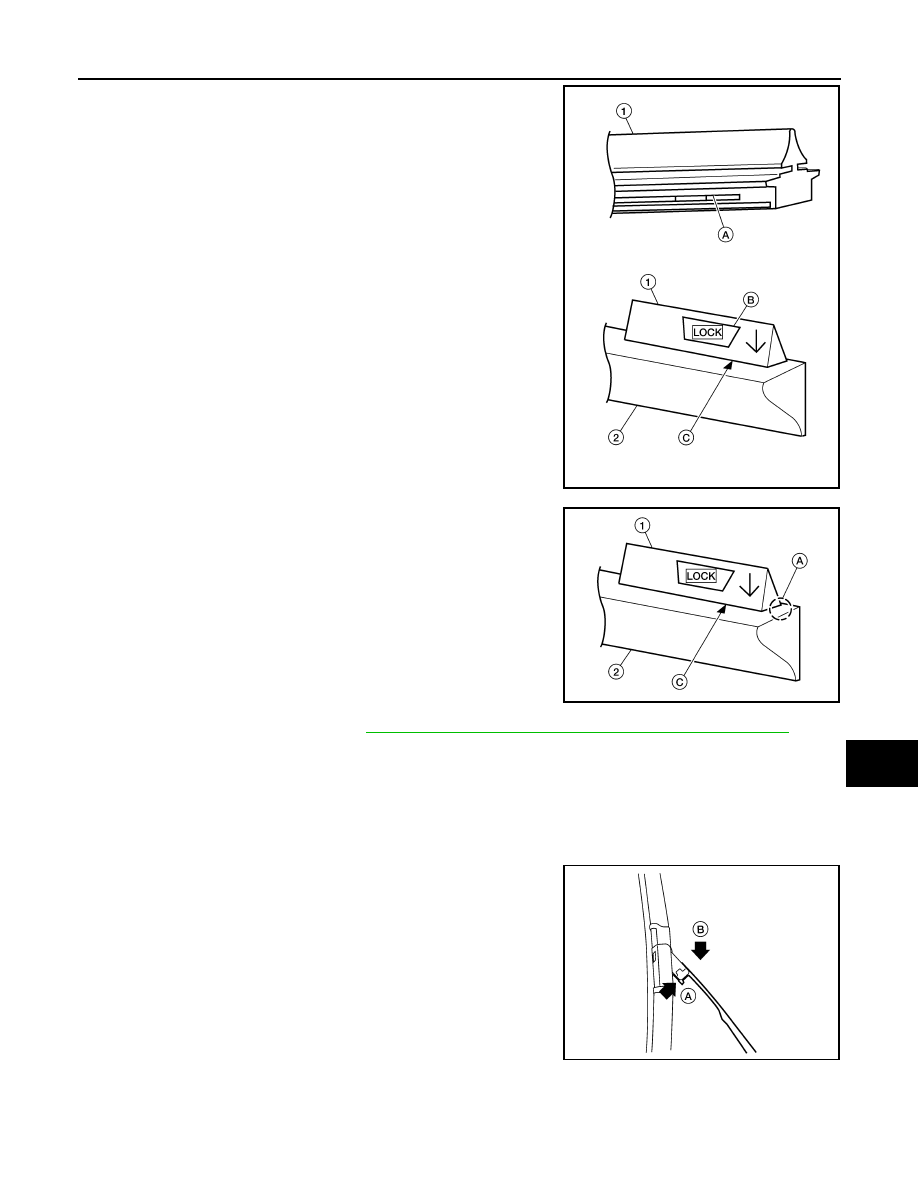
3. Push the wiper blade refill (1) until the tabs on the front wiper

blade (2) fit into the stoppers (A) in the end of the wiper blade

refill (1). Make sure the LOCK mark (B) on the wiper blade refill

(1) is aligned with the lock point symbol (C) on the front wiper

blade (2) as shown.

4. Before installing the front wiper blade assembly, make sure that

the wiper blade refill (1) end is fully covered by the front wiper

blade (2) in area (A) as shown.

5. Install the front wiper blade. Refer to 

WW-91, "FRONT WIPER BLADE : Removal and Installation"

.

FRONT WIPER BLADE
FRONT WIPER BLADE : Removal and Installation

INFOID:0000000004216529

REMOVAL

1. Lift the front wiper arm and wiper blade assembly away from the windshield.
2. Rotate the front wiper blade assembly and push the release tab

(A), then move the front wiper blade assembly down (B) the

front wiper arm.

3. Remove the front wiper blade assembly.

INSTALLATION

CAUTION:

• After the front wiper blade assembly installation, return the front wiper arm to the original position

on the windshield to prevent damage when the hood is opened.

ALLIA0864ZZ

ALLIA0865ZZ

AWLIA1565ZZ

WW-92

< ON-VEHICLE REPAIR >

FRONT WIPER

• Check that the front wiper blade assembly contacts the windshield properly; otherwise the front

wiper arm may be damaged from wind pressure while driving.

1. Insert the front wiper blade assembly onto the front wiper arm and slide it up until it clicks into place.
2. Rotate the front wiper blade assembly so the dimple is in the groove.
3. Lay the front wiper arm and front wiper blade assembly back down on the windshield.

FRONT WIPER ARMS
FRONT WIPER ARMS : Removal and Installation

INFOID:0000000004216530

REMOVAL

1. Turn wiper switch ON to operate wiper motor, and then turn wiper switch OFF (auto stop).
2. Open hood, remove wiper arm caps, and remove wiper arm nuts.
3. Raise wiper arm, and remove wiper arm from the pivot shaft.

INSTALLATION

1. Clean up the pivot shaft as shown. This will reduce possibility of

wiper arm looseness.

2. Prior to wiper arm installation, turn wiper switch ON to operate wiper motor and then turn it OFF (auto

stop).

3. Push wiper arm onto pivot shaft, paying attention to blind spline.
4. Lift the blade up and then set it down onto glass surface to set

the blade center to clearance (A), (B), (C) and (D) immediately

before temporarily tightening the wiper arm nuts.

5. Spray washer fluid. Turn wiper switch ON to operate wiper motor

and then turn it OFF. 

6. Make sure that wiper blades stop within clearance (A), (B), (C)

and (D). 

7. Tighten wiper arm nuts to specification. Refer to 

WW-88, "Exploded View"

.

8. Attach wiper arm caps.

ADJUSTMENT

To adjust the wiper arm stop location, the wiper arm must be removed and installed. Refer to 

WW-92, "FRONT

WIPER ARMS : Removal and Installation"

.

FRONT WIPER DRIVE ASSEMBLY
FRONT WIPER DRIVE ASSEMBLY : Removal and Installation

INFOID:0000000004216531

REMOVAL

1. Turn wiper switch ON to operate wiper motor, and then turn wiper switch OFF (auto stop).

SEL024J

Clearance (A)

: 41.3 

± 7.5 mm (1.626 ± 0.295 in)

Clearance (B)

: 65.5 

± 7.5 mm (2.579 ± 0.295 in)

Clearance (C)

: 27.8 mm (1.094 in)

Clearance (D)

: 53.7 mm (2.114 in)

BKIA0254E

FRONT WIPER

WW-93

< ON-VEHICLE REPAIR >

C

D

E

F

G

H

I

J

K

M

A

B

WW

N

O

P

2. Remove wiper arms. Refer to 

WW-92, "FRONT WIPER ARMS : Removal and Installation"

.

3. Remove the cowl top cover. Refer to 

EXT-17, "Removal and Installation"

.

4. Remove the strut brace bolts (A), detach the wiper drive assem-

bly harness clips, then remove the strut brace (1).

5. Detach the wiper drive harness clip from the wiper drive assembly frame.
6. Remove the front wiper drive assembly bolts (A), disconnect the

wiper drive motor connector (B) and remove the front wiper drive

assembly (1).

INSTALLATION

1. Install the front wiper drive assembly (1), connect the wiper drive

motor connector (B) and install the front wiper drive assembly

bolts (A).

2. Turn wiper switch ON to operate wiper motor, then turn wiper switch OFF (auto stop).
3. Attach the wiper drive harness clip to the wiper drive assembly frame.
4. Install the strut brace (1), then attach the wiper drive assembly

harness clips and install the strut brace bolts (A).

5. Install the cowl top cover. Refer to 

EXT-17, "Removal and Installation"

.

6. Attach the wiper arms and adjust the wiper arm stop location. Refer to 

WW-92, "FRONT WIPER ARMS :

Removal and Installation"

.

ALLIA0026ZZ

ALLIA0027ZZ

ALLIA0027ZZ

ALLIA0026ZZ

WW-94

< ON-VEHICLE REPAIR >

FRONT WASHER

FRONT WASHER

WASHER TUBE
WASHER TUBE : Layout

INFOID:0000000004216532

FRONT WASHER NOZZLE
FRONT WASHER NOZZLE : Removal and Installation

INFOID:0000000004216533

REMOVAL

1. Remove the cowl top cover. Refer to 

EXT-17, "Removal and Installation"

.

2. Push washer nozzle tab (A), to release the washer nozzle (1)

from the cowl top cover, then disconnect the washer nozzle

hose (2) from the washer nozzle (1).

INSTALLATION

1.

Washer nozzle LH

2.

Washer nozzle hose LH

3.

Washer nozzle RH

4.

Washer nozzle hose RH

5.

Y-tube connector

6.

Clip

7.

Washer tank hose

8.

Washer tank

A.

Tube connectors

ALLIA0859ZZ

ALLIA0028ZZ


Content   ..  1146  1147  1148