Nissan Altima HL32 Hybrid. Manual - part 1085


  Index      Nissan     Nissan Altima HL32 Hybrid (2009 year) - Service and Repair Manual


Search            


Content   ..  1083  1084  1085  1086   ..


Nissan Altima HL32 Hybrid. Manual - part 1085


VTL-20

< ON-VEHICLE REPAIR >

AIR MIX DOOR MOTOR

AIR MIX DOOR MOTOR

Removal and Installation

INFOID:0000000004215246

NOTE:

The illustrations are shown with the heater and cooling unit assembly out of the vehicle for clarity.

AIR MIX DOOR MOTOR - LH

Removal

1. Remove the instrument lower cover LH. Refer to 

IP-12, "Removal and Installation"

.

2. Remove the center console side finisher LH. Refer to 

IP-12, "Removal and Installation"

.

3. Remove the heater and cooling unit foot duct LH (2).
4. Remove the tire pressure (monitoring system) receiver. Refer to

WT-61, "Removal and Installation"

.

5. Disconnect the air mix door motor connector (1).
6. Remove the air mix door motor screws (A) and then remove the

air mix door motor LH.

Installation

Installation is in the reverse order of removal.

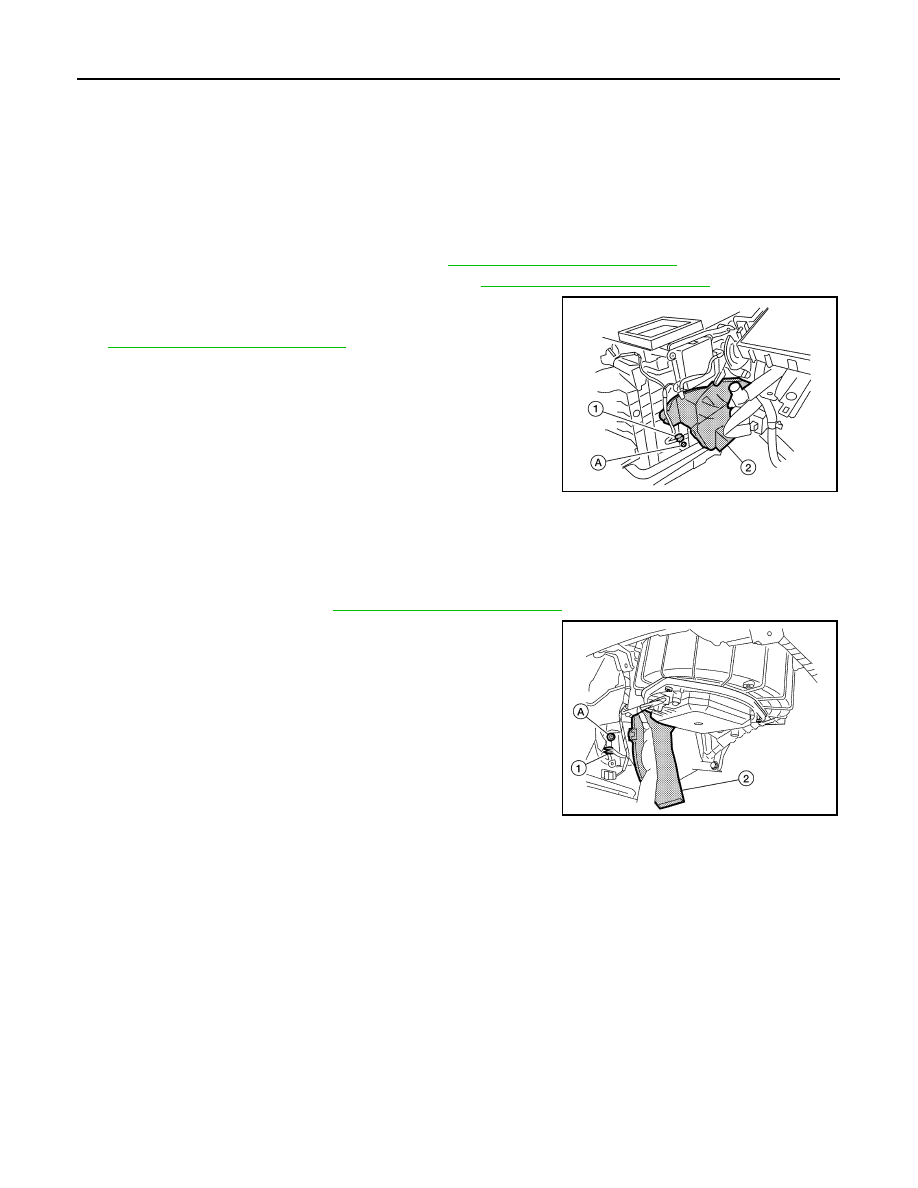
AIR MIX DOOR MOTOR - RH

Removal

1. Remove the glove box. Refer to 

IP-12, "Removal and Installation"

.

2. Remove the heater and cooling unit foot duct RH (2).
3. Disconnect the air mix door motor connector (1).
4. Remove the air mix door motor screws (A) and then remove the

air mix door motor RH.

Installation

Installation is in the reverse order of removal.

ALIIA0019ZZ

ALIIA0020ZZ

EVAPORATOR

VTL-21

< ON-VEHICLE REPAIR >

C

D

E

F

G

H

J

K

L

M

A

B

VTL

N

O

P

EVAPORATOR

Removal and Installation

INFOID:0000000004215247

COMPONENTS

Heater and Cooling Unit

REMOVAL

NOTE:

The evaporator and expansion valve assembly cannot be disassembled. Replace them as an assembly.
1. Remove the heater and cooling unit assembly. Refer to 

HA-28, "HFC-134a (R-134a) Service Procedure"

.

2. Remove the blower unit. Refer to 

VTL-13, "Removal and Installation"

.

3. Remove the heater and cooling unit foot duct RH.
4. Remove the air mix door motor RH.
5. Remove the evaporator cover.
6. Remove the evaporator and expansion valve assembly.

• Remove the intake sensor to transfer to the new evaporator and expansion valve assembly.

CAUTION:

• Cap or wrap the joint of the pipes with suitable material such as vinyl tape to avoid the entry of

air.

• Mark the mounting position of the intake sensor. 

INSTALLATION

Installation is in the reverse order of removal.

CAUTION:

Replace the O-rings with new ones, then apply electric compressor oil to them when installing them.

ALIIA0021ZZ

1.

Heater and cooling unit case

2.

Evaporator and expansion valve as-
sembly

3.

Intake sensor

4.

In-cabin microfilter

5.

Evaporator cover

6.

Heater and cooling unit foot duct RH

7.

Blower unit

Front

VTL-22

< ON-VEHICLE REPAIR >

HEATER CORE

HEATER CORE

Removal and Installation

INFOID:0000000004215248

COMPONENTS

REMOVAL

1. Remove the heater and cooling unit assembly. Refer to 

VTL-17, "Removal and Installation"

.

2. Remove the heater grommet, heater pipe support and heater pipe cover.
3. Remove the heater and cooling unit foot duct LH.
4. Remove the heater core.

INSTALLATION

Installation is in the reverse order of removal.

• Make sure that the aspirator hose is securely attached to the aspirator on the heater and cooling unit foot

duct LH.

1.

Heater grommet

2.

Heater pipe support

3.

Heater and cooling unit foot duct LH

4.

Heater core

5.

Heater and cooling unit case

Front

ALIIA0022ZZ

DUCTS AND GRILLES

VTL-23

< ON-VEHICLE REPAIR >

C

D

E

F

G

H

J

K

L

M

A

B

VTL

N

O

P

DUCTS AND GRILLES

DUCTS, NOZZLES AND GRILLES
DUCTS, NOZZLES AND GRILLES : Components

INFOID:0000000004215249

Ducts

ALIIA0023ZZ

1.

Upper ventilator duct

2.

Heater and cooling unit assembly

3.

Connector duct (LH)

4.

Floor ventilator duct (LH)

5.

Connector duct (center)

6.

Rear floor duct (LH)

7.

Rear ventilator duct (center)

8.

Rear floor duct (RH)

9.

Floor ventilator duct (RH)

10. Connector duct (RH)

11. Rear console duct

Front


Content   ..  1083  1084  1085  1086   ..