Nissan Sentra. Manual - part 611


  Index      Nissan     Nissan Sentra (2014 year) - Service and Repair Manual


Search            


Content   ..  609  610  611  612   ..


Nissan Sentra. Manual - part 611


REAR PARCEL SHELF FINISHER

INT-33

< REMOVAL AND INSTALLATION >

C

D

E

F

G

H

I

K

L

M

A

B

INT

N

O

P

Removal and Installation

INFOID:0000000009756917

REMOVAL

1. Remove high-mounted stop lamp (if equipped). Refer to 

EXL-124, "Removal and Installation"

.

2. Remove rear pillar finisher (LH/RH). Refer to 

INT-29, "REAR PILLAR FINISHER : Removal and Installa-

tion"

.

3. Remove top three clips from the rear seatback finishers (LH/RH).
4. Remove the rear seat belt lower anchor bolts. Refer to 

SB-11, "Removal and Installation - Seat Belt

Retractor"

.

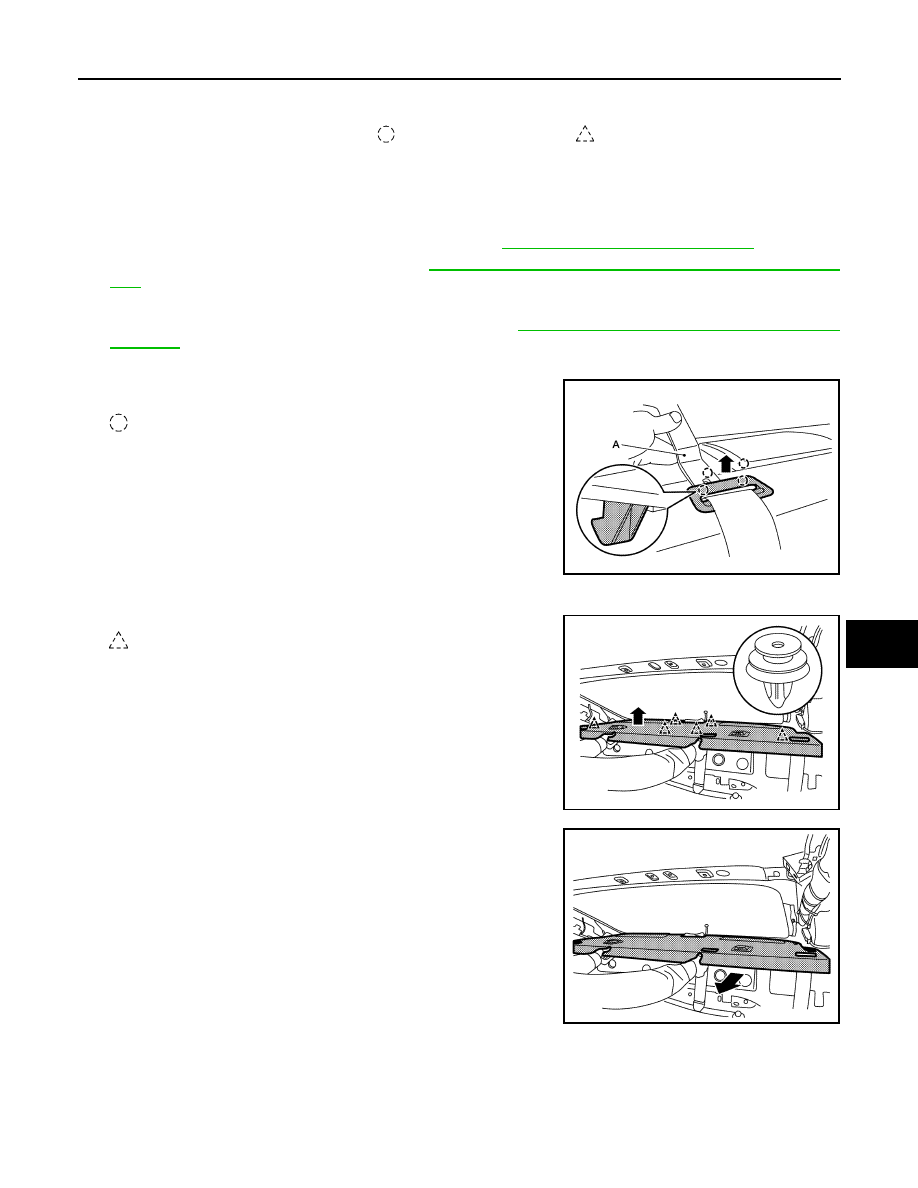
5. Remove rear parcel shelf finisher.
a. Release seat belt finisher pawls using a suitable tool (A) and

remove all seat belt finishers (LH/RH/center).

: Pawl

b. Route all rear seat belts through rear parcel shelf finisher.
c. Release the rear parcel shelf finisher clips as shown.

: Clip

d. Pull rear parcel shelf finisher forward and remove.

6. Remove top tether strap anchor finishers from rear parcel shelf finisher.

INSTALLATION

Installation is in the reverse order of removal.

7.

Top tether strap anchor finisher 
(LH)

8.

Seat belt finisher (LH)

9.

Seat belt finisher (center)

10.

High-mounted stop lamp

Pawl

Clip

AWJIA0977ZZ

AWJIA0975ZZ

JMJIA7802ZZ

INT-34

< REMOVAL AND INSTALLATION >

REAR PARCEL SHELF FINISHER

Removal and Installation-Top Tether Strap Anchor Finisher

INFOID:0000000009756918

REMOVAL

Release top tether strap anchor finisher pawls and remove the  top tether strap anchor finisher.

INSTALLATION

Installation is in the reverse order of removal.

FLOOR TRIM

INT-35

< REMOVAL AND INSTALLATION >

C

D

E

F

G

H

I

K

L

M

A

B

INT

N

O

P

FLOOR TRIM

Exploded View

INFOID:0000000009756919

Removal and Installation

INFOID:0000000009756920

REMOVAL

1. Remove front seat assemblies. Refer to the following.

• Refer to 

SE-18, "DRIVER SIDE : Removal and Installation - Seat Assembly"

 (Driver Seat).

• Refer to 

SE-20, "PASSENGER SIDE : Removal and Installation - Seat Assembly"

 (Passenger Seat).

2. Remove rear seat cushion assembly. Refer to 

SE-23, "Removal and Installation - Seat Cushion Assem-

bly"

.

3. Remove dash side finishers (LH/RH). Refer to 

INT-26, "DASH SIDE FINISHER : Removal and Installa-

tion"

.

4. Remove center pillar lower finishers (LH/RH). Refer to 

INT-27, "CENTER PILLAR LOWER FINISHER :

Removal and Installation"

.

ALJIA1130ZZ

1.

Floor trim

2.

Harness protector

3.

Front floor spacer (RH)

4.

Front floor spacer (LH)

5.

Rear floor spacer (LH)

6.

Rear floor spacer (RH)

7.

Column hole cover

Pawl

Front

INT-36

< REMOVAL AND INSTALLATION >

FLOOR TRIM

5. Remove rear pillar lower finishers (LH/RH). Refer to 

INT-30, "REAR PILLAR FINISHER : Removal and

Installation - Rear Pillar Lower Finisher"

.

6. Remove lap pre-tensioner anchor bolt. Refer to 

SB-8, "Removal and Installation"

7. Remove center console assembly. Refer to 

IP-17, "Removal and Installation"

.

8. Remove console rear bracket. Refer to 

IP-17, "Exploded View"

.

9. Remove rear floor duct. Refer to 

VTL-7, "REAR FLOOR DUCT : Removal and Installation - Rear Floor

Duct"

10. Remove shift selector assembly. Refer to 

TM-253, "Removal and Installation"

.

11. Remove diagnosis sensor unit. Refer to 

SR-28, "Removal and Installation"

.

12. Remove parking brake lever assembly. Refer to 

PB-7, "Removal and Installation"

.

13. Remove nut (A) and then remove instrument stay.

14. Disconnect drain hose.

15. Remove clips (A) and the column hole cover.

16. Release pawl using a suitable tool (A) and open the harness

protector.

: Pawl

JMIIA1942ZZ

JMIIA1950ZZ

JMJIA6499ZZ

ALJIA1131ZZ


Content   ..  609  610  611  612   ..