Nissan Sentra. Manual - part 535


  Index      Nissan     Nissan Sentra (2014 year) - Service and Repair Manual


Search            


Content   ..  533  534  535  536   ..


Nissan Sentra. Manual - part 535


HA-34

< REMOVAL AND INSTALLATION >

COMPRESSOR

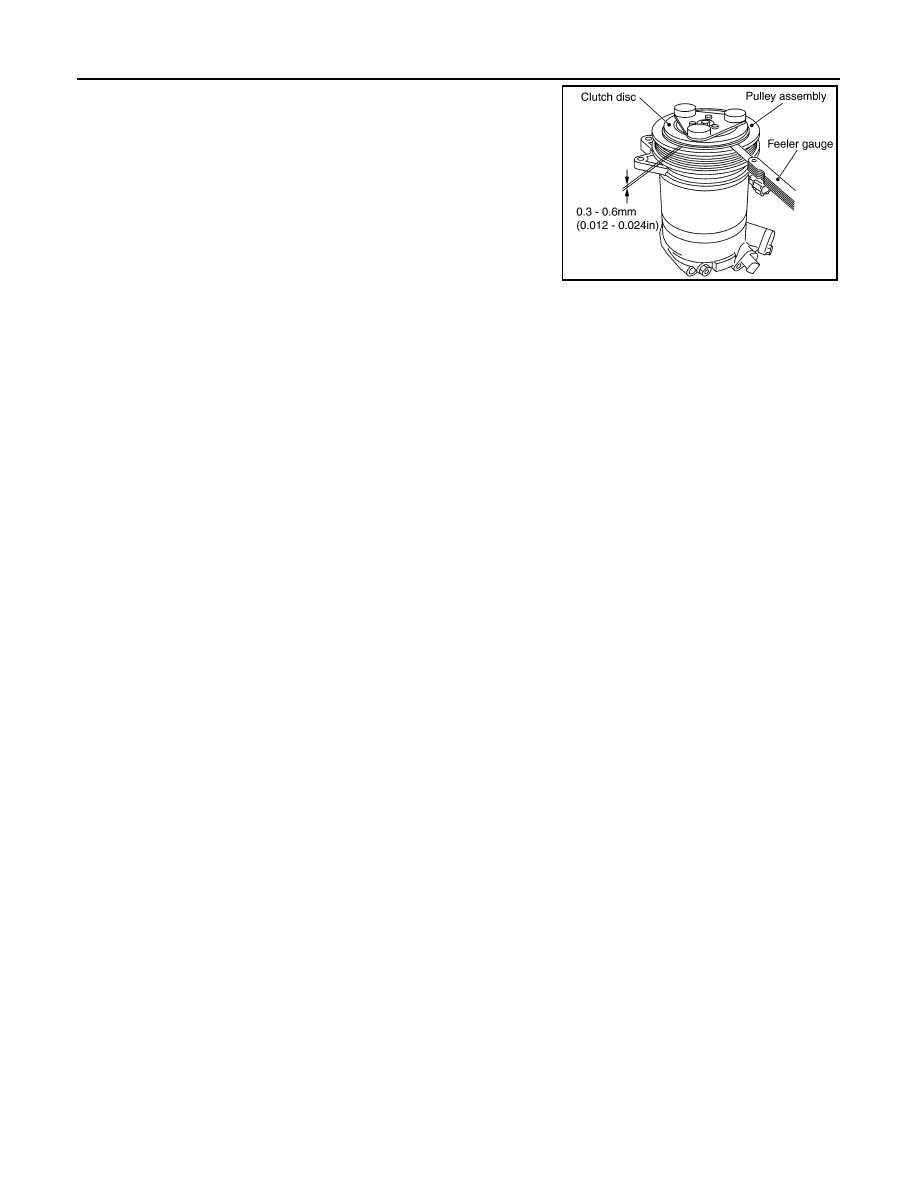
1. Check the clearance around the entire periphery of the clutch

disc.

2. If specified clearance is not obtained, replace compressor clutch.

BREAK-IN OPERATION

When replacing compressor clutch assembly, always conduct the break-in operation. This is done by engag-

ing and disengaging the clutch about 30 times. Break-in operation raises the level of transmitted torque.

Clutch disc to 
pulley clearance

: 0.3 - 0.6 mm (0.01 - 0.02 in)

RJIA1886E

COOLER PIPE AND HOSE

HA-35

< REMOVAL AND INSTALLATION >

C

D

E

F

G

H

J

K

L

M

A

B

HA

N

O

P

COOLER PIPE AND HOSE

Exploded View

INFOID:0000000009756310

LOW-PRESSURE FLEXIBLE HOSE
LOW-PRESSURE FLEXIBLE HOSE : Removal and Installation

INFOID:0000000009756311

REMOVAL

1. Discharge the refrigerant. Refer to 

HA-23, "Recycle Refrigerant"

.

2. Remove the upper torque rod bolts (A) and the upper torque rod

(1).

1.

High-pressure service port

2.

High-pressure pipe

3.

Expansion valve

4.

Low-pressure service port

5.

Low-pressure flexible hose

6.

Compressor

7.

Refrigerant pressure sensor

8.

Condenser and liquid tank assembly 9.

High-pressure flexible hose

AWBIA1912ZZ

ALIIA0648ZZ

HA-36

< REMOVAL AND INSTALLATION >

COOLER PIPE AND HOSE

3. Remove the washer tank inlet bolt (A), then pull the washer tank

inlet (1) up and out of the washer tank.

4. Remove the engine ground bolts (A) and the engine ground (1).

5. Remove the A/C pipe bracket bolts (A).

(1): Low-pressure service port

(2): High-pressure service port

6. Remove the push nut (A) from the expansion valve insulator (1)

and reposition.

7. Remove the bolt (A) that retains the high-pressure pipe and low-

pressure flexible hose to the expansion valve, then disconnect

the low-pressure flexible hose from the expansion valve and

high-pressure pipe.

CAUTION:

Cap or wrap the joint of the hose with suitable material such

as vinyl tape to avoid the entry of air.

ALIIA0649ZZ

ALIIA0650ZZ

ALIIA0651ZZ

ALIIA0660ZZ

ALIIA0654ZZ

COOLER PIPE AND HOSE

HA-37

< REMOVAL AND INSTALLATION >

C

D

E

F

G

H

J

K

L

M

A

B

HA

N

O

P

8. Remove the front under cover. Refer to 

EXT-31, "ENGINE UNDER COVER : Removal and Installation"

.

9. Remove the bolt that retains the high-pressure flexible hose to the compressor, then disconnect the high-

pressure flexible hose from the compressor.

10. Remove the bolt that retains the low-pressure flexible hose to the compressor, then disconnect the low-

pressure flexible hose from the compressor.

11. Remove the low-pressure flexible hose.

INSTALLATION

Installation is in the reverse order of removal.

CAUTION:

• Do not reuse O-rings.

• Apply A/C oil to the new O-rings.

• After charging refrigerant, check for leaks. Refer to 

HA-21, "Leak Test"

.

HIGH-PRESSURE FLEXIBLE HOSE
HIGH-PRESSURE FLEXIBLE HOSE : Removal and Installation

INFOID:0000000009756312

REMOVAL

1. Discharge the refrigerant. Refer to 

HA-23, "Recycle Refrigerant"

.

2. Remove the core support upper cover. Refer to 

HA-39, "Exploded View"

.

3. Remove the bolt (A) that retains the high-pressure flexible hose

to the condenser, then disconnect the high-pressure flexible

hose from the condenser and liquid tank assembly.

CAUTION:

Cap or wrap the joint of the hose with suitable material such

as vinyl tape to avoid the entry of air.

4. Remove the bolt that retains the high-pressure flexible hose to the compressor, then disconnect the high-

pressure flexible hose from the compressor.

5. Remove the high-pressure flexible hose.

INSTALLATION

Installation is in the reverse order of removal.

CAUTION:

• Do not reuse O-rings.

• Apply A/C oil to new O-rings.

• After charging refrigerant, check for leaks. Refer to 

HA-21, "Leak Test"

.

HIGH-PRESSURE PIPE
HIGH-PRESSURE PIPE : Removal and Installation

INFOID:0000000009756313

REMOVAL

1. Discharge the refrigerant. Refer to 

HA-23, "Recycle Refrigerant"

.

2. Remove the core support upper. Refer to 

HA-39, "Exploded View"

.

3. Remove the low-pressure flexible hose. Refer to 

HA-35, "LOW-PRESSURE FLEXIBLE HOSE : Removal

and Installation"

.

ALIIA0652ZZ


Content   ..  533  534  535  536   ..