Nissan Leaf. Manual - part 1058


  Index      Nissan     Nissan Leaf (2011-2014 year) - Service and Repair Manual


Search            


Content   ..  1056  1057  1058  1059   ..


Nissan Leaf. Manual - part 1058


REAR SEAT

SE-39

< REMOVAL AND INSTALLATION >

C

D

E

F

G

H

I

K

L

M

A

B

SE

N

O

P

• Seatback assembly (RH)

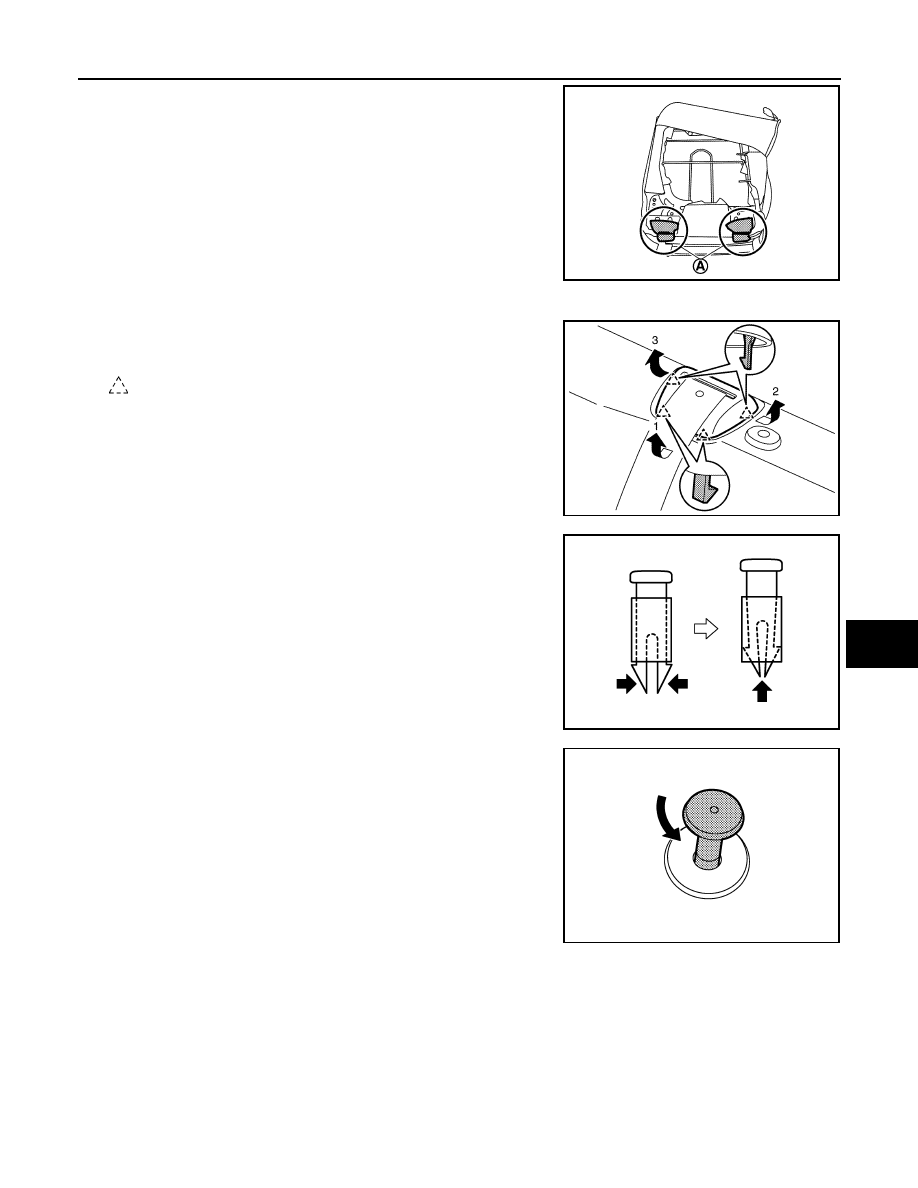
5. Remove center seat belt finisher (seatback assembly (LH) only).
a. Pull up on front of center seat belt finisher, then release pawls.
b. Pull up on sides of center seat belt finisher, release pawls and

remove.

: Pawl

6. Release the headrest holder locks as shown and remove the

headrest holders.

CAUTION:

Before removing/installing the headrest holder, check its

orientation (front/rear and right/left).

7. Rotate the seatback latch release knob counterclockwise and

remove.

JMJIA8359ZZ

JMJIA5062ZZ

PIIB4084J

JMJIA4374ZZ

SE-40

< REMOVAL AND INSTALLATION >

REAR SEAT

8. Reach up through seatback pad and remove the seatback latch

release knob finisher as shown.

CAUTION:

When installing seatback lock knob finisher, check front

and rear orientation and be careful to install it normally.

9. Remove seatback trim and seatback pad as an assembly.
10. Remove hog rings and separate the seatback trim from the seatback pad.

NOTE:

Remove all hog rings and discard them.

11. Remove seatback latch assembly bolts and the seatback latch assembly.
12. Remove center seat belt retractor. Refer to 

SB-16, "SEAT BELT RETRACTOR : Removal and Installa-

tion"

.

ASSEMBLY

Assemble is in the reverse order of disassembly.

• Install new hog rings on the seatback trim in original positions. 

• Use only one hog ring in each designated location.

• Make sure hog rings are correctly fastened around both the seat-

back trim and seatback pad wires.

• Use NISSAN standard hog rings and tools to assemble.

SEAT CUSHION
SEAT CUSHION : Removal and Installation

INFOID:0000000010122966

REMOVAL

CAUTION:

When removing the seat cushion, do not damage the rear seat heater harness and harness connector.
1. Lift up the seat cushion assembly close to the front edge (B) to release it from the seat cushion hooks (A)

(one for each side) and remove the seat cushion assembly.

: Front

CAUTION:

Do not use excessive force to front of seat cushion assembly when removing.

To avoid damage, lift seat cushion assembly closest to seat cushion hooks.

JMJIA4375ZZ

PIIB3356J

JMJIA4835ZZ

REAR SEAT

SE-41

< REMOVAL AND INSTALLATION >

C

D

E

F

G

H

I

K

L

M

A

B

SE

N

O

P

2. Pull out seat belt buckle from seat cushion assembly.
3. Lift up seat cushion assembly, and then disconnect the rear seat

heater harness connector (A) and unclip the harness from the

seat cushion assembly.

: Clip

4. Remove seat cushion assembly from vehicle.

INSTALLATION

Installation is in the reverse order of removal.

CAUTION:

• If center seat belt buckle (1) and seat belt buckle RH (2) are not installed in normal position, the seat

belt cannot be fastened. After seat cushion assembly installation, check that center seat belt buckle

is positioned as shown.

SEAT CUSHION : Disassembly and Assembly

INFOID:0000000010122967

DISASSEMBLY

1. Remove the seat cushion assembly. Refer to 

SE-40, "SEAT CUSHION : Removal and Installation"

.

2. Remove the hog rings and separate the seat cushion trim from the seat cushion pad.
NOTE:

Remove all pieces of hog rings and discard them.

ASSEMBLY

Assemble is in the reverse order of disassembly.

• Install new hog rings on the seat cushion trim in original positions. 

• Use only one hog ring in each designated location.

• Make sure hog rings are correctly fastened around both the seat

cushion trim and seat cushion pad wires.

• Use NISSAN standard hog rings and tools to assemble.

SEATBACK HINGE
SEATBACK HINGE : Removal and Installation

INFOID:0000000010122968

Seatback hinge bracket (center)

JMJIA8360ZZ

JMJIA7317ZZ

PIIB3356J

SE-42

< REMOVAL AND INSTALLATION >

REAR SEAT

REMOVAL

1. Remove seatback assembly (LH/RH). Refer to 

SE-37, "SEATBACK : Removal and Installation"

.

2. Remove seatback hinge bracket (center) bolts and remove.

INSTALLATION

1. Temporarily tighten all bolts, then tighten bolts to specification in

order shown. Refer to 

SE-36, "Exploded View"

.

: Front

Seatback hinge bracket (LH/RH)

REMOVAL

1. Remove seatback assembly. Refer to 

SE-37, "SEATBACK : Removal and Installation"

.

2. Remove seatback hinge bracket finisher.
a. Pull seatback hinge finisher in direction shown (

) and release

at locations (A).

b. Then lift in direction shown (

) and remove.

3. Remove bolt (A) and the seatback hinge bracket.

JMJIA8361ZZ

JMJIA8362ZZ

JMJIA8363ZZ

JMJIA8364ZZ


Content   ..  1056  1057  1058  1059   ..