Nissan Frontier D22. Manual - part 810


  Index      Nissan     Nissan Frontier D22 Pickup (1998-2004 year) - Service and Repair Manual


Search            


Content   ..  808  809  810  811   ..


Nissan Frontier D22. Manual - part 810


MT-46

[FS5R30A]

ON-VEHICLE SERVICE

ON-VEHICLE SERVICE

PFP:00000

Replacing Rear Oil Seal — 2WD Model

ECS007HY

REMOVAL

1.

Remove the propeller shaft. Refer to 

PR-8, "Removal and Instal-

lation"

 .

2.

Remove rear oil seal using Tool.

Always replace with a new rear oil seal once it has been
removed.

INSTALLATION

1.

Install new rear oil seal until it stops.

Apply multi-purpose grease to seal lip of oil seal before install-
ing.

2.

Installation is in the reverse order of removal.

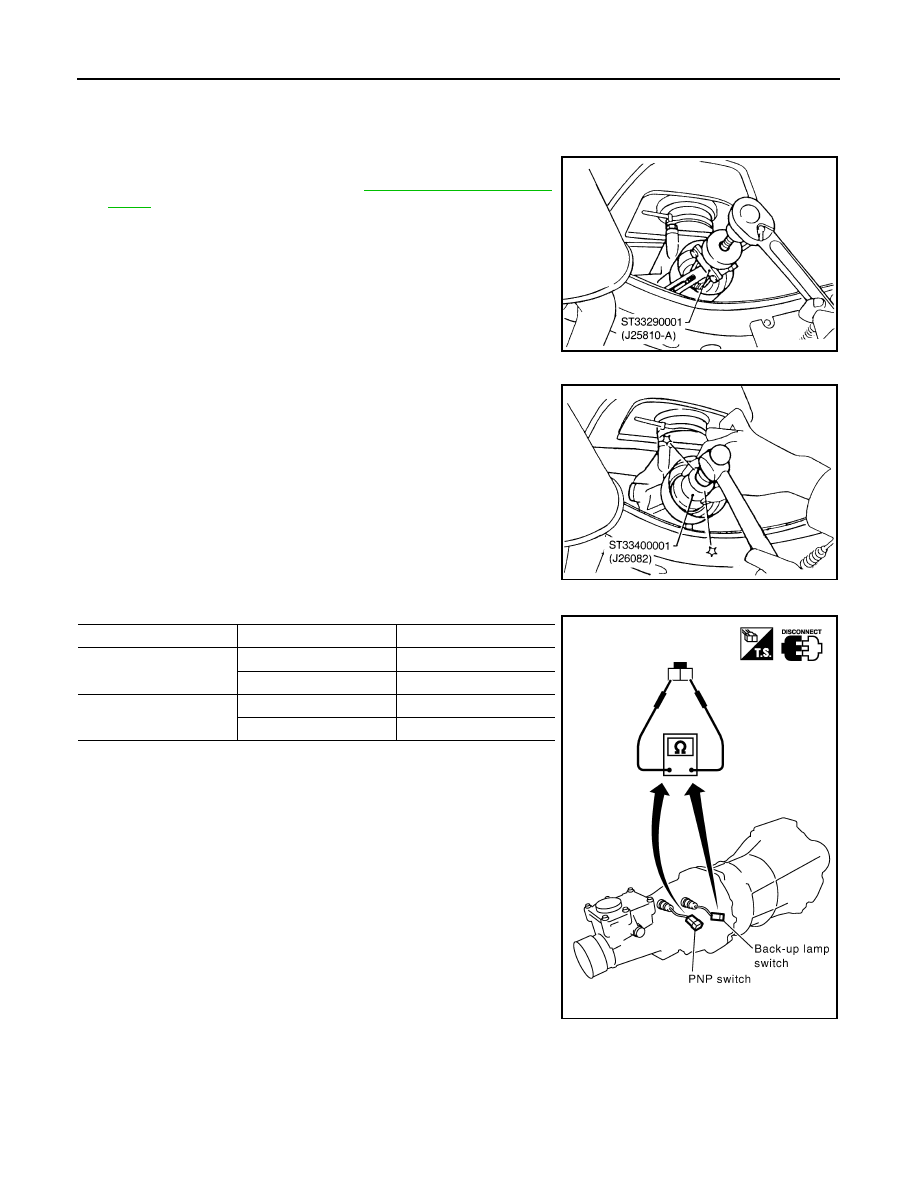
Position Switch Check

ECS007HZ

Tool number

: ST33290001 (J25810-A)

SMT479CA

Tool number

: ST33400001 (J26082)

SMT480CA

Switch

Gear position

Continuity

Back-up lamp switch

Reverse

Yes

Except reverse

No

Park/neutral position 
(PNP) switch

Neutral

Yes

Except neutral

No

SMT981D

ON-VEHICLE SERVICE

MT-47

[FS5R30A]

D

E

F

G

H

I

J

K

L

M

A

B

MT

AMT205

MT-48

[FS5R30A]

TRANSMISSION ASSEMBLY

TRANSMISSION ASSEMBLY

PFP:32010

Removal and Installation

ECS007I0

REMOVAL

CAUTION:

When removing the M/T assembly from engine, first remove the crankshaft position sensor (OBD)
from the M/T assembly. Be careful not to damage sensor edge.

2WD Model

1.

Remove battery negative terminal.

2.

Remove shift lever.

3.

Remove crankshaft position sensor (OBD) from upper side of
transmission case.

4.

Remove operating cylinder from transmission. Refer to 

CL-5,

"Components"

 .

5.

Disconnect vehicle speed sensor, back-up lamp switch, heated
oxygen sensor (rear) and park/neutral position (PNP) switch
harness connectors.

6.

Remove starter motor. Refer to 

SC-25, "VG33E AND VG33ER

MODELS"

7.

Remove propeller shaft. Refer to 

PR-8, "Removal and Installa-

tion"

 .

Insert plug into rear oil seal after removing propeller shaft.

Be careful not to damage spline, sleeve yoke and rear oil seal when removing propeller shaft.

8.

Remove gussets from transmission or engine.

9.

Remove exhaust tube mounting bracket from transmission. Refer to 

EX-3, "EXHAUST SYSTEM"

 .

10. Support manual transmission with a jack.
11. Remove rear mounting member. Refer to  

EM-128, "Removal and Installation"

 .

12. Lower manual transmission.

AMT189

SMT099A

TRANSMISSION ASSEMBLY

MT-49

[FS5R30A]

D

E

F

G

H

I

J

K

L

M

A

B

MT

WARNING:

Support manual transmission together with transfer while removing it.

4WD Model

1.

Disconnect the battery negative terminal.

2.

Remove shift lever from transmission and control lever from
transfer.

3.

Remove clutch operating cylinder from transmission. Refer to

CL-5, "Components"

 .

4.

Disconnect the vehicle speed sensor, back-up lamp switch,
heated oxygen sensor (rear) and Park/neutral position (PNP)
switch harness connectors.

5.

Remove the starter motor. Refer to 

SC-25, "VG33E AND

VG33ER MODELS"

 .

6.

Remove front and rear propeller shafts. Refer to 

PR-8,

"Removal and Installation"

 .

Insert plug into rear oil seal after removing propeller shaft.

Be careful not to damage spline, sleeve yoke and rear oil seal when removing propeller shaft.

7.

Remove exhaust tube mounting bracket from transmission. Refer to 

EX-3, "EXHAUST SYSTEM"

 .

8.

Remove front exhaust tubes and center pipe.

9.

Remove the torsion bars and mounts. Refer to 

FSU-17, "TORSION BAR SPRING"

 .

10. Remove the rear torsion bar cross member.

11. Remove the gussets from the transmission or engine.

12. Support the manual transmission with a jack.
13. Remove rear mounting member. Refer to  

EM-128, "Removal and Installation"

 .

14. Lower manual transmission.

WARNING:

Support manual transmission together with transfer while removing it.

15. Remove crankshaft position sensor (OBD) from upper side of transmission case.

16. Remove transmission bolts.

WARNING:

Support manual transmission together with transfer while removing it.

AMT203

SMT558A


Content   ..  808  809  810  811   ..