Nissan Xterra. Manual - part 432


  Index      Nissan     Nissan Xterra (2014 year) - Service and Repair Manual


Search            


Content   ..  430  431  432  433   ..


Nissan Xterra. Manual - part 432


PRECAUTIONS

FL-3

< PRECAUTION >

C

D

E

F

G

H

I

J

K

L

M

A

FL

N

P

O

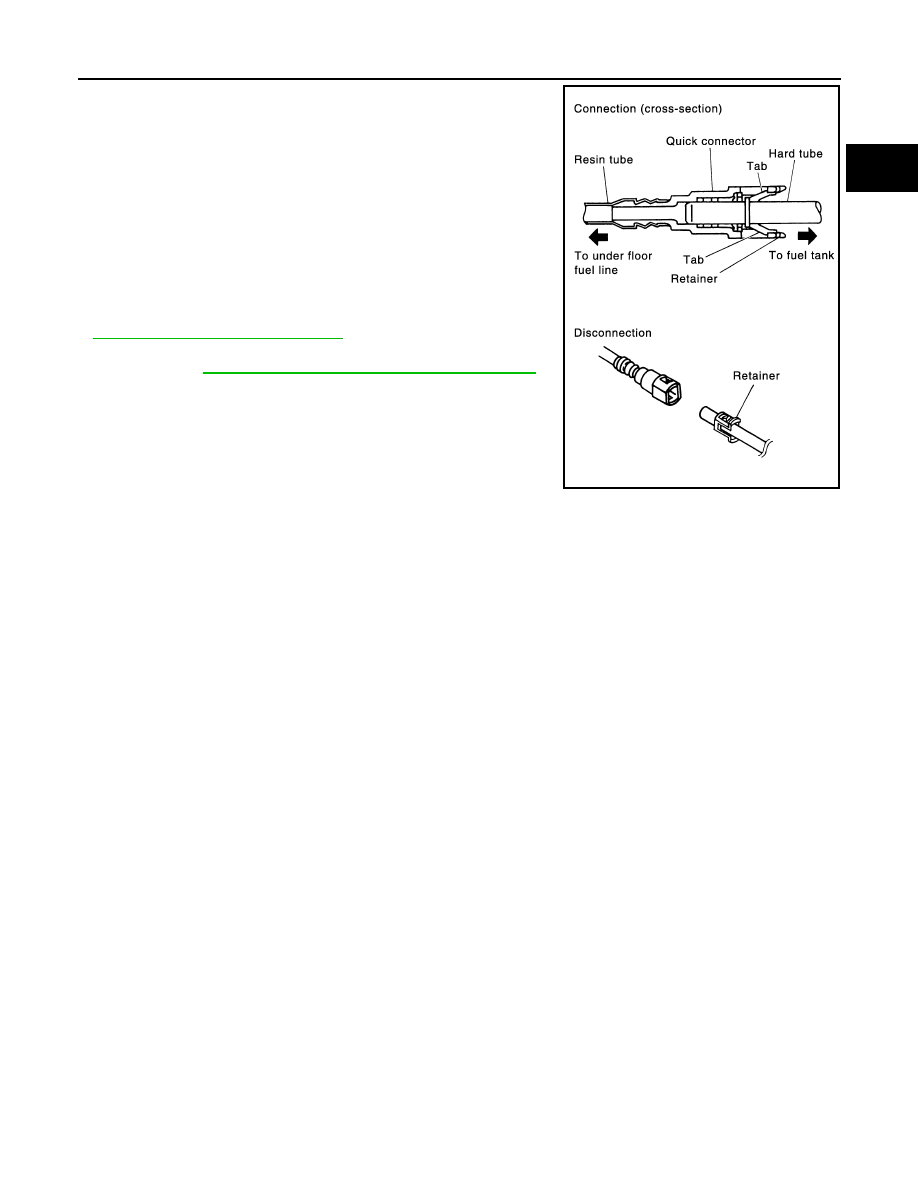
• After connecting the fuel tube quick connectors, make sure

the quick connectors are secure.

Ensure that the connector and resin tube do not contact any

adjacent parts.

• After installing tubes, make sure there is no fuel leakage at

connections in the following steps.

- Apply fuel pressure to fuel lines with turning ignition switch

ON (with engine stopped). Then check for fuel leaks at con-

nections.

- Start engine, raise idle, and verify there are no fuel leaks at the

fuel system connections.

• Use only a Genuine NISSAN fuel filler cap as a replacement. If

an incorrect fuel filler cap is used, the MIL may come on. 

• For servicing “Evaporative Emission System” parts. Refer to

FL-16, "Removal and Installation"

• For checking “On Board Refueling Vapor Recovery (ORVR)”

parts. Refer to 

EC-496, "How to Detect Fuel Vapor Leakage"

.

PBIC1268E

FL-4

< PREPARATION >

PREPARATION

PREPARATION

PREPARATION

Special Service Tool

INFOID:0000000009484531

The actual shape of the tools may differ from those illustrated here.

Commercial Service Tool

INFOID:0000000009484532

Tool number
(TechMate No.)
Tool name

Description

KV101207S0
( — )
Unified fuel lock ring wrench

Removing and installing fuel tank lock ring

(J-45722)
130 mm lock ring tool

JPBIA6384ZZ

LBIA0398E

Tool name

Description

Power tool

Loosening nuts, screws and bolts

PIIB1407E

FUEL SYSTEM

FL-5

< PERIODIC MAINTENANCE >

C

D

E

F

G

H

I

J

K

L

M

A

FL

N

P

O

PERIODIC MAINTENANCE

FUEL SYSTEM

Checking Fuel Line

INFOID:0000000009484533

Inspect fuel lines, fuel filler cap and fuel tank for improper attach-

ment, leaks, cracks, damage, loose connections, chafing or deterio-

ration.

If necessary, repair or replace damaged parts.

SMA803A

FL-6

< REMOVAL AND INSTALLATION >

FUEL TANK

REMOVAL AND INSTALLATION

FUEL TANK

Removal and Installation

INFOID:0000000009484534

1.

Lock ring

2.

Fuel level sensor, fuel filter, and fuel 
pump assembly

3.

O-ring

4.

EVAP hose

5.

Fuel tank

6.

Fuel tank straps

7.

Fuel tank shield

8.

Lower fuel filler hose

9.

Fuel filler pipe and vent pipe

10. Vent hose

11.

Upper fuel filler hose

12. Fuel filler pipe and cup

AWBIA1020GB


Content   ..  430  431  432  433   ..