Nissan March K13. Manual - part 653


  Index      Nissan     Nissan March K13 - Service and Repair Manual)


Search            


Content   ..  651  652  653  654   ..


Nissan March K13. Manual - part 653


TRANSAXLE ASSEMBLY

TM-29

< UNIT DISASSEMBLY AND ASSEMBLY >

[5MT: RS5F91R]

C

E

F

G

H

I

J

K

L

M

A

B

TM

N

O

P

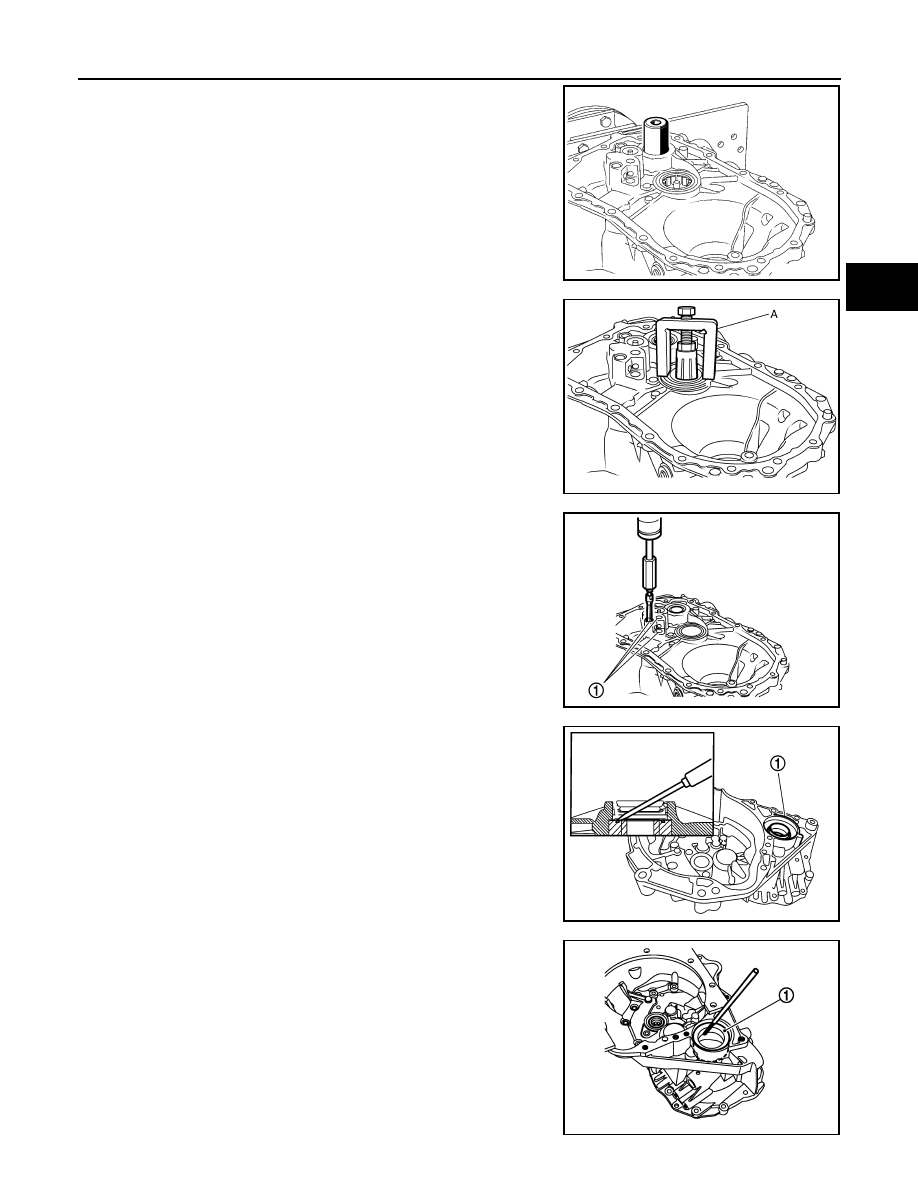
27. Remove input shaft front bearing from clutch housing, using a

drift [Commercial service tool].

28. Cut oil channel tube at the root.
29. Remove mainshaft front bearing and oil channel from clutch

housing, using the valve seat remover (A) [SST: KV111011S0].

30. Remove bushings (1) from clutch housing, using a bearing

remover [Commercial service tool].

31. Remove differential side oil seals (1) from clutch housing and

transaxle case, using a screwdriver.

CAUTION:

Never damage transaxle case and clutch housing.

32. Remove differential side bearing outer races (1) from clutch

housing and transaxle case, using a brass rod.

CAUTION:

Never damage transaxle case and clutch housing.

MCIB0044E

PCIB1536E

PCIB1537E

PCIB1534E

JPDIC0484ZZ

TM-30

< UNIT DISASSEMBLY AND ASSEMBLY >

[5MT: RS5F91R]

TRANSAXLE ASSEMBLY

33. Pull 2 way connector (1) straight to remove it from air breather

inner tube (2).

34. Remove air breather inner tube from transaxle case.

35. Remove bushings (1) from transaxle case, using a bearing

remover [Commercial service tool].

36. Remove retaining pin (

) from selector, using a pin punch.

37. Remove selector from control shaft.

38. Remove oil gutter from transaxle case.

39. Remove mounting bolt (

), and then remove bushing, spring,

and gear catch from transaxle case.

40. Remove check ball plug from transaxle case.

41. Remove mounting bolts (

), and then remove control shaft (1)

from transaxle case.

42. Remove O-ring from control shaft.

43. Expand snap rings (1) and remove input shaft rear bearing and

mainshaft rear bearing from transaxle case, using the drift (A)
[SST: ST35300000].

44. Remove snap rings from transaxle case.
45. Remove check balls (2) from transaxle case.

PCIB1541E

PCIB1538E

JPDIC0533ZZ

PCIB1540E

PCIB1535E

TRANSAXLE ASSEMBLY

TM-31

< UNIT DISASSEMBLY AND ASSEMBLY >

[5MT: RS5F91R]

C

E

F

G

H

I

J

K

L

M

A

B

TM

N

O

P

Assembly

INFOID:0000000006056581

1.

Install snap rings (1) along transaxle case groove so that notch
mates with housing as shown in the figure.

CAUTION:

Check snap ring installing direction. Never misassemble.

2.

Expand snap rings (1) and install input shaft rear bearing and
mainshaft rear bearing to transaxle case, using the drift (A)
[SST: ST35300000].

CAUTION:

Check that snap ring is correctly installed within bearing
groove.

3.

Install check balls (2) to transaxle case.

4.

Install bushings (1) until they reach transaxle case, using a drift
(A) [Commercial service tool].

5.

Apply gear oil to O-ring, and then install it to control shaft.

CAUTION:

Never reuse O-ring.

6.

Install control shaft (1) to transaxle case, and tighten mounting
bolts (

) to the specified torque.

CAUTION:

Replace control shaft and selector as a set.

PCIB1547E

PCIB1548E

JPDIC0636ZZ

PCIB1540E

TM-32

< UNIT DISASSEMBLY AND ASSEMBLY >

[5MT: RS5F91R]

TRANSAXLE ASSEMBLY

7.

Install selector to control shaft, and then install retaining pin (

)

to selector, using a pin punch.

CAUTION:

• Be careful with the orientation of selector.
• Replace control shaft and selector as a set.
• Never reuse retaining pin.

8.

Install gear catch, spring, and bushing to transaxle case, and
then tighten mounting bolt (

) to the specified torque.

CAUTION:

Replace gear catch, spring, and bushing as a set.

9.

Install oil gutter to transaxle case.

10. Install air breather inner tube (2) to transaxle case.

CAUTION:

Never damage air breather inner tube.
NOTE:
It is easier to install when air breather inner tube end is wrapped
and narrowed by tape. Remove tape after installation.

11. Insert 2 way connector (1) straight, and then install it to air

breather inner tube.

CAUTION:

Check air breather inner tube for twists after installing.

12. Install differential side oil seals (1) to clutch housing and tran-

saxle case, using the drift [Stamping number: B.vi 1666-B] of the
drift set [SST: KV32500QAA].

CAUTION:

• Never incline differential side oil seal.
• Never damage clutch housing and transaxle case.

SCIA1726J

JPDIC0533ZZ

PCIB1541E

B

: Transaxle case side

C

: Clutch housing side

Dimension “L

1

: 5.7 – 6.3 mm (0.224 – 0.248 in)

Dimension “L

2

: 2.4 – 3.0 mm (0.094 – 0.118 in)

JPDIC0401ZZ


Content   ..  651  652  653  654   ..