Nissan March K13. Manual - part 427


  Index      Nissan     Nissan March K13 - Service and Repair Manual)


Search            


Content   ..  425  426  427  428   ..


Nissan March K13. Manual - part 427


IP-18

< REMOVAL AND INSTALLATION >

INSTRUMENT PANEL ASSEMBLY

22. Remove optical sensor (with Auto light system) Refer to 

XX-XX, "*****"

.

23. Remove sunload sensor (with Auto A/C). Refer to 

HAC-78, "Removal and Installation"

.

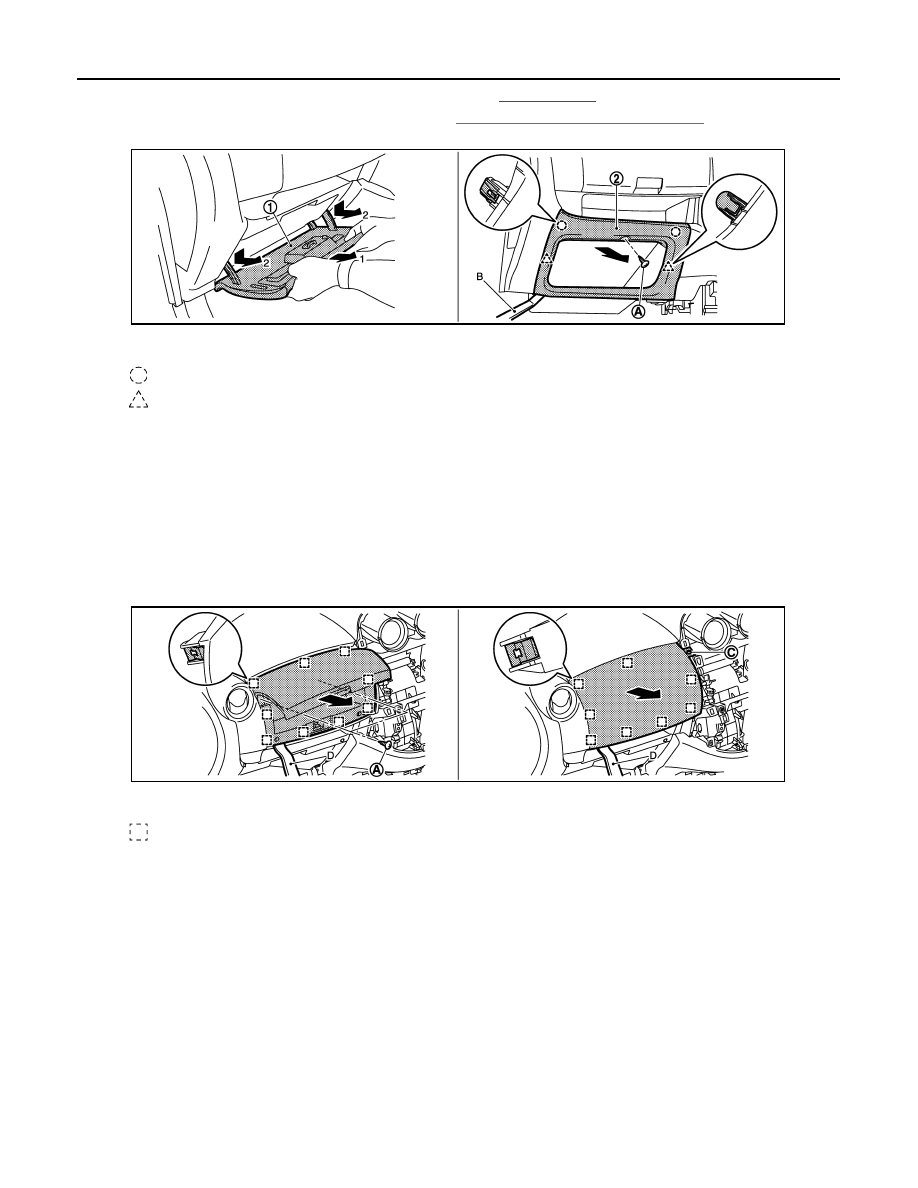
24. Remove glove box lid or glove box escutcheon.

• Glove box lid
- Open the glove box lid (1).
- Pull the glove box lid toward vehicle upper, and then disengage the joint from the instrument panel

assembly.

• Glove box escutcheon
- Remove glove box escutcheon fixing screws (A).
- Insert a remover tool (B) between glove box escutcheon and instrument panel assembly, and then dis-

engage clips and pawls.

- Pull back glove box escutcheon.

25. Remove glove upper box assembly or instrument finisher B.

• Glove upper box assembly
- Remove glove upper box assembly fixing screws (A).
- Insert a remover tool (D) between glove upper box assembly and glove box cover, and then disengage

metal clips.

- Pull back glove upper box assembly.
• Instrument finisher B
- Remove instrument finisher B fixing screws (C).
- Insert a remover tool (D) between glove upper box assembly and glove box cover, and then disengage

metal clips.

- Pull back glove upper box assembly.

Glove box lid

Glove box escutcheon

: Clip

: Pawl

JMJIA3992ZZ

Glove upper box assembly (with Glove box lid)

Instrument finisher B (without Glove box lid)

: Metal clip

JMJIA3993ZZ

INSTRUMENT PANEL ASSEMBLY

IP-19

< REMOVAL AND INSTALLATION >

C

D

E

F

G

H

I

K

L

M

A

B

IP

N

O

P

26. Remove glove box cover.

1.

Remove glove box cover fixing screws (A).

2.

Pull back glove box cover, and disengage pawl and metal
clips.

NOTE:
For models with glove box lid, glove cover is tightened together
to glove box striker.

27. Remove Instrument finisher D or front passenger air bag module.

• Instrument finisher D
- Remove instrument finisher D fixing screws (A).
- Lift up instrument finisher D, and then disengage pawls.

• Front passenger air bag module: Refer to 

SR-19, "Removal and Installation"

.

28. Remove front body side welt LH. Refer to 

INT-23, "BODY SIDE WELT : Removal and Installation"

.

29. Remove front pillar garnish LH. Refer to 

INT-22, "FRONT PILLAR GARNISH : Removal and Installation"

.

30. Remove instrument side finisher LH.

1.

Insert a remover tool (A) between instrument side finisher
LH and instrument lower panel LH, and then disengage
pawls.

2.

Pull the instrument side finisher LH direction of the arrow.

CAUTION:

Apply protective tape on the part to protect from damage.

31. Remove instrument panel assembly.

: Pawl

: Metal clip

JMJIA3994ZZ

: Pawl

JMJIA4078ZZ

: Pawl

JMJIA3998ZZ

IP-20

< REMOVAL AND INSTALLATION >

INSTRUMENT PANEL ASSEMBLY

1.

Remove instrument panel assembly mounting screws (A).

CAUTION:

Cover tool with a shop cloth to prevent windshield glass from being damaged.

2.

Disengage harness (A) and harness (B) of front pillar LH and RH portions from instrument panel
assembly.

3.

Remove instrument panel from passenger door opening portion.

CAUTION:

• Cover A/T shift selector upper surface with a shop cloth to prevent it from being damaged.
• When removing instrument panel assembly, 2 workers are required to prevent it from drop-

ping.

32. Remove the following parts after removing instrument panel assembly.

• Side ventilator grille LH/RH: Refer to 

VTL-5, "SIDE VENTILATOR GRILLE : Removal and Installation"

.

• Center ventilator duct LH/RH: Refer to 

VTL-6, "CENTER VENTILATOR DUCT : Removal and Installa-

tion"

.

INSTALLATION

Install in the reverse order of removal.

JMJIA3995ZZ

JMJIA3996ZZ

CENTER CONSOLE ASSEMBLY

IP-21

< REMOVAL AND INSTALLATION >

C

D

E

F

G

H

I

K

L

M

A

B

IP

N

O

P

CENTER CONSOLE ASSEMBLY

Exploded View

INFOID:0000000006022705

Removal and Installation

INFOID:0000000006044252

CAUTION:

When removing, always use a remover tool that is made of plastic.

REMOVAL

1.

Shift selector lever knob in “N” position. (A/T models)

2.

Remove shift knob. (M/T models)

3.

Release the parking brake lever by turning the adjusting nut with a deep socket wrench and loosening the
cable. Refer to 

PB-2, "Inspection and Adjustment"

.

1.

Console boot

2.

Center console assembly
(M/T models)

3.

Center console assembly
(A/T models)

4.

Switches

5.

Console switch bracket

: Clip

JMJIA3999ZZ


Content   ..  425  426  427  428   ..