Nissan March K13. Manual - part 372
 

  Index      Nissan     Nissan March K13 - Service and Repair Manual)


Search            


Content   ..  370  371  372  373   ..


Nissan March K13. Manual - part 372


HAC-22

< SYSTEM DESCRIPTION >

[AUTOMATIC AIR CONDITIONER]

DIAGNOSIS SYSTEM (A/C AUTO AMP.)

DIAGNOSIS SYSTEM (A/C AUTO AMP.)

Diagnosis Description

INFOID:0000000006024018

ON BOARD SELF-DIAGNOSIS SYSTEM

On board self-diagnosis system is built into A/C auto amp. to quickly locate the case of malfunctions. The self-
diagnosis system diagnoses sensor, door motor, blower motor, etc. and also can make the setting of auxiliary
mechanism.  

SELF-DIAGNOSIS PROCEDURE

Self-diagnosis Mode Entry

The self-diagnosis is started by pressing the OFF switch at 5 seconds or more within 10 seconds after starting
engine. 
NOTE:
If battery voltage drops below 12 V during diagnosis STEP-3, door motor speed becomes slower and as a
result, the system may generate an error even when operation is normal. Start engine before performing this
diagnosis to avoid this.

Changes of Step up and Step down

• The changes of STEP 1 – 5 can be performed by pressing the temperature control switch.
• The change of STEP 6 – 7 can be performed by pressing the fan control switch during the condition of

STEP-5.

Self-diagnosis Cancellation

By AUTO switch is pressed or ignition switch is turned OFF, the self-diagnosis is canceled. 

STEP-1: INDICATOR CHECK

Description

A/C switch indicator and A/C display indication are checked. 
Normal: All switch indicator and display indication are turned ON.
Malfunction: Malfunctioning part indicator is not turned ON.

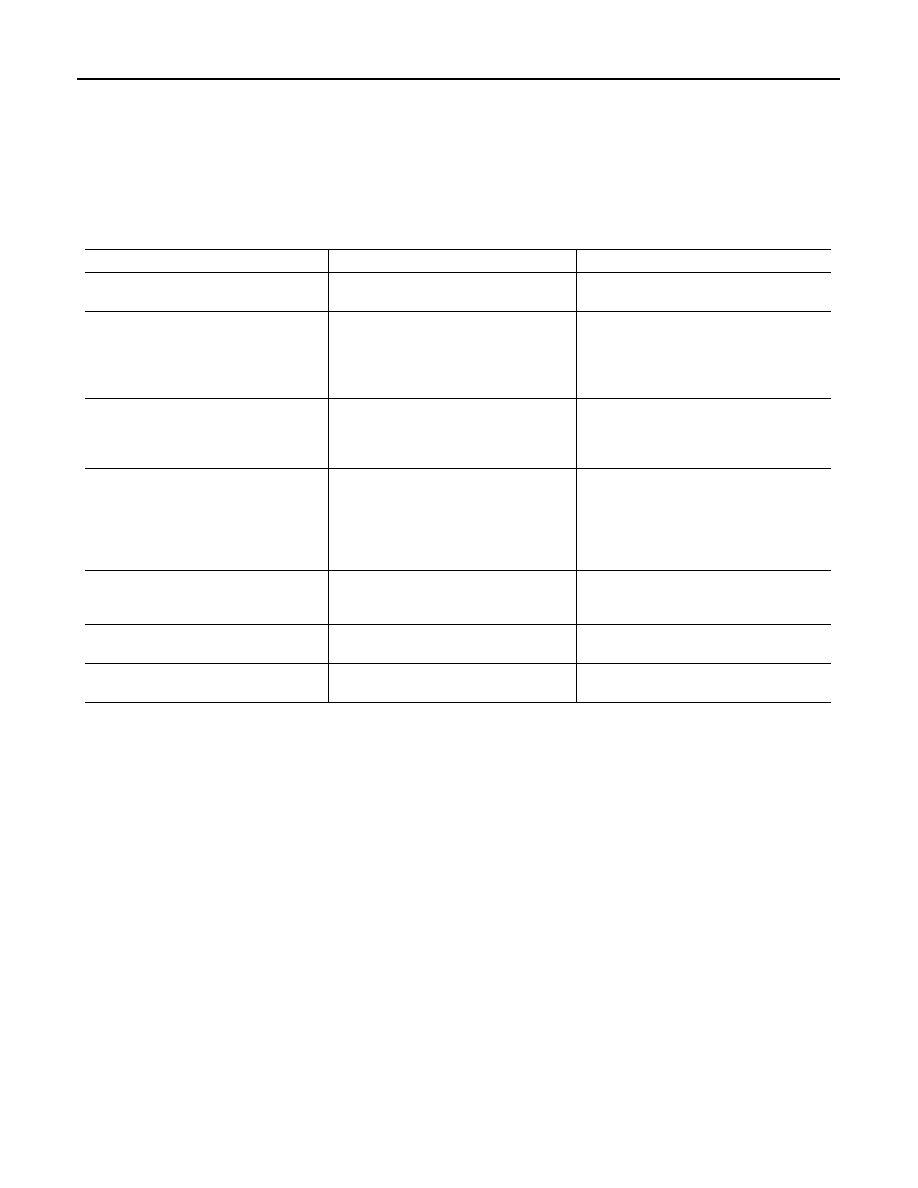
STEP-2: SENSOR DIAGNOSIS

Diagnosis item

Diagnosis content

Diagnosis part

STEP 1:
Indicator check

Switch indicator and display indication are 
checked.

A/C control (A/C auto amp.)

STEP 2:
Sensor diagnosis

The circuit diagnoses of each sensor and 
intake door motor are performed. A/C auto 
amp. indicates the result on the display.

• Ambient sensor
• In-vehicle sensor
• Intake sensor
• Sunload sensor
• Intake door motor (PBR)

STEP 3:
Door motor diagnosis

The circuit diagnoses of mode door motor 
and air mix door motor are performed. A/C 
auto amp. indicates the result on the dis-
play.

• Mode door motor
• Air mix door motor

STEP 4:
Operation check

Operational check of each part is per-
formed.

• Mode door motor
• Intake door motor
• Air mix door motor
• Blower  motor
• Compressor
• Condenser fan

STEP 5:
Each sensor recognition temperature 
check

Each sensor recognition temperature is in-
dicated on the display.

• Ambient sensor
• In-vehicle sensor
• Intake sensor

STEP 6:
Temperature setting trimmer

Temperature setting trimmer is performed.

—

STEP 7:
Inlet port memory function

Inlet port memory function is performed.

—

DIAGNOSIS SYSTEM (A/C AUTO AMP.)

HAC-23

< SYSTEM DESCRIPTION >

[AUTOMATIC AIR CONDITIONER]

C

D

E

F

G

H

J

K

L

M

A

B

HAC

N

O

P

Description

When STEP-2 is selected, “2” is indicated on the display for 3 seconds, in this period, sensor diagnosis is
started.
Normal: “20” is displayed.

Malfunction: The ones place digit of corresponding code number blinks 2 times on the A/C display. When
short-circuit error, A/C switch indicator“ blinks on the display.
NOTE:
If two or more sensors, or door motor malfunction, the ones place digit of corresponding code numbers blink
respectively twice. 

Diagnosis Result

*: Perform the self-diagnosis under sunshine. When performing indoors, aim a light (more than 60 W) at sunload sensor, otherwise code
NO. 25 indicates despite that sunload sensor is functioning normally.

NOTE:
• When ambient sensor has the malfunction of open-circuit, the sensor judges that ambient temperature is

extremely cold, and controls the in vehicle temperature to warmly.

• When performing the diagnosis of intake door motor, the target angle of PBR is set at 40%.
• The error judgment status of intake door motor is not decided by open or short circuit, it is decided by the

voltage value as follows:

- Short: 2.5 V or more
- Open: 1.5 V or less

STEP-3: DOOR MOTOR DIAGNOSIS

Description

When STEP-3 is selected, “3” is indicated on the display for 1 second, in this period, door motor diagnosis is
started.
The check of door motor is performed by A/C auto amp. transmitting output signal to each door motor.

JMIIA0755GB

Code No.

Corresponding sensor 

or door motor

Malfunctioning judgment condition

Reference

Open

Short

21 / 

z

 21

Ambient sensor

−

42

°

C (

−

44

°

F) or less

100

°

C (212

°

F) or more

HAC-43, "Diagnosis Proce-
dure"

22 / 

z

 22

In-vehicle sensor

−

42

°

C (

−

44

°

F) or less

100

°

C (212

°

F) or more

HAC-45, "Diagnosis Proce-
dure"

24 / 

z

 24

Intake sensor

−

42

°

C (

−

44

°

F) or less

100

°

C (212

°

F) or more

HAC-47, "Diagnosis Proce-
dure"

25 / 

z

 25

Sunload sensor*

64.7 W/m

2

 (56 kcal/

m

2

·h)

2832 W/m

2

 (2435 kcal/m

2

·h)

HAC-49, "Diagnosis Proce-
dure"

26 / 

z

 26

Intake door motor (PBR)

PBR angle 5% or less

PBR angle 95% or more

HAC-55, "Diagnosis Proce-
dure"

HAC-24

< SYSTEM DESCRIPTION >

[AUTOMATIC AIR CONDITIONER]

DIAGNOSIS SYSTEM (A/C AUTO AMP.)

Normal: “30” is displayed.

Malfunction: The ones place digit of corresponding code number blinks 2 times on the A/C display.
NOTE:
If two or more door motor connectors malfunction, the ones place digit of corresponding code numbers blink
respectively twice. 

Diagnosis Result

NOTE:
• If all four terminals of each door motor show an open circuit, there is probably a disconnected connector or

an open circuit in door motor drive power supply harness.

• If a short circuit occurs in harness between terminals for each door motor drive signal, although it cannot be

detected by self-diagnosis, door motor will vibrate when it operates.

STEP-4: OPERATION CHECK

Description

When STEP-4 is selected, each part operation is started with indicating “4” on the display.
Each time DEF switch is pressed, the display will change to 41 

→

 42 

→

 43 

→

 44 

→

 45 

→

 46 

→

 41.

Operation Contents

Checks must be visually, by listening the sound or by touching air outlets with hand, etc. for improper opera-
tion.

STEP-5: EACH SENSOR RECOGNITION CHECK

Description

When STEP-5 is selected, “5” is indicated on the display.
Each time DEF switch is pressed, each sensor recognition temperature is changed in order of the following:
5 

→

 Ambient temperature 

→

 In-vehicle temperature 

→

 Intake temperature 

→

 5.

NOTE:
Each sensor recognition temperature is not displayed in less than 

−

30

°

C (

−

22

°

F) or more than 55

°

C (131

°

F).

JMIIA0756GB

Code No.

Mode or intake door position

Reference

31

VENT

Mode door motor

HAC-53, "Diagnosis Procedure"

32

D/F1

33

DEF

37

FRE

Intake door motor

HAC-55, "Diagnosis Procedure"

38

20%%

39

REC

Code No.

Mode door position

Intake door position

Air mix door position

Magnet clutch

Blower fan motor

(voltage)

41

VENT

REC

Full cold

ON

5.5 V

42

B/L

REC

Full cold

ON

Battery voltage

43

B/L

20% FRE

Full hot

OFF

9 V

44

D/F

FRE

Full hot

OFF

9 V

45

D/F

FRE

Full hot

ON

9 V

46

DEF

FRE

Full hot

ON

Battery voltage

DIAGNOSIS SYSTEM (A/C AUTO AMP.)

HAC-25

< SYSTEM DESCRIPTION >

[AUTOMATIC AIR CONDITIONER]

C

D

E

F

G

H

J

K

L

M

A

B

HAC

N

O

P

STEP-6: TEMPERATURE SETTING TRIMMER

Description

The trimmer compensates for differences in range of 

±

3

°

C (

±

6

°

F) between temperature setting (displayed dig-

itally) and temperature felt by customer.

Setting Procedure

Refer to 

HAC-41, "Temperature Setting Trimmer"

.

FOOT POSITION SETTING TRIMMER

Description

Wind distribution ratio in FOOT mode can be set.
Refer to 

Dummy cross-reference("XX-XX")

.

INLET PORT MEMORY FUNCTION

Description

• Inlet port setting can be memorized when ignition switch is turned OFF.
• Inlet port setting can be selected from FRE (fresh air intake), REC (recirculation), or “Do not perform the

memory” when ignition switch is turned ON.

Setting Procedure

Refer to 

XX-XX, "*****"

.


Content   ..  370  371  372  373   ..