Nissan Almera Tino V10. Manual - part 148


  Index      Nissan     Nissan Almera Tino V10 - Service Manual (2003 year)


Search            


Content   ..  146  147  148  149   ..


Nissan Almera Tino V10. Manual - part 148


AT-316

[EXC.F/EURO-OBD]

TROUBLE DIAGNOSES FOR SYMPTOMS

4.

CHECK A/T FLUID CONDITION

1.

Remove oil pan, refer to

AT-410, "REMOVAL"

.

2.

Check A/T fluid condition.

OK or NG

OK

>> GO TO 5

NG

>> 1. Disassemble A/T.

2. Check the following items:

Forward clutch assembly

Overrun clutch assembly

Reverse clutch assembly

5.

CHECK SYMPTOM

Check again.
OK or NG

OK

>> INSPECTION END

NG

>> 1. Perform TCM input/output signal inspection.

2. If NG, recheck TCM pin terminals for damage or loose connection with harness connector.

5. Large Shock. “N”

“R” Position

ECS009AB

SYMPTOM:
There is large shock when changing from “N” to “R” position.

1.

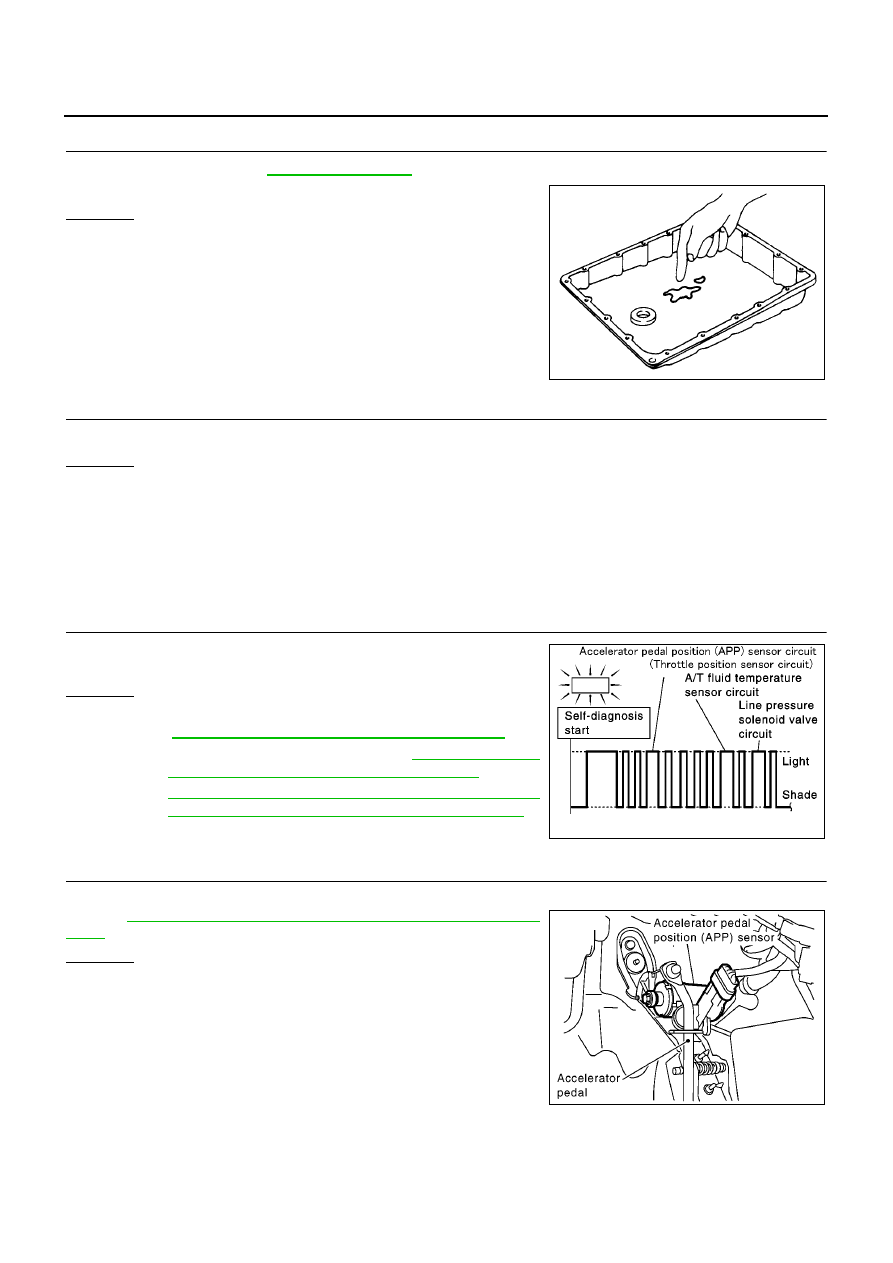
CHECK SELF-DIAGNOSTIC RESULTS

Does self-diagnosis show damage to A/T fluid temperature sensor,
line pressure solenoid valve or throttle position sensor circuit?

Yes or No

Yes

>>

Check damaged circuit. Refer to the following items.

AT-392, "LINE PRESSURE SOLENOID VALVE"

THROTTLE POSITION SENSOR:

AT-356, "ACCELE

RATOR PEDAL POSITION (APP) SENSOR"

AT-381, "BATT/FLUID TEMP SEN (A/T FLUID TEMP
SENSOR CIRCUIT AND TCM POWER SOURCE)"

No

>> GO TO 2

2.

CHECK THROTTLE POSITION SENSOR*

*: This sensor means accelerator pedal position (APP) sensor.
Refer to

AT-356, "ACCELE RATOR PEDAL POSITION (APP) SEN-

SOR"

.

OK or NG

OK

>> GO TO 3

NG

>> Repair or replace Accelerator pedal position(APP)sen-

sor.

SAT171B

SCIA0769E

MCIA0096E

TROUBLE DIAGNOSES FOR SYMPTOMS

AT-317

[EXC.F/EURO-OBD]

D

E

F

G

H

I

J

K

L

M

A

B

AT

3.

CHECK LINE PRESSURE

Check line pressure at idle with selector lever in “D” position. Refer
to

AT-267, "Line Pressure Test"

.

OK or NG

OK

>> GO TO 4

NG

>> 1. Remove control valve assembly. Refer to

AT-410,

"Control Valve Assembly and Accumulators"

.

2. Check the following items:

Valves to control line pressure (Pressure regulator
valve, pressure modifier valve, pilot valve and pilot fil-
ter)

Line pressure solenoid valve

4.

CHECK SYMPTOM

Check again.

OK or NG

OK

>> INSPECTION END

NG

>> 1. Perform TCM input/output signal inspection.

2. If NG, recheck TCM pin terminals for damage or loose connection with harness connector.

6. Vehicle Does Not Creep Backward In “R” Position

ECS009AC

SYMPTOM:
Vehicle does not creep backward when selecting “R” position.

1.

CHECK A/T FLUID LEVEL

Check A/T fluid level again.

OK or NG

OK

>> GO TO 2

NG

>> Refill ATF.

SAT494G

SAT638A

AT-318

[EXC.F/EURO-OBD]

TROUBLE DIAGNOSES FOR SYMPTOMS

2.

CHECK STALL TEST

Check stall revolution with selector lever in “1” and “R” positions.
Refer to

AT-264, "Stall Test"

.

OK or NG

OK

>> GO TO 3

OK in “1” position, NG in “R” position>>1.Remove

control

valve

assembly. Refer to

AT-410, "Control Valve Assembly

and Accumulators"

.

2. Check the following items:

Valves to control line pressure (Pressure regulator
valve, pressure modifier valve, pilot valve and pilot fil-
ter)

Line pressure solenoid valve (

AT-392, "LINE PRES-

SURE SOLENOID VALVE"

)

3. Disassemble A/T.

4. Check the following items:

Oil pump assembly

Torque converter

Reverse clutch assembly

High clutch assembly

Low & reverse brake assembly

Low one-way clutch

NG in both “1” and “R” positions>>GO TO 6

3.

CHECK LINE PRESSURE

Check line pressure at idle with selector lever in “R” position. Refer
to

AT-267, "Line Pressure Test"

.

OK or NG

OK

>> GO TO 4

NG

>> 1. Remove control valve assembly. Refer to

AT-410,

"Control Valve Assembly and Accumulators"

.

2. Check the following items:

Valves to control line pressure (Pressure regulator
valve, pressure modifier valve, pilot valve and pilot fil-
ter)

Line pressure solenoid valve (

AT-392, "LINE PRES-

SURE SOLENOID VALVE"

)

3. Disassemble A/T.

4. Check the following item:

Oil pump assembly

SAT493G

SAT494G

TROUBLE DIAGNOSES FOR SYMPTOMS

AT-319

[EXC.F/EURO-OBD]

D

E

F

G

H

I

J

K

L

M

A

B

AT

4.

CHECK A/T FLUID CONDITION

1.

Remove oil pan, refer to

AT-410, "REMOVAL"

.

2.

Check A/T fluid condition.

OK or NG

OK

>> GO TO 5

NG

>> GO TO 6

5.

CHECK SYMPTOM

Check again.
OK or NG

OK

>> INSPECTION END

NG

>> 1. Perform TCM input/output signal inspection.

2. If NG, recheck TCM pin terminals for damage or loose connection with harness connector.

6.

DETECT MALFUNCTIONING ITEM

1.

Remove control valve assembly. Refer to

AT-410, "Control Valve Assembly and Accumulators"

.

2.

Check the following items:

Valves to control line pressure (Pressure regulator valve, pressure modifier valve, pilot valve and pilot fil-
ter)

Line pressure solenoid valve (

AT-392, "LINE PRESSURE SOLENOID VALVE"

)

3.

Disassemble A/T.

4.

Check the following items:

Oil pump assembly

Torque converter

Reverse clutch assembly

High clutch assembly

Low & reverse brake assembly

Low one-way clutch

OK or NG

OK

>> GO TO 5

NG

>> Repair or replace damaged parts.

SAT171B


Content   ..  146  147  148  149   ..