Nissan GT-R (2007-2014 year). EXHAUST SYSTEM / EXTERIOR LIGHTING SYSTEM. Service Manual - part 4


  Index      Manuals     Nissan GT-R (2007-2014 year). EXHAUST SYSTEM / EXTERIOR LIGHTING SYSTEM. Service Manual


Search            copyright infringement  


Content      ..     2      3      4     


Nissan GT-R (2007-2014 year). EXHAUST SYSTEM / EXTERIOR LIGHTING SYSTEM. Service Manual - part 4


EXL-46

< REMOVAL AND INSTALLATION >

[XENON TYPE]

FRONT COMBINATION LAMP

1.

Remove front bumper fascia. Refer to 

EXT-14, "Exploded View"

.

2.

Remove the headlamp mounting bolts.

3.

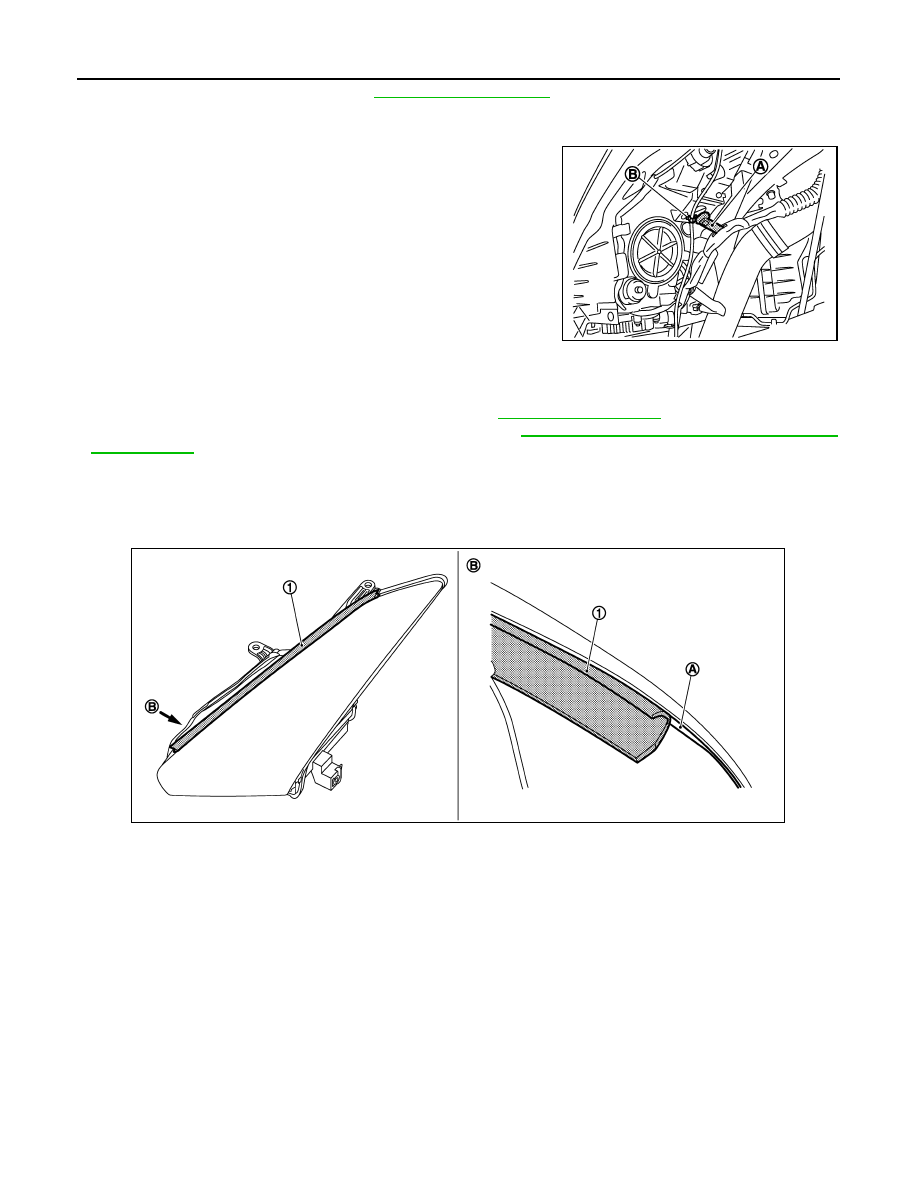
Remove the harness clip (A) and the washer tube (B)*.
*: Left side only

4.

Pull out the headlamp assembly forward the vehicle. 

5.

Disconnect the connector before removing the headlamp hous-
ing assembly. 

INSTALLATION

Install in the reverse order of removal.

CAUTION:

• After installation, perform aiming adjustment. Refer to 

EXL-42, "Description"

.

• After installation, check that headlamp lighting. Refer to 

EXL-48, "Inspection After Installation (HID

Control Unit)"

.

• When the front combination lamp on one side is replaced, and rubber seal is not installed to the front

combination lamp on the side that is not replaced, install a rubber seal to the front combination lamp
that is not replaced as per the following procedure.

• Always clean the front combination lamp surface where rubber seal is affixed.

1.

Align rubber seal (1) with lens inner protrusion (A) and affix so that there is not gap.

2.

Align rubber seal edge (1) with hood seal assembly edge (2) and affix under hood seal assembly.

JPLIA1163ZZ

NNLIB0019ZZ

Revision: 2012 November

2014 GT-R

FRONT COMBINATION LAMP

EXL-47

< REMOVAL AND INSTALLATION >

[XENON TYPE]

C

D

E

F

G

H

I

J

K

M

A

B

EXL

N

O

P

3.

Align rubber seal end (1) with hood end (3) and affix so that it does not protrude from hood.

Replacement

INFOID:0000000009160381

CAUTION:

• Disconnect the battery negative terminal or remove the fuse.
• After installing the bulb, install the resin cap and the bulb socket securely for watertightness.
• Never touch the glass of bulb directly by hand. Keep grease and other oily matters away from it.
• Never touch bulb by hand while it is lit or right after being turned off.
• Never leave bulb out of lamp reflector for a long time because dust, ,moisture smoke, etc. may affect

the performance of lamp. When replacing bulb, be sure to replace it with new one.

HEADLAMP BULB (LO)

1.

Remove the front tire. Refer to 

WT-11, "Exploded View"

.

2.

Remove the fender protector. Keep a service area. Refer to 

EXT-29, "FENDER PROTECTOR : Exploded

View"

.

3.

Rotate the resin cap counterclockwise and unlock it.

4.

Rotate the bulb socket counterclockwise and unlock it.

5.

Remove the retaining spring lock. Remove the bulb from the headlamp housing assembly.

CAUTION:

Never break the xenon bulb ceramic tube when replacing the bulb.

HEADLAMP BULB (HI)

1.

Remove the front tire. Refer to 

WT-11, "Exploded View"

.

2.

Remove the fender protector. Keep a service area. Refer to 

EXT-29, "FENDER PROTECTOR : Exploded

View"

.

3.

Remove the washer tank inlet. Refer to 

WW-15, "Exploded View"

.

*: When replace a left.

4.

Rotate the resin cap counterclockwise and unlock it.

5.

Disconnect the headlamp bulb (HI) connector.

NNLIB0020ZZ

Revision: 2012 November

2014 GT-R

EXL-48

< REMOVAL AND INSTALLATION >

[XENON TYPE]

FRONT COMBINATION LAMP

6.

Rotate the bulb socket counterclockwise and unlock it.

7.

Remove the bulb from the headlamp housing assembly.

PARKING LAMP BULB

1.

Rotate the bulb socket counterclockwise and unlock it.

2.

Remove the bulb from the bulb socket.

FRONT TURN SIGNAL LAMP BULB

1.

Remove the front tire. Refer to 

WT-11, "Exploded View"

.

2.

Remove the fender protector. Keep a service area. Refer to 

EXT-29, "FENDER PROTECTOR : Exploded

View"

.

3.

Rotate the bulb socket counterclockwise and unlock it.

4.

Remove the bulb from the bulb socket.

Disassembly and Assembly

INFOID:0000000009160382

DISASSEMBLY

1.

Rotate the resin cap counterclockwise and unlock it.

2.

Rotate the xenon bulb socket counterclockwise and unlock it.

3.

Remove the retaining spring lock. And then remove the xenon bulb.

4.

Remove the HID control unit installation screw.

5.

Remove the HID control unit harness installation screw. And then disconnect the connector from
HID control unit.

6.

Pull out the xenon bulb socket from the headlamp housing assembly.

7.

Rotate the resin cap counterclockwise and unlock it.

8.

Disconnect the headlamp (HI) connector.

9.

Rotate the halogen bulb socket counterclockwise and unlock it.

10. Remove the halogen bulb socket from the headlamp housing assembly.
11. Rotate the parking lamp bulb socket counterclockwise and unlock it.

12. Remove the bulb from the parking lamp bulb socket.

13. Rotate the front turn signal lamp bulb socket counterclockwise and unlock it.
14. Remove the bulb from the front turn signal lamp bulb socket.

ASSEMBLY

Assemble in the reverse order of disassembly.

CAUTION:

• Install HID control unit securely.
• After installing the bulb, install the resin cap and the bulb socket securely for watertightness.
• Seal packing cannot be reused.
• After installation, check that headlamp lighting. Refer to 

EXL-48, "Inspection After Installation (HID

Control Unit)"

.

Inspection After Installation (HID Control Unit)

INFOID:0000000009160383

CAUTION:

Temporarily install the headlamp on the vehicle. Connect the battery to the connector (vehicle side)
when checking ON/OFF status.

XENON HEADLAMP LIGHTING CHECK

When recycled HID control unit, check the following, when there is abnormality replace the HID control unit.
1.

Xenon bulb is cold condition (turn OFF more than 10 minutes), and repetition does headlamp turned ON/
OFF, check that a headlamp illuminated it surely.

2.

Headlamp is turn ON until the xenon bulb becomes stable condition (for about 5 minutes) from cold condi-
tion, check that there are not on and off light, abnormality such as blinking.

3.

Xenon bulb is warm condition (turn ON more than 15 minutes and turn OFF for 1 minute), and repetition
does headlamp turned ON/OFF, check that a headlamp illuminated it surely.

Revision: 2012 November

2014 GT-R

FRONT COMBINATION LAMP

EXL-49

< REMOVAL AND INSTALLATION >

[XENON TYPE]

C

D

E

F

G

H

I

J

K

M

A

B

EXL

N

O

P

4.

Headlamp is turn ON for about 30 minutes, check that there are not on and off light, abnormality such as
blinking whether brightness of right and left does not have a difference.

Revision: 2012 November

2014 GT-R

EXL-50

< REMOVAL AND INSTALLATION >

[XENON TYPE]

DAYTIME RUNNING LIGHT

DAYTIME RUNNING LIGHT

Exploded View

INFOID:0000000009160384

Removal and Installation

INFOID:0000000009160385

CAUTION:

Disconnect the battery negative terminal or remove the fuse.

REMOVAL

Left side

1.

Remove engine under cover. 

EXT-36, "ENGINE UNDER COVER : Removal and Installation"

.

2.

Remove washer tank mounting bolt, and then keep a service area.

3.

Disconnect daytime running light harness connector.

4.

Remove daytime running light mounting bolt and nut, and then remove daytime running light bracket.

5.

Move daytime running light (1) until it contacts bumper fascia rib
portion (A).

1.

Bumper fascia

2.

Daytime running light

3.

U nut

4.

Daytime running light bracket A

5.

Daytime running light bracket B

JMLIA1867ZZ

JMLIA1918ZZ

Revision: 2012 November

2014 GT-R

DAYTIME RUNNING LIGHT

EXL-51

< REMOVAL AND INSTALLATION >

[XENON TYPE]

C

D

E

F

G

H

I

J

K

M

A

B

EXL

N

O

P

6.

Rotate daytime running light around center of rib portion and
remove LED hyper day light.

Right side

1.

Remove bumper fascia. Refer to 

EXT-15, "Removal and Installation"

.

2.

Remove daytime running light mounting bolt and nut, and then remove daytime running light bracket.

3.

Move daytime running light (1) until it contacts bumper fascia rib
portion (A).

4.

Rotate daytime running light around center of rib portion and
remove LED hyper day light.

INSTALLATION

Install in the reverse order of removal.

JMLIA1919ZZ

JMLIA1918ZZ

JMLIA1919ZZ

Revision: 2012 November

2014 GT-R

EXL-52

< REMOVAL AND INSTALLATION >

[XENON TYPE]

FRONT SIDE MARKER LAMP

FRONT SIDE MARKER LAMP

Exploded View

INFOID:0000000009160386

Removal and Installation

INFOID:0000000009160387

CAUTION:

Disconnect the battery negative terminal or remove the fuse.

REMOVAL

1.

Insert any appropriate tool (A) into the gap between the side turn
signal lamp and fender protector.

2.

Pull the side turn signal lamp toward vehicle outside while push-
ing metal clip (B) toward vehicle front, and then remove side turn
signal lamp from vehicle.

3.

Disconnect the side turn signal lamp connector.Remove the side turn signal lamp.

NOTE:
Support the vehicle-side harness of the side turn signal lamp with tape so that it does not drop inside the front
fender.

INSTALLATION

1.

Connect the side turn signal lamp connector.

2.

Fix the pawl side. And then push the clip side.

Replacement

INFOID:0000000009160388

CAUTION:

• Disconnect the battery negative terminal or remove the fuse.
• Never touch the glass of bulb directly by hand. Keep grease and other oily matters away from it.
• Never touch bulb by hand while it is lit or right after being turned off.
• Never leave bulb out of lamp reflector for a long time because dust, moisture smoke, etc. may affect

the performance of lamp. When replacing bulb, be sure to replace it with new one.

FRONT SIDE MARKER LAMP BULB

1.

Front side marker lamp

JPLIA1330ZZ

: Vehicle front

NNLIB0018ZZ

Revision: 2012 November

2014 GT-R

FRONT SIDE MARKER LAMP

EXL-53

< REMOVAL AND INSTALLATION >

[XENON TYPE]

C

D

E

F

G

H

I

J

K

M

A

B

EXL

N

O

P

1.

Remove the front side marker lamp. Refer to 

EXL-52, "Exploded View"

.

2.

Turn the bulb socket (1) counterclockwise and unlock it. 

3.

Remove the bulb (2) from the socket.

NNLIA0025ZZ

Revision: 2012 November

2014 GT-R

EXL-54

< REMOVAL AND INSTALLATION >

[XENON TYPE]

LIGHTING & TURN SIGNAL SWITCH

LIGHTING & TURN SIGNAL SWITCH

Exploded View

INFOID:0000000009160389

The lighting & turn signal switch is integrated in the combination switch. 

BCS-21, "Exploded View"

.

Revision: 2012 November

2014 GT-R

HAZARD SWITCH

EXL-55

< REMOVAL AND INSTALLATION >

[XENON TYPE]

C

D

E

F

G

H

I

J

K

M

A

B

EXL

N

O

P

HAZARD SWITCH

Exploded View

INFOID:0000000009160390

The hazard switch is integrated in the set-up switch. Refer to 

IP-12, "Exploded View"

.

Revision: 2012 November

2014 GT-R

EXL-56

< REMOVAL AND INSTALLATION >

[XENON TYPE]

REAR COMBINATION LAMP

REAR COMBINATION LAMP

Exploded View

INFOID:0000000009160391

REMOVAL

DISASSEMBLY

Removal and Installation

INFOID:0000000009160392

CAUTION:

Disconnect the battery negative terminal or remove the fuse.

REMOVAL

1.

Remove the fascia rear bumper center. Refer to 

EXT-20, "Exploded View"

.

2.

Remove the rear bumper fascia. Refer to 

EXT-20, "Exploded View"

.

3.

Remove the rear combination lamp mounting bolts.

4.

Disconnect the rear side marker lamp connector.

5.

Remove the rear combination lamp.

INSTALLATION

1.

Rear combination lamp assembly

NNLIA0013ZZ

1.

Rear combination lamp

2.

Back-up lamp bulb

3.

Back-up lamp bulb socket

4.

Rear turn signal lamp bulb socket

5.

Rear turn signal lamp bulb

NNLIA0079ZZ

Revision: 2012 November

2014 GT-R

REAR COMBINATION LAMP

EXL-57

< REMOVAL AND INSTALLATION >

[XENON TYPE]

C

D

E

F

G

H

I

J

K

M

A

B

EXL

N

O

P

Install in the reverse order of removal.

Replacement

INFOID:0000000009160393

CAUTION:

• Disconnect the battery negative terminal or remove the fuse.
• Never touch the glass of bulb directly by hand. Keep grease and other oily matters away from it.
• Never touch bulb by hand while it is lit or right after being turned off.
• Never leave bulb out of lamp reflector for a long time because dust, moisture smoke, etc. may affect

the performance of lamp. When replacing bulb, be sure to replace it with new one.

REAR TURN SIGNAL LAMP BULB

1.

Remove the trunk lid finisher. Refer to 

INT-29, "Removal and Installation"

.

2.

Remove the rubber cover (1).

3.

Turn the rear turn signal lamp bulb socket (2) counterclockwise
and unlock it.

4.

Remove the bulb (3) from the rear turn signal lamp bulb socket.

BACK-UP LAMP BULB

1.

Remove the trunk lid finisher. Refer to 

INT-29, "Removal and Installation"

.

2.

Remove the rubber cover (1).

3.

Turn the back-up lamp bulb socket (2) counterclockwise and
unlock it.

4.

Remove the bulb (3) from the back-up lamp bulb socket.

NNLIA0016ZZ

NNLIA0015ZZ

Revision: 2012 November

2014 GT-R

EXL-58

< REMOVAL AND INSTALLATION >

[XENON TYPE]

REAR SIDE MARKER LAMP

REAR SIDE MARKER LAMP

Exploded View

INFOID:0000000009160394

Removal and Installation

INFOID:0000000009160395

REMOVAL

CAUTION:

Disconnect the battery negative terminal or remove the fuse.
1.

Remove the rear bumper fascia. Refer to 

EXT-20, "Exploded View"

.

2.

Disconnect the rear side marker lamp connector.

3.

Remove the rear side marker lamp mounting bolts and clip. 

4.

Remove the rear side marker lamp.

INSTALLATION

Install in the reverse order of removal.

1.

Rear side marker lamp

JPLIA1160ZZ

Revision: 2012 November

2014 GT-R

HIGH-MOUNTED STOP LAMP

EXL-59

< REMOVAL AND INSTALLATION >

[XENON TYPE]

C

D

E

F

G

H

I

J

K

M

A

B

EXL

N

O

P

HIGH-MOUNTED STOP LAMP

Exploded View

INFOID:0000000009160396

Removal and Installation

INFOID:0000000009160397

REMOVAL

CAUTION:

Disconnect the battery negative terminal or the remove the fuse.
1.

Remove the rear wing. Refer to 

EXT-52, "Exploded View"

.

2.

Remove the center leg bracket.

3.

Remove the high-mounted stop lamp mounting screw. And then
cut the two-sided tape by the any appropriate tool (A).

4.

Disconnect the connector. And then remove the high-mounted
stop lamp from the rear wing.

INSTALLATION

Install in the reverse order of removal.

1.

Rear wing

2.

High-mounted stop lamp

3.

Center leg bracket

NNLIA0017ZZ

NNLIA0018ZZ

Revision: 2012 November

2014 GT-R

EXL-60

< REMOVAL AND INSTALLATION >

[XENON TYPE]

LICENSE PLATE LAMP

LICENSE PLATE LAMP

Exploded View

INFOID:0000000009160398

Removal and Installation

INFOID:0000000009160399

CAUTION:

Disconnect the battery negative terminal or remove the fuse.

REMOVAL

1.

Remove the license plate lamp in numerical order shown in the
figure.

2.

Disconnect the connector.

3.

Remove license plate lamp.

INSTALLATION

1.

Connect the connector.

2.

Fix the pawl side. And then push the resin clip side.

Replacement

INFOID:0000000009160400

CAUTION:

• Disconnect the battery negative terminal or remove the fuse.
• Never touch the glass of bulb directly by hand. Keep grease and other oily matters away from it.
• Never touch bulb by hand while it is lit or right after being turned off.
• Never leave bulb out of lamp reflector for a long time because dust, moisture smoke, etc. may affect

the performance of lamp. When replacing bulb, be sure to replace it with new one.

LICENSE PLATE LAMP BULB

1.

Remove license plate lamp. Refer to 

EXL-60, "Exploded View"

.

1.

License plate lamp

NNLIA0026ZZ

JPLIA0056ZZ

Revision: 2012 November

2014 GT-R

LICENSE PLATE LAMP

EXL-61

< REMOVAL AND INSTALLATION >

[XENON TYPE]

C

D

E

F

G

H

I

J

K

M

A

B

EXL

N

O

P

2.

Turn the bulb socket (1) counterclockwise and unlock it. 

3.

Remove the bulb (2) from the socket.

JPLIA0055ZZ

Revision: 2012 November

2014 GT-R

EXL-62

< REMOVAL AND INSTALLATION >

[XENON TYPE]

REAR FOG LAMP

REAR FOG LAMP

Exploded View

INFOID:0000000009160401

REMOVAL

Removal and Installation

INFOID:0000000009160402

CAUTION:

Disconnect battery negative terminal or remove the fuse. 

REMOVAL

1.

Remove rear fog lamp mounting bolts from rear diffuser under side.

2.

Pull out rear fog lamp to vehicle rear, and then disconnect harness connector.

3.

Remove rear fog lamp.

INSTALLATION

Installation is the reverse order of removal.

1.

Rear bumper fascia

2.

Rear fog lamp assembly

JMLIA1868ZZ

Revision: 2012 November

2014 GT-R

SERVICE DATA AND SPECIFICATIONS (SDS)

EXL-63

< SERVICE DATA AND SPECIFICATIONS (SDS) 

[XENON TYPE]

C

D

E

F

G

H

I

J

K

M

A

B

EXL

N

O

P

SERVICE DATA AND SPECIFICATIONS (SDS)

SERVICE DATA AND SPECIFICATIONS (SDS)

Bulb Specifications

INFOID:0000000009160403

Item

Type

Wattage (W)

Front combination lamp

Headlamp (LO)

D2S (Xenon)

35

Headlamp (HI)

H9

65

Parking lamp

W5W

5

Front turn signal lamp

7444NA

28

Daytime running light

LED

Front side marker lamp

W5W

5

Rear combination lamp

Stop lamp

LED

Tail lamp

LED

Rear turn signal lamp

WY21W (Amber)

21

Back-up lamp

W16W

16

Rear side marker lamp

LED

License plate lamp

W5W

5

High-mounted stop lamp

LED

Rear fog lamp

LED

Revision: 2012 November

2014 GT-R


Content      ..     2      3      4