Nissan Pathfinder (2012 year). Manual - part 222


  Index      Manuals     Nissan Pathfinder (2012 year) - Service and Repair Manual


Search            copyright infringement  


Content      ..     220      221      222      223     ..


Nissan Pathfinder (2012 year). Manual - part 222


PROPELLER SHAFT

DLN-341

< UNIT REMOVAL AND INSTALLATION >

[PROPELLER SHAFT: 2S1350]

C

E

F

G

H

I

J

K

L

M

A

B

DLN

N

O

P

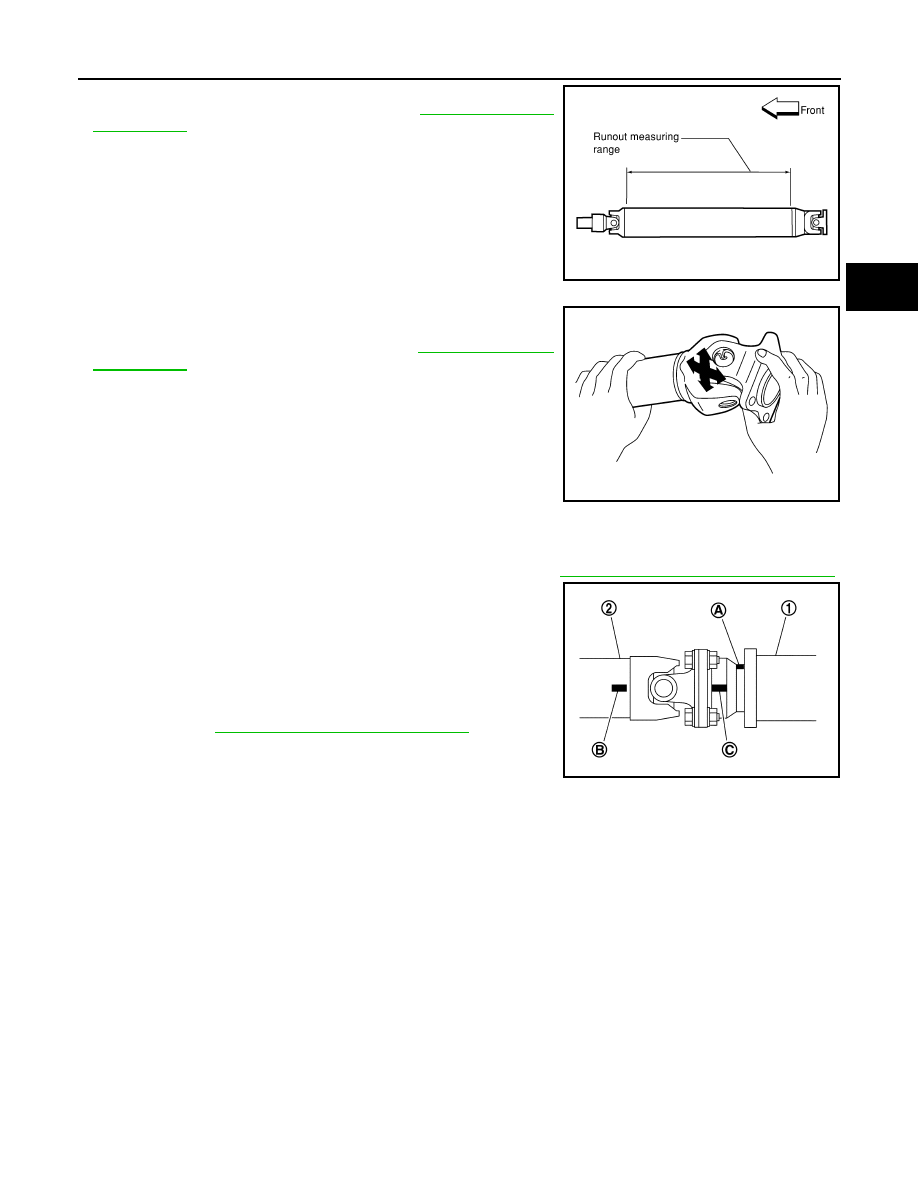
• Inspect the propeller shaft runout. If runout exceeds the limit,

replace the propeller shaft assembly. Refer to 

DLN-344, "General

Specification"

.

• While holding the flange yoke on one side, check axial play of the

joint as shown. If the journal axial play exceeds the specification,

repair or replace the journal parts. Refer to 

DLN-344, "General

Specification"

.

• Check the propeller shaft tube for dents or cracks. If damage is

detected, replace the propeller shaft assembly.

INSTALLATION

Installation is in the reverse order of removal.

• After installation, check for vibration by driving the vehicle. Refer to 

DLN-338, "NVH Troubleshooting Chart"

.

• If propeller shaft assembly of final drive assembly has been

replaced, connect them as follows:

- Face companion flange mark (A) of the final drive (1) upward. With

the mark (A) faced upward, couple the propeller shaft and the final

drive so that the matching mark (B) of the propeller shaft (2) can be

positioned as close as possible with the matching mark (C) of the

final drive companion flange.

- Tighten propeller shaft and final drive bolts and nuts of the to spec-

ification. Refer to 

DLN-340, "Removal and Installation"

.

CAUTION:

Do not reuse the bolts and nuts. Always install new ones.

LDIA0121E

LDIA0117E

PDIA0892J

August 2012

2012 Pathfinder

DLN-342

< UNIT DISASSEMBLY AND ASSEMBLY >

[PROPELLER SHAFT: 2S1350]

PROPELLER SHAFT

UNIT DISASSEMBLY AND ASSEMBLY

PROPELLER SHAFT

Disassembly and Assembly

INFOID:0000000007357601

DISASSEMBLY

Journal

1. Put matching marks on the rear propeller shaft and flange yoke

as shown.

CAUTION:

For matching marks use paint. Do not damage the rear pro-

peller shaft or flange yoke.

2. Remove the snap rings.

3. Push out and remove the journal bearings by lightly tapping the

flange yoke with a hammer, taking care not to damage the jour-

nal or flange yoke hole.

NOTE:

Put marks on the disassembled parts so that they can be rein-

stalled in their original positions from which they were removed.

4. Push out and remove the remaining journal bearings at the

opposite side by lightly tapping the flange yoke with a hammer,

taking care not to damage the journal or flange yoke hole.

NOTE:

Put marks on the disassembled parts so that they can be rein-

stalled in their original positions from which they were removed.

ASSEMBLY

SPD128

APD011

SPD732

SPD131

August 2012

2012 Pathfinder

PROPELLER SHAFT

DLN-343

< UNIT DISASSEMBLY AND ASSEMBLY >

[PROPELLER SHAFT: 2S1350]

C

E

F

G

H

I

J

K

L

M

A

B

DLN

N

O

P

Journal

1. Assemble the journal bearings. Apply multipurpose grease on

the bearing inner surface.

NOTE:

During assembly, use caution so that the needle bearings do not

fall down.

2. Select new snap rings that will provide the specified play in an

axial direction of the journal, and install them. Refer to 

DLN-344,

"Snap Ring"

.

CAUTION:

Do not reuse snap rings

NOTE:

Select snap rings with a difference in thickness at both sides

within 0.02 mm (0.0008 in).

3. Adjust the thrust clearance between the bearing and snap ring

to zero by tapping the yoke.

4. Make sure that the journal moves smoothly and is below the

joint flex effort specification. Refer to 

DLN-344, "General Specifi-

cation"

.

WPD019

APD012

SPD732

LDIA0119E

August 2012

2012 Pathfinder

DLN-344

< SERVICE DATA AND SPECIFICATIONS (SDS) 

[PROPELLER SHAFT: 2S1350]

SERVICE DATA AND SPECIFICATIONS (SDS)

SERVICE DATA AND SPECIFICATIONS (SDS)

SERVICE DATA AND SPECIFICATIONS (SDS)

General Specification

INFOID:0000000007357602

4WD models

Unit: mm (in)

PROPELLER SHAFT RUNOUT

Unit: mm (in)

PROPELLER SHAFT JOINT FLEX EFFORT

Unit: N·m (kg-m, in-lb)

JOURNAL AXIAL PLAY

Unit: mm (in)

Snap Ring

INFOID:0000000007357603

Unit: mm (in)

*: Always check with the Parts Department for the latest parts information.

Applied model

4WD

VK56DE

A/T

Propeller shaft model

2S1350 (aluminum tube)

Number of joints

2

Coupling method with rear final drive

Flange type

Coupling method with transfer

Sleeve type

Shaft length (Spider to spider) 

880.9 

±

 1.5 (34.68 

±

 0.06)

Shaft outer diameter

102.5 + 0.17 / - 0.25 (4.04 

±

 0.01)

Item

Limit

Propeller shaft runout

0.6 (0.024) or less

Item

Limit

Propeller shaft joint flex effort

2.26 (0.23, 20) or less

Item

Limit

Journal axial play

0.02 (0.0008) or less

Thickness

Color

Part Number*

1.99 (0.0783)

White

37146-C9400

 2.02 (0.0795)

Yellow

37147-C9400

2.05 (0.0807)

Red

37148-C9400

2.08 (0.0819)

Green

37149-C9400

2.11 (0.0831)

Blue

37150-C9400

2.14 (0.0843)

Light brown

37151-C9400

2.17 (0.0854)

Black

37152-C9400

2.20 (0.0866)

No paint

37153-C9400

August 2012

2012 Pathfinder

PRECAUTIONS

DLN-345

< PRECAUTION >

[FRONT FINAL DRIVE: R180A]

C

E

F

G

H

I

J

K

L

M

A

B

DLN

N

O

P

PRECAUTION

PRECAUTIONS

Precaution for Supplemental Restraint System (SRS) "AIR BAG" and "SEAT BELT 
PRE-TENSIONER"

INFOID:0000000007357604

The Supplemental Restraint System such as “AIR BAG” and “SEAT BELT PRE-TENSIONER”, used along

with a front seat belt, helps to reduce the risk or severity of injury to the driver and front passenger for certain

types of collision. This system includes seat belt switch inputs and dual stage front air bag modules. The SRS

system uses the seat belt switches to determine the front air bag deployment, and may only deploy one front

air bag, depending on the severity of a collision and whether the front occupants are belted or unbelted.

Information necessary to service the system safely is included in the SR and SB section of this Service Man-

ual.

WARNING:

• To avoid rendering the SRS inoperative, which could increase the risk of personal injury or death in

the event of a collision which would result in air bag inflation, all maintenance must be performed by

an authorized NISSAN/INFINITI dealer.

• Improper maintenance, including incorrect removal and installation of the SRS, can lead to personal

injury caused by unintentional activation of the system. For removal of Spiral Cable and Air Bag

Module, see the SR section.

• Do not use electrical test equipment on any circuit related to the SRS unless instructed to in this

Service Manual. SRS wiring harnesses can be identified by yellow and/or orange harnesses or har-

ness connectors.

PRECAUTIONS WHEN USING POWER TOOLS (AIR OR ELECTRIC) AND HAMMERS

WARNING:

• When working near the Airbag Diagnosis Sensor Unit or other Airbag System sensors with the Igni-

tion ON or engine running, DO NOT use air or electric power tools or strike near the sensor(s) with a

hammer. Heavy vibration could activate the sensor(s) and deploy the air bag(s), possibly causing

serious injury.

• When using air or electric power tools or hammers, always switch the Ignition OFF, disconnect the

battery, and wait at least 3 minutes before performing any service.

Precaution Necessary for Steering Wheel Rotation After Battery Disconnect

INFOID:0000000007357605

NOTE:

• This Procedure is applied only to models with Intelligent Key system and NATS (NISSAN ANTI-THEFT SYS-

TEM).

• Remove and install all control units after disconnecting both battery cables with the ignition knob in the

LOCK

 position.

• Always use CONSULT to perform self-diagnosis as a part of each function inspection after finishing work. If

DTC is detected, perform trouble diagnosis according to self-diagnostic results.

For models equipped with the Intelligent Key system and NATS, an electrically controlled steering lock mech-

anism is adopted on the key cylinder.

For this reason, if the battery is disconnected or if the battery is discharged, the steering wheel will lock and

steering wheel rotation will become impossible.

If steering wheel rotation is required when battery power is interrupted, follow the procedure below before

starting the repair operation.

OPERATION PROCEDURE

1. Connect both battery cables.

NOTE:

Supply power using jumper cables if battery is discharged.

2. Use the Intelligent Key or mechanical key to turn the ignition switch to the 

ACC

 position. At this time, the

steering lock will be released.

3. Disconnect both battery cables. The steering lock will remain released and the steering wheel can be

rotated.

4. Perform the necessary repair operation.

August 2012

2012 Pathfinder

DLN-346

< PRECAUTION >

[FRONT FINAL DRIVE: R180A]

PRECAUTIONS

5. When the repair work is completed, return the ignition switch to the 

LOCK

 position before connecting

the battery cables. (At this time, the steering lock mechanism will engage.)

6. Perform a self-diagnosis check of all control units using CONSULT. 

Precaution for Servicing Front Final Drive

INFOID:0000000007357606

• Before starting diagnosis of the vehicle, understand the symptoms well. Perform correct and systematic

operations. 

• Check for the correct installation status prior to removal or disassembly. When matching marks are required,

be certain they do not interfere with the function of the parts they are applied to. 

• Overhaul should be done in a clean work area, a dust proof area is recommended.

• Before disassembly, completely remove sand and mud from the exterior of the unit, preventing them from

entering into the unit during disassembly or assembly.

• Always use shop paper for cleaning the inside of components.

• Avoid using cotton gloves or a shop cloth to prevent the entering of lint.

• Check appearance of the disassembled parts for damage, deformation, and abnormal wear. Replace them

with new ones if necessary. 

• Gaskets, seals and O-rings should be replaced any time the unit is disassembled.

• Clean and flush the parts sufficiently and blow them dry.

• Be careful not to damage sliding surfaces and mating surfaces.

• When applying sealant, remove the old sealant from the mating surface; then remove any moisture, oil, and

foreign materials from the application and mating surfaces.

• In principle, tighten nuts or bolts gradually in several steps working diagonally from inside to outside. If a

tightening sequence is specified, observe it.

• During assembly, observe the specified tightening torque.

• Add new differential gear oil, petroleum jelly, or multi-purpose grease, as specified.

August 2012

2012 Pathfinder

PREPARATION

DLN-347

< PREPARATION >

[FRONT FINAL DRIVE: R180A]

C

E

F

G

H

I

J

K

L

M

A

B

DLN

N

O

P

PREPARATION

PREPARATION

Special Service Tool

INFOID:0000000007357607

The actual shapes of Kent-Moore tools may differ from those of special service tools illustrated here.

Tool number
(Kent-Moore No.)
Tool name

Description

ST33290001
(J-34286)
Puller

Removing front oil seal 

ST30720000
(J-25405)
Drift

• Installing front oil seal
• Installing side oil seal

a: 77 mm (3.03 in) dia.
b: 55.5 mm (2.185 in) dia.

ST27863000
(

)

Drift

• Installing front oil seal
• Installing side oil seal

a: 74.5 mm (2.933 in) dia.
b: 62.5 mm (2.461 in) dia.

ST3127S000
(J-25765-A)
Preload gauge
1: GG91030000

(J-25765)
Torque wrench

2: HT62940000

(

)

Socket adapter (1/2

)

3: HT62900000

(

)

Socket adapter (3/8

)

Measuring drive pinion bearing preload torque 
and total preload torque

KV10111100
(J-37228)
Seal cutter

Removing carrier cover

ZZA0601D

ZZA0811D

ZZA1003D

NT124

S-NT046

August 2012

2012 Pathfinder

DLN-348

< PREPARATION >

[FRONT FINAL DRIVE: R180A]

PREPARATION

ST3306S001
(

)

Differential side bearing puller set
1: ST33051001

(J-22888-20)
Puller

2: ST33061000

(J-8107-2)
Base

Removing and installing side bearing inner 
race

a: 28.5 mm (1.122 in) dia.
b: 38 mm (1.50 in) dia.

ST30031000
(J-22912-01)
Replacer

Removing drive pinion rear bearing inner race

KV38100600
(J-25267)
Drift

Installing side bearing adjusting washer

ST30613000
(J-25742-3)
Drift

Installing drive pinion rear bearing outer race

a: 72 mm (2.83 in) dia.
b: 48 mm (1.89 in) dia.

ST30611000
(J-25742-1)
Drift bar

Installing drive pinion rear bearing outer race 
(Use with ST30613000)

KV38100200
(J-26233)
Drift

Installing drive pinion front bearing outer race

a: 65 mm (2.56 in) dia.
b: 49 mm (1.93 in) dia.

ST30901000
(J-26010-01)
Drift

Installing drive pinion rear bearing inner race

a: 79 mm (3.11 in) dia.
b: 45 mm (1.77 in) dia.
c: 35.2 mm (1.386 in) dia.

Tool number
(Kent-Moore No.)
Tool name

Description

NT072

ZZA0700D

SDIA0429J

ZZA1000D

S-NT090

ZZA1143D

ZZA0978D

August 2012

2012 Pathfinder


Content      ..     220      221      222      223     ..