Nissan Murano Z51. Manual - part 939


  Главная      Nissan     Nissan Murano Z51 (2010 year) - Service Manual


поиск по сайту            


содержание   ..  937  938  939  940   ..


Nissan Murano Z51. Manual - part 939


INT-26

< REMOVAL AND INSTALLATION >

HEADLINING

HEADLINING

NORMAL ROOF

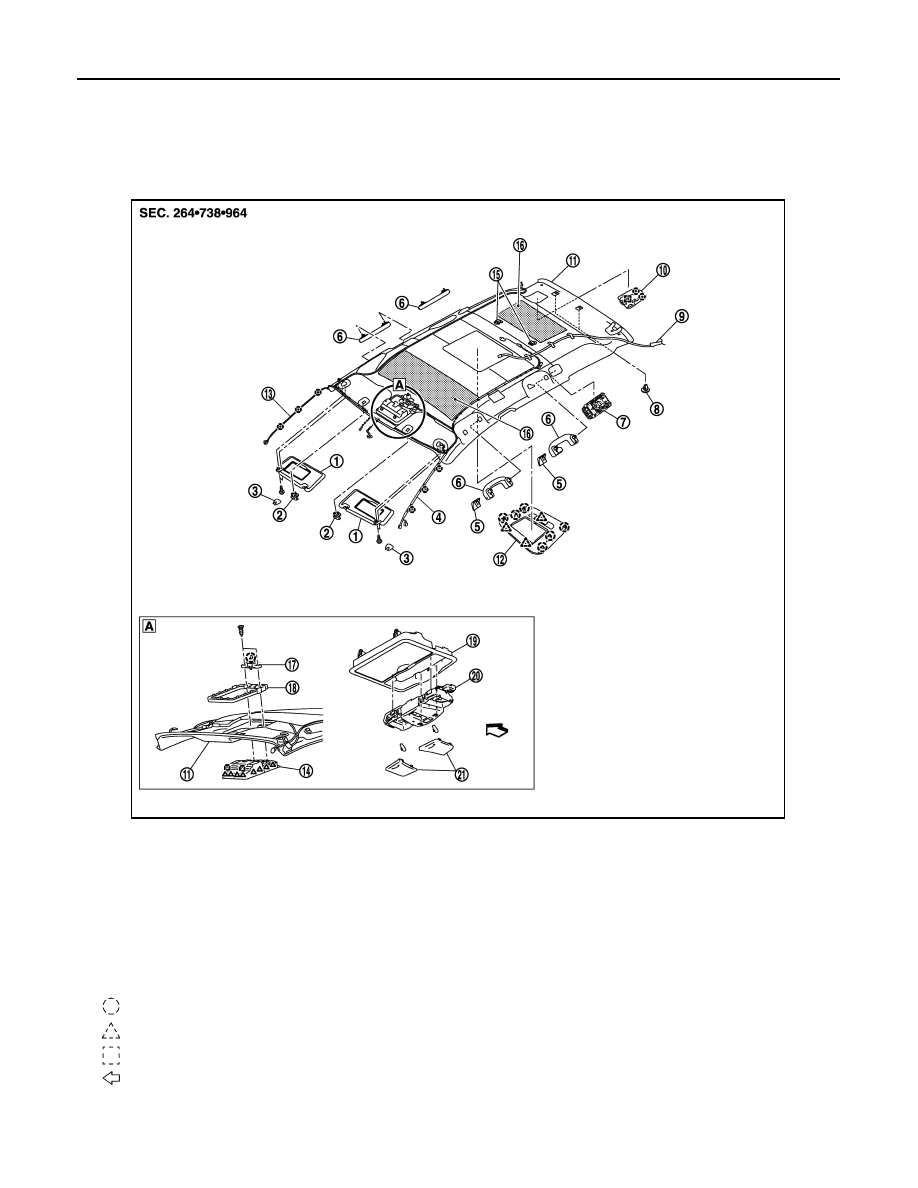
NORMAL ROOF : Exploded View

INFOID:0000000005513295

1.

Sun-visor assembly (LH/RH)

2.

Sun-visor holder (LH/RH)

3.

Sun-visor cover (LH/RH)

4.

Roof harness

5.

Assist grip cap

6.

Assist grip

7.

Personal lamp assembly

8.

Headlining clip

9.

Rear DVD harness

10. Center seat belt retractor cov-

er

11. Headlining assembly 

12. Roof plate assembly

13. Antenna feeder harness

14. Roof console assembly

15. Dual-lock fastener

16. Roof insulator

17. Map lamp bracket 

18. Roof bracket 

19. Roof console

20. Map lamp assembly

21. Map lamp lens

: Clip

: Pawl

: Metal clip

: Vehicle front

JMJIA2692ZZ

HEADLINING

INT-27

< REMOVAL AND INSTALLATION >

C

D

E

F

G

H

I

K

L

M

A

B

INT

N

O

P

NORMAL ROOF : Removal and Installation

INFOID:0000000005513296

REMOVAL

1.

Remove front seat belt anchor bolt (LH/RH). Refer to 

SB-9, "SEAT BELT BUCKLE : Exploded View"

.

2.

Remove rear seat belt anchor bolt (LH/RH). Refer to 

SB-14, "SEAT BELT BUCKLE : Exploded View"

.

3.

Remove luggage side lower finisher (LH/RH), luggage side upper finisher (LH/RH). Refer to 

INT-20,

"Removal and Installation"

.

4.

Remove front pillar garnish (LH/RH), front kicking plate (LH/RH), center pillar lower garnish (LH/RH), cen-
ter pillar upper garnish (LH/RH), front body side welt (LH/RH), rear body side welt (LH/RH) and rear kick-
ing plate (LH/RH). Refer to 

INT-20, "Removal and Installation"

.

5.

Disconnect roof harness (1) connectors (A), the antenna feeder (2) harness connector (C) and the clips
(B).

6.

Disengage the rear display unit fixing clips with a remover tool, disconnect the harness connector and
then remove the rear display unit. Refer to 

AV-536, "Removal and Installation"

7.

Remove sun-visor (LH/RH). 
• Remove sun-visor cover. 
• Remove mounting screws.
• Disconnect vanity mirror lamp harness connector (With vanity mirror lamp)

8.

Disconnect inside mirror and rain sensor harness connector. Refer to 

MIR-70, "Exploded View"

.

9.

Rotate 90 degrees and remove sun-visor holder (1) (LH/RH).

10. With flat-bladed screwdriver (A), press the upper side mounting

plastic clip (1) and pull up to remove the mounting plastic clip (1)
from assist grip (2).

L: Left side of vehicle

R: Right side of vehicle

JMJIA2760ZZ

JMJIA0098GB

JMJIA2790ZZ

INT-28

< REMOVAL AND INSTALLATION >

HEADLINING

11. Once the mounting plastic clip (1) is removed, pull out the assist

grip (2) to remove.

12. Recline front seat back to facilitate the headlining removal.
13. Pull map lamp assembly toward and disengage metal clips (B)

and dual-lock fastener (A).

CAUTION:

Map lamp assembly is crimped from the back of headlining.
Remove it by disengaging the crimped area of back of map
lamp assembly after removing headlining from the vehicle.

14. Disengage center seat belt retractor cover(1) fixing clips and

metal clip with remover tool (A), then remove rear center seat
belt cover.

15. Disconnect the antenna feeder harness connectors (A), (B), the roof harness connector (C) and clips (D).

16. Using remover tool, remove headlining clip at the back side of headlining.

JMJIA1380ZZ

JMJIA1008ZZ

: Clip

: Metal clip

JMJIA2759ZZ

(1): Right side of vehicle

(2): Left side of vehicle

JMJIA2729ZZ

HEADLINING

INT-29

< REMOVAL AND INSTALLATION >

C

D

E

F

G

H

I

K

L

M

A

B

INT

N

O

P

17. Remove headlining (1) from back door.

CAUTION:

• When removing the headlining, 2 workers are required.
• Never bend headlining when removing.
• Be careful not to scratch or damage any part of the body

while taking out the headlining. 

18. Remove the following parts after removing headlining.

• Map lamp assembly. Refer to 

INL-121, "Removal and Installation"

.

• Personal lamp. Refer to 

INL-128, "Removal and Installation"

.

• Roof harness assembly.
• Antenna feeder harness assembly. Refer to the following.
- Base audio. Refer to 

AV-48, "Harness Layout"

.

- BOSE audio without navigation (Radio): Refer to 

AV-560, "Harness Layout"

.

- BOSE audio without navigation (Satellite radio): Refer to 

AV-561, "Harness Layout"

.

- BOSE audio without navigation (TEL): Refer to 

AV-562, "Harness Layout"

.

- BOSE audio with navigation (Radio): Refer to 

AV-810, "Harness Layout"

.

- BOSE audio with navigation (Satellite radio): Refer to 

AV-811, "Harness Layout"

.

- BOSE audio with navigation (GPS): Refer to 

AV-812, "Harness Layout"

.

INSTALLATION

Install in the reverse order of removal.

CAUTION:

• As for guide, install first sun-visor holder (LH/RH) and then the rear headlining clips at the back side

of headlining.

• Be careful not to bend the headlining when installing.

SUNROOF

JMJIA1010ZZ


содержание   ..  937  938  939  940   ..