Nissan Murano Z51. Manual - part 1190


  Главная      Nissan     Nissan Murano Z51 (2010 year) - Service Manual


поиск по сайту            


содержание   ..  1188  1189  1190  1191   ..


Nissan Murano Z51. Manual - part 1190


RF-100

< REMOVAL AND INSTALLATION >

SUNSHADE MOTOR ASSEMBLY

Removal and Installation

INFOID:0000000005516870

REMOVAL

CAUTION:

• Before removing sunshade motor, check that glass lid is fully closed.
• After removing sunshade motor, never attempt to rotate sunshade motor assembly as a single unit.

1.

Remove the headlining. Refer to 

INT-30, "SUNROOF : Removal and Installation"

2.

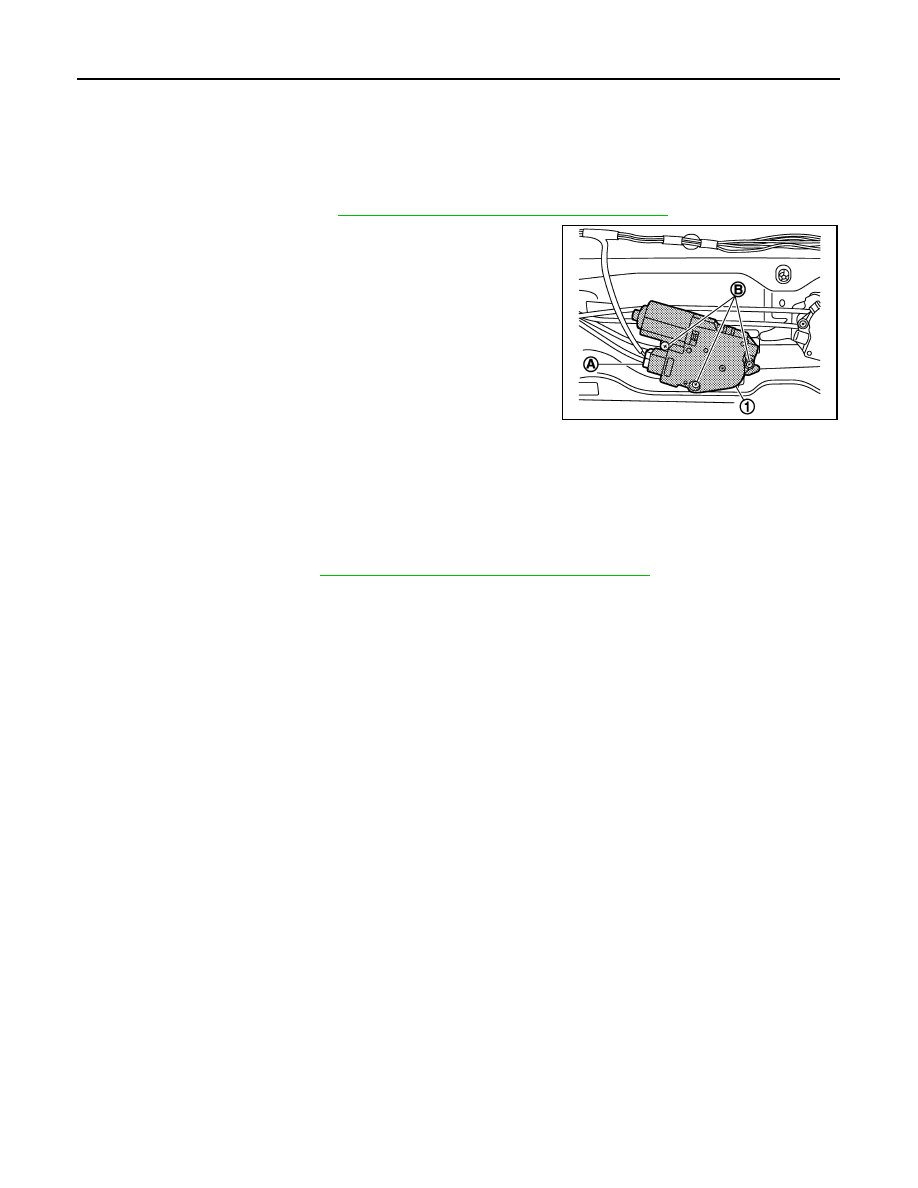
Disconnect connector (A) from sunshade motor assembly (1).
Remove sunshade motor assembly mounting screws (B), and
then remove sunshade motor assembly.

INSTALLATION

CAUTION:

Before installing the sunshade motor assembly, be sure to the place the link and wire assembly in the
symmetrical and fully closed position.
1.

Move the sunshade motor assembly laterally by little so that the gear is completely engaged into the wire
on the sunroof unit assembly and mounting surface becomes parallel. Then secure the sunshade motor
assembly with screws.

2.

Install the headlining. Refer to 

INT-30, "SUNROOF : Removal and Installation"

.

JMKIA1909ZZ

SUNROOF UNIT ASSEMBLY

RF-101

< REMOVAL AND INSTALLATION >

C

D

E

F

G

H

I

J

L

M

A

B

RF

N

O

P

SUNROOF UNIT ASSEMBLY

Exploded View

INFOID:0000000005516871

REMOVAL

1.

Roof side finisher RH

2.

Rear link cover

3.

TORX bolt

4.

Glass lid

5.

Roof side finisher LH

6.

Inner blind

7.

Sunroof unit assembly

8.

Sunroof bracket

9.

Drain hose

10. Drain connector

11.

Drain plug

12. Sunroof motor assembly

JMKIA1901ZZ

RF-102

< REMOVAL AND INSTALLATION >

SUNROOF UNIT ASSEMBLY

DISASSEMBLY

13. Sunshade motor assembly

Refer to 

GI-4, "Components"

 for symbols in the figure.

1.

Windshield glass

2.

Front sunroof glass

3.

Adhesive

4.

Sunroof frame

5.

Roof panel

6.

Primer

7.

Roof side finisher

8.

Rear sunroof glass

Refer to 

GI-4, "Components"

 for symbols in the figure.

JMKIA1898GB

SUNROOF UNIT ASSEMBLY

RF-103

< REMOVAL AND INSTALLATION >

C

D

E

F

G

H

I

J

L

M

A

B

RF

N

O

P

Removal and Installation

INFOID:0000000005516872

REMOVAL

CAUTION:

• Always work with a helper.
• When taking sunroof unit assembly out, use cloths to protect the seats and trim from damage.
• Never reuse the front and rear sunroof glass which has been removed once.

1.

Remove the headlining. Refer to 

INT-30, "SUNROOF : Removal and Installation"

2.

Remove the glass lid. Refer to 

RF-95, "Removal and Installation"

.

3.

Disconnect drain hoses.

4.

Remove the sunroof brackets (LH/RH).

5.

Remove nuts and bolts from the front end, side rail and rear end.

1.

Weather-strip

2.

Wind deflector

3.

Sunroof frame

4.

Front sunshade

5.

Sunshade cover

6.

Rear sunshade

Refer to 

GI-4, "Components"

 for symbols in the figure.

JMKIA1902ZZ


содержание   ..  1188  1189  1190  1191   ..