Nissan Murano Z51. Manual - part 1189


  Главная      Nissan     Nissan Murano Z51 (2010 year) - Service Manual


поиск по сайту            


содержание   ..  1187  1188  1189  1190   ..


Nissan Murano Z51. Manual - part 1189


RF-96

< REMOVAL AND INSTALLATION >

GLASS LID

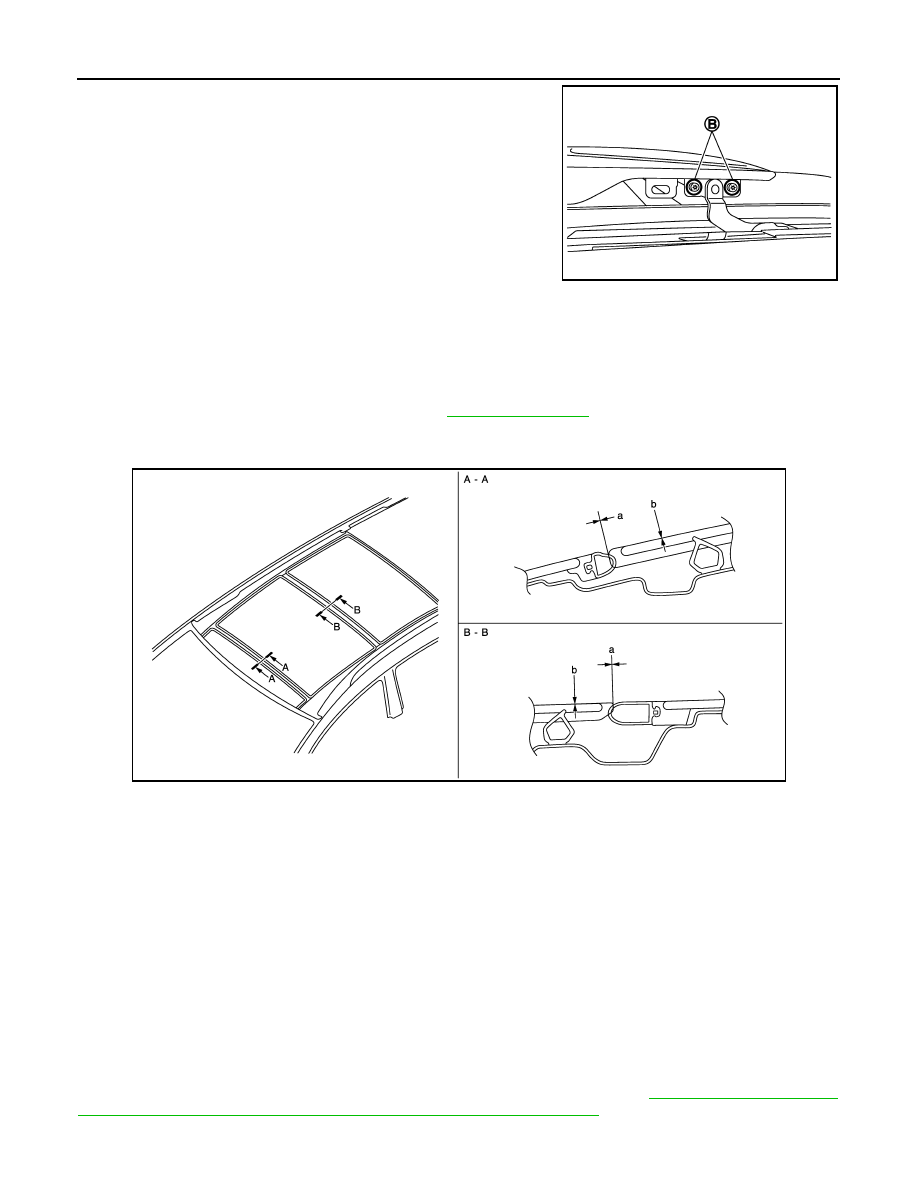
• Remove the TORX bolts (B).

6.

Remove the glass lid from the vehicle.

INSTALLATION

CAUTION:

After installing the glass lid, perform the leak test and check that there is no malfunction.
NOTE:
After installation carry out fitting adjustment. Refer to 

RF-96, "Adjustment"

.

Install in the reverse order of removal.

Adjustment

INFOID:0000000005516866

WEATHER-STRIP OVERLAP ADJUSTMENT AND SURFACE MISMATCH ADJUSTMENT

1.

Tilt up glass lid, and then remove inner blind and rear link cover.

2.

After loosening glass lid from TORX bolts (left and right), tilt down glass lid.

3.

Adjust glass lid from outside of vehicle so it resembles “ A – A”“B – B” as shown in the figure.

4.

To prevent glass lid from moving after adjustment, first tighten the TORX bolts of front left, and then
tighten the TORX bolts of rear right.

5.

Tighten remaining TORX bolts, being careful to prevent glass lid from moving.

6.

Tilt glass lid up and down several times to check that it moves smoothly.

NOTE:
After adjustment the sunroof unit assembly, perform additional service. Refer to 

RF-4, "ADDITIONAL SER-

VICE WHEN REPLACING CONTROL UNIT : Special Repair Requirement"

.

JMKIA1907ZZ

JMKIA1903ZZ

a

b

A – A

0.2 - 4.6 mm (0.008 - 0.181 in)

-1.5 - 1.5 mm (-0.059 - 0.059 in)

B – B

0.5 - 4.9 mm (0.020 - 0.193 in)

-1.5 - 1.5 mm (-0.059 - 0.059 in)

SUNROOF MOTOR ASSEMBLY

RF-97

< REMOVAL AND INSTALLATION >

C

D

E

F

G

H

I

J

L

M

A

B

RF

N

O

P

SUNROOF MOTOR ASSEMBLY

Exploded View

INFOID:0000000005516867

1.

Roof side finisher RH

2.

Rear link cover

3.

TORX bolt

4.

Glass lid

5.

Roof side finisher LH

6.

Inner blind

7.

Sunroof unit assembly

8.

Sunroof bracket

9.

Drain hose

10. Drain connector

11.

Drain plug

12. Sunroof motor assembly

13. Sunshade motor assembly

Refer to 

GI-4, "Components"

 for symbols in the figure.

JMKIA1901ZZ

RF-98

< REMOVAL AND INSTALLATION >

SUNROOF MOTOR ASSEMBLY

Removal and Installation

INFOID:0000000005516868

REMOVAL

CAUTION:

• Before removing sunroof motor, check that glass lid is fully closed.
• After removing sunroof motor, never attempt to rotate sunroof motor assembly as a single unit.

1.

Remove the headlining. Refer to 

INT-30, "SUNROOF : Removal and Installation"

2.

Disconnect connector (A) from sunroof motor assembly (1).
Remove sunroof motor assembly mounting screws (B), and then
remove sunroof motor assembly.

INSTALLATION

CAUTION:

Before installing the sunroof motor assembly, be sure to the place the link and wire assembly in the
symmetrical and fully closed position.
1.

Move the sunroof motor assembly laterally by little so that the gear is completely engaged into the wire on
the sunroof unit assembly and mounting surface becomes parallel. Then secure the sunroof motor
assembly with screws.

2.

Install the headlining. Refer to 

INT-30, "SUNROOF : Removal and Installation"

.

JMKIA1908ZZ

SUNSHADE MOTOR ASSEMBLY

RF-99

< REMOVAL AND INSTALLATION >

C

D

E

F

G

H

I

J

L

M

A

B

RF

N

O

P

SUNSHADE MOTOR ASSEMBLY

Exploded View

INFOID:0000000005516869

1.

Roof side finisher RH

2.

Rear link cover

3.

TORX bolt

4.

Glass lid

5.

Roof side finisher LH

6.

Inner blind

7.

Sunroof unit assembly

8.

Sunroof bracket

9.

Drain hose

10. Drain connector

11.

Drain plug

12. Sunroof motor assembly

13. Sunshade motor assembly

Refer to 

GI-4, "Components"

 for symbols in the figure.

JMKIA1901ZZ


содержание   ..  1187  1188  1189  1190   ..