Nissan Murano Z51. Manual - part 1007


  Главная      Nissan     Nissan Murano Z51 (2010 year) - Service Manual


поиск по сайту            


содержание   ..  1005  1006  1007  1008   ..


Nissan Murano Z51. Manual - part 1007


ENGINE MAINTENANCE

MA-23

< PERIODIC MAINTENANCE >

C

D

E

F

G

H

I

J

K

L

M

B

MA

N

O

A

FUEL LINES : Inspection

INFOID:0000000005516149

Inspect fuel lines, fuel filler cap, and fuel tank for improper attach-
ment, leakage, cracks, damage, loose connections, chafing or dete-
rioration.

If necessary, repair or replace damaged parts.
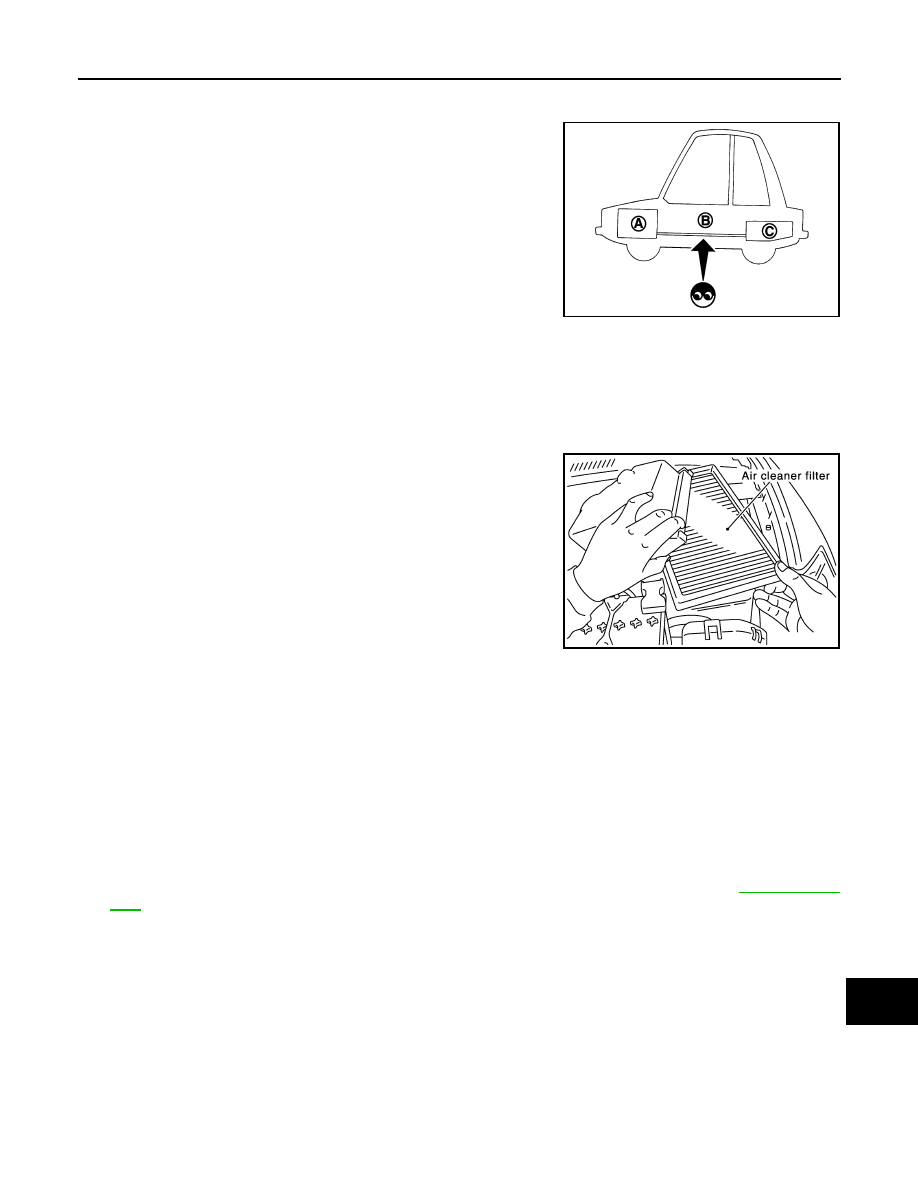
AIR CLEANER FILTER

AIR CLEANER FILTER : Removal and Installation

INFOID:0000000005516150

REMOVAL

1.

Unhook air cleaner case (lower) side clips and lift up air cleaner case (upper).

2.

Remove air cleaner filter and holder assembly from air cleaner
case (lower).

3.

Remove the air cleaner filter from the holder.

INSTALLATION

Note the following, and install in the reverse order of removal.
• Install the air cleaner filter by aligning the seal with the notch of air cleaner case.

ENGINE OIL

ENGINE OIL : Draining

INFOID:0000000005516151

WARNING:

• Be careful not to get burn yourself, as engine oil may be hot.
• Prolonged and repeated contact with used engine oil may cause skin cancer. Try to avoid direct skin

contact with used engine oil. If skin contact is made, wash thoroughly with soap or hand cleaner as
soon as possible. 

1.

Warm up the engine, and check for engine oil leakage from engine components. Refer to 

LU-7, "Inspec-

tion"

.

2.

Stop the engine and wait for 10 minutes.

3.

Loosen oil filler cap.

A

: Engine

B

: Fuel line

C

: Fuel tank

JPBIA0129ZZ

PBIC1165E

MA-24

< PERIODIC MAINTENANCE >

ENGINE MAINTENANCE

4.

Remove drain plug (1) and then drain engine oil.

ENGINE OIL : Refilling

INFOID:0000000005516152

1.

Install drain plug with new drain plug washer. Refer to 

EM-43, "Exploded View"

.

CAUTION:

Be sure to clean drain plug and install with new drain plug washer.

2.

Refill with new engine oil.
Engine oil specification and viscosity: Refer to 

MA-15, "FOR NORTH AMERICA : Fluids and Lubri-

cants"

 (for North America) or 

MA-16, "FOR MEXICO : Fluids and Lubricants"

 (for Mexico).

CAUTION:

• When filling engine oil, never pull out oil level gauge.
• The refill capacity depends on the engine oil temperature and drain time. Use these specifica-

tions for reference only.

• Always use oil level gauge to determine the proper amount of engine oil in engine.

3.

Warm up the engine and check area around drain plug and oil filter for engine oil leakage.

4.

Stop the engine and wait for 10 minutes.

5.

Check the engine oil level. Refer to 

LU-7, "Inspection"

.

OIL FILTER

OIL FILTER : Removal and Installation

INFOID:0000000005516153

REMOVAL

CAUTION:

• Oil filter is provided with relief valve. Use genuine NISSAN oil filter or equivalent.
• Be careful not to get burned when engine and engine oil may be hot.
• When removing, prepare a shop cloth to absorb any engine oil leakage or spillage.
• Never allow engine oil to adhere to drive belt.
• Completely wipe off any engine oil that adheres to engine and vehicle.

1.

Remove splash guard (RH). Refer to 

EXT-24, "FENDER PROTECTOR : Exploded View"

.

2.

Using oil filter wrench [SST: KV10115801 (J-38956)] (A), remove
oil filter.

: Vehicle front

JPBIA1676ZZ

Tightening torque

: Refer to 

EM-43, "Exploded View"

.

Engine oil capacity

Refer to 

MA-39, "ENGINE OIL : 

Periodical Maintenance Specification"

.

: Vehicle front

JPBIA1678ZZ

ENGINE MAINTENANCE

MA-25

< PERIODIC MAINTENANCE >

C

D

E

F

G

H

I

J

K

L

M

B

MA

N

O

A

INSTALLATION

1.

Remove foreign materials adhering to oil filter installation surface.

2.

Apply engine oil to the oil seal contact surface of new oil filter.

3.

Screw oil filter manually until it touches the installation surface,
then tighten it by 2/3 turn (A). Or tighten to the specification.

OIL FILTER : Inspection

INFOID:0000000005516154

INSPECTION AFTER INSTALLATION

1.

Check the engine oil level. Refer to 

LU-7, "Inspection"

.

2.

Start the engine, and check there is no leakage of engine oil.

3.

Stop the engine and wait for 10 minutes.

4.

Check the engine oil level, and adjust the level. Refer to 

LU-7, "Inspection"

.

SPARK PLUG

SPARK PLUG : Removal and Installation

INFOID:0000000005516155

REMOVAL

1.

Remove engine cover. Refer to 

EM-29, "Exploded View"

.

2.

Remove air cleaner cases (upper and lower) and air duct assembly. Refer to 

EM-31, "Exploded View"

.

3.

Remove electric throttle control actuator. Refer to 

EM-33, "Exploded View"

.

4.

Remove intake manifold collector. Refer to 

EM-33, "Exploded View"

.

5.

Remove ignition coil. Refer to 

EM-54, "Exploded View"

.

6.

Remove spark plug with a spark plug wrench (commercial ser-
vice tool).

INSTALLATION

SMA010

Oil filter:

: 17.7 N·m (1.8 kg-m, 13 ft-lb)

JPBIA0077ZZ

a

: 14 mm (0.55 in)

JPBIA0030ZZ

MA-26

< PERIODIC MAINTENANCE >

ENGINE MAINTENANCE

Install in the reverse order of removal.

SPARK PLUG : Inspection

INFOID:0000000005516156

INSPECTION AFTER REMOVAL

Use the standard type spark plug for normal condition.

CAUTION:

• Never drop or shock spark plug.
• Never use a wire brush for cleaning.
• If plug tip is covered with carbon, spark plug cleaner may be

used.

• Spark plug gap adjustment is not required between replace-

ment intervals.

• Measure spark plug gap. When it exceeds the limit, replace

spark plug even if it is within the specified replacement mile-
age. Refer to 

EM-146, "Spark Plug"

.

POSITIVE CRANKCASE VENTILATION SYSTEM

POSITIVE CRANKCASE VENTILATION SYSTEM : Inspection

INFOID:0000000005516157

PCV (POSITIVE CRANKCASE VENTILATION) VALVE

With engine running at idle, remove PCV valve from rocker cover. A
properly working valve makes a hissing noise as air passes through
it. A strong vacuum should be felt immediately when a finger is
placed over valve inlet.

PCV VALVE VENTILATION HOSE

Spark plug (Standard type)

: Refer to 

MA-39, "SPARK PLUG : Spark 

Plug"

.

Cleaner air pressure:

Less than 588 kPa (6 kg/cm

2

, 85 

psi)

Cleaning time:

Less than 20 seconds

SMA773C

JPBIA0031ZZ

PBIB1589E


содержание   ..  1005  1006  1007  1008   ..