Nissan Murano. Manual - part 1402


  Главная      Nissan     Nissan Murano (2014 year) - Service Manual


поиск по сайту            


содержание   ..  1400  1401  1402  1403   ..


Nissan Murano. Manual - part 1402


TM-150

< PREPARATION >

[CVT: RE0F09B]

PREPARATION

PREPARATION

PREPARATION

Special Service Tools

INFOID:0000000009719560

The actual shapes of Kent-Moore tools may differ from those of special service tools illustrated here.

Commercial Service Tools

INFOID:0000000009719561

Tool number
(Kent-Moore No.)
Tool name

Description


(OTC3492)
Oil pressure gauge set

Measuring line pressure
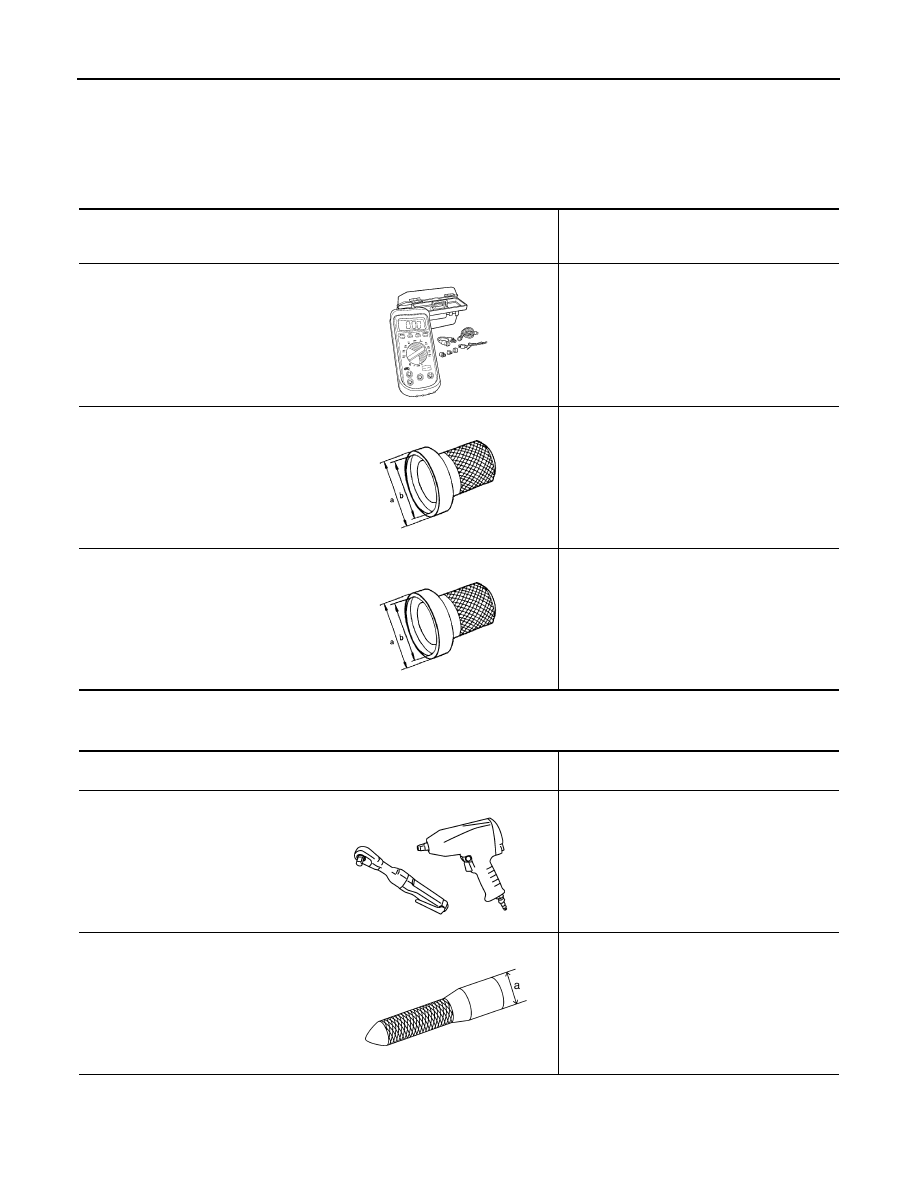
ST33400001
(J-26082)
Drift
a: 60 mm (2.36 in) dia.
b: 47 mm (1.85 in) dia.

Installing differential side oil seal

KV40100621
(J-25405)
Drift
a: 76 mm (2.99 in) dia.
b: 69 mm (2.72 in) dia.

Installing side oil seal (transfer joint)

SCIA7531E

ZZA0814D

ZZA0814D

Tool number
Tool name

Description

Power tool

Loosening nuts and bolts

31197CA000
Drive plate location guide
a: 14 mm (0.55 in) dia.

Installing transaxle assembly

PBIC0190E

SCIA2013E

CVT FLUID

TM-151

< PERIODIC MAINTENANCE >

[CVT: RE0F09B]

C

E

F

G

H

I

J

K

L

M

A

B

TM

N

O

P

PERIODIC MAINTENANCE

CVT FLUID

Inspection

INFOID:0000000009719562

CHECKING CVT FLUID

The fluid level should be checked with the fluid warmed up to 50 to 80

°

C (122 to 176

°

F). The fluid level check

procedure is as follows:
1.

Check for fluid leakage.

2.

With the engine warmed up, drive the vehicle in an urban area.
When ambient temperature is 20

°

C (68

°

F), it takes about 10

minutes for the CVT fluid to warm up to 50 to 80

°

C (122 to

176

°

F).

3.

Park the vehicle on a level surface.

4.

Apply parking brake firmly.

5.

With engine at idle, while depressing brake pedal, move shift
selector throughout the entire shift range.

6.

Pull out the CVT fluid level gauge from the CVT fluid charging
pipe after pressing the tab on the CVT fluid level gauge to
release the lock.

7.

Wipe fluid off the CVT fluid level gauge. Insert the CVT fluid
level gauge rotating 180

°

 from the originally installed position,

then securely push the CVT fluid level gauge until it meets the
top end of the CVT fluid charging pipe.

CAUTION:

When wiping away the CVT fluid level gauge, always use
lint-free paper, not a cloth rag.

8.

Place the selector lever in “P” or “N” and check that the fluid
level is within the specified range.

CAUTION:

When reinstalling CVT fluid level gauge, insert it into the
CVT fluid charging pipe and rotate it to the original installa-
tion position until securely locked.

CVT FLUID CONDITION

SMA146B

SCIA1933E

SCIA1931E

SCIA1932E

TM-152

< PERIODIC MAINTENANCE >

[CVT: RE0F09B]

CVT FLUID

Check CVT fluid condition.
• If CVT fluid is very dark or smells burned, check operation of CVT.

Flush cooling system after repair of CVT.

• If CVT fluid contains frictional material (clutches, brakes, etc.),

replace radiator and flush cooler line using cleaning solvent and
compressed air after repair of CVT. Refer to 

TM-153, "Cleaning"

.

Changing

INFOID:0000000009719563

CAUTION:

Replace an O-ring with new ones at the final stage of the operation when installing.

1.

Remove drain plug from oil pan.

2.

Remove O-ring from drain plug.

3.

Install O-ring to drain plug.

CAUTION:

Never reuse O-ring.

4.

Install drain plug to oil pan. Refer to 

TM-171, "Exploded View"

.

5.

Fill CVT fluid from CVT fluid charging pipe to the specified level.

CAUTION:

• Use only recommended fluid. Never mix with other fluid.
• Using CVT fluid other than recommended fluid will deteriorate in driveability and CVT durability,

and may damage the CVT, which is not covered by the warranty.

• When filling CVT fluid, take care not to scatter heat generating parts such as exhaust.
• Sufficiently shake the container of CVT fluid before using.
• Delete CVT fluid deterioration date with CONSULT after changing CVT fluid. Refer to 

TM-38,

"CONSULT Function"

.

6.

With the engine warmed up, drive the vehicle in an urban area.
NOTE:
When ambient temperature is 20

°

C (68

°

F), it takes about 10 minutes for the CVT fluid to warm up to 50 to

80

°

C (122 to 176

°

F).

7.

Check CVT fluid level and condition.

8.

Repeat steps 1 to 5 if CVT fluid has been contaminated.

Fluid status

Conceivable cause

Required operation

Varnished (viscous 
varnish state)

CVT fluid becomes 
degraded due to 
high temperatures.

Replace the CVT fluid and check the 
CVT main unit and the vehicle for 
malfunctions (wire harnesses, cool-
er pipes, etc.)

Milky white or 
cloudy

Water in the fluid

Replace the CVT fluid and check for 
places where water is getting in.

Large amount of 
metal powder mixed 
in

Unusual wear of 
sliding parts within 
CVT

Replace the CVT fluid and check for 
improper operation of the CVT.

ATA0022D

CVT fluid

: Refer to 

MA-15, "FOR NORTH AMERICA : Fluids and Lubricants"

 (For North 

America) or 

MA-16, "FOR MEXICO : Fluids and Lubricants"

 (For Mexico).

Fluid capacity

: Refer to 

MA-15, "FOR NORTH AMERICA : Fluids and Lubricants"

 (For North 

America) or 

MA-16, "FOR MEXICO : Fluids and Lubricants"

 (For Mexico).

CVT FLUID COOLER SYSTEM

TM-153

< PERIODIC MAINTENANCE >

[CVT: RE0F09B]

C

E

F

G

H

I

J

K

L

M

A

B

TM

N

O

P

CVT FLUID COOLER SYSTEM

Cleaning

INFOID:0000000009719564

Whenever an automatic transaxle is repaired, overhauled, or replaced, the CVT fluid cooler mounted in the
radiator must be inspected and cleaned.
Metal debris and friction material, if present, can be trapped or be deposited in the CVT fluid cooler. This
debris can contaminate the newly serviced CVT or, in severe cases, can block or restrict the flow of CVT fluid.
In either case, malfunction of the newly serviced CVT may occur.
Debris, if present, may deposit as CVT fluid enters the cooler inlet. It will be necessary to back flush the cooler
through the cooler outlet in order to flush out any built up debris.

CVT FLUID COOLER CLEANING PROCEDURE

1.

Position an oil pan under the transaxle's inlet and outlet cooler hoses.

2.

Identify the inlet and outlet fluid cooler hoses.

3.

Disconnect the fluid cooler inlet and outlet rubber hoses from the
steel cooler tubes or bypass valve.
NOTE:
Replace the cooler hoses if rubber material from the hose
remains on the tube fitting.

4.

Allow any CVT fluid that remains in the cooler hoses to drain into
the oil pan.

5.

Insert the extension adapter hose of a can of Transmission
Cooler Cleaner (Nissan P/N 999MP-AM006) into the cooler out-
let hose.

CAUTION:

• Wear safety glasses and rubber gloves when spraying the

Transmission Cooler Cleaner.

• Spray Transmission Cooler Cleaner only with adequate

ventilation.

• Avoid contact with eyes and skin.
• Never breath vapors or spray mist.

6.

Hold the hose and can as high as possible and spray Transmis-
sion Cooler Cleaner in a continuous stream into the cooler outlet
hose until CVT fluid flows out of the cooler inlet hose for 5 seconds.

7.

Insert the tip of an air gun into the end of the cooler outlet hose.

8.

Wrap a shop rag around the air gun tip and end of the cooler
outlet hose.

9.

Blow compressed air regulated to 5 to 9 kg/cm

2

 (70 to 130 psi)

through the cooler outlet hose for 10 seconds to force out any
remaining CVT fluid.

10. Repeat steps 5 through 9 three additional times.

11. Position an oil pan under the banjo bolts that connect the CVT

fluid cooler steel lines to the transaxle.

12. Remove the banjo bolts.

13. Flush each steel line from the cooler side back toward the tran-

saxle by spraying Transmission Cooler Cleaner in a continuous stream for 5 seconds.

14. Blow compressed air regulated to 5 to 9 kg/cm

2

 (70 to 130 psi) through each steel line from the cooler

side back toward the transaxle for 10 seconds to force out any remaining CVT fluid.

15. Ensure all debris is removed from the steel cooler lines.

16. Ensure all debris is removed from the banjo bolts and fittings.

SCIA4421E

SCIA4422E

SCIA4423E


содержание   ..  1400  1401  1402  1403   ..