Nissan X-Trail 32. Manual - part 708


  Главная      Nissan     Nissan X-Trail 32 - Service Manual


поиск по сайту            


содержание   ..  706  707  708  709   ..


Nissan X-Trail 32. Manual - part 708


ELECTRIC CONTROLLED COUPLING

DLN-243

< UNIT DISASSEMBLY AND ASSEMBLY >

[REAR FINAL DRIVE: R145]

C

E

F

G

H

I

J

K

L

M

A

B

DLN

N

O

P

Disassembly and Assembly

INFOID:0000000011008626
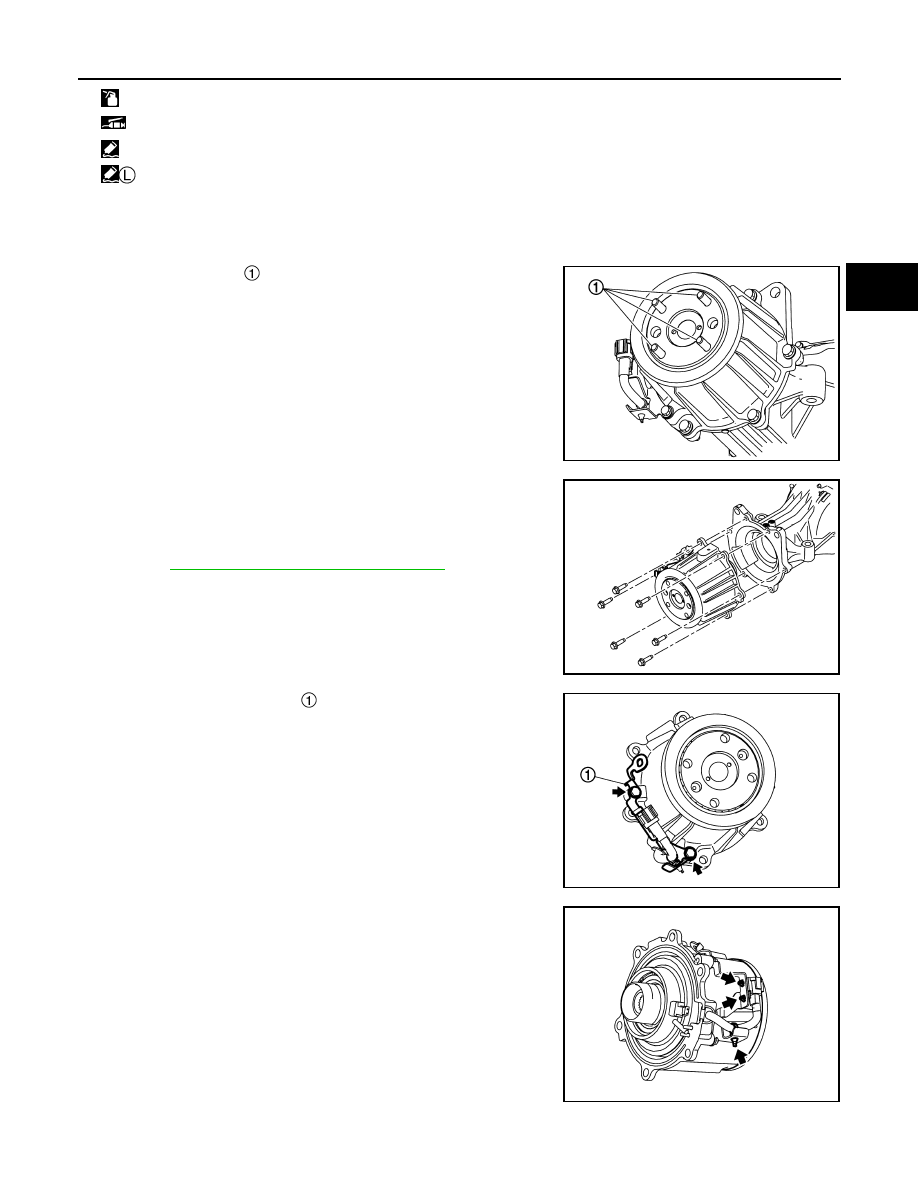
DISASSEMBLY

1.

Remove stud bolts 

.

2.

Remove electric controlled coupling assembly from final drive
assembly.

3.

Remove wave spring.

4.

Remove drive pinion oil seal from the inside of gear carrier.
Refer to 

DLN-258, "Disassembly and Assembly"

.

CAUTION:

When removing electric controlled coupling, replace drive
pinion oil seal.

5.

Remove connector bracket 

 from electric controlled coupling.

6.

Separate band clip and connector clip from connector bracket.

ASSEMBLY

*: Apply anti-corrosion oil.

: Apply multi purpose grease.

: Apply Genuine Liquid Gasket, Three Bond 1217 or equivalent.

: Apply Genuine High Strength Thread Locking Sealant, Loctite 270 or equivalent.

JSDIA5282ZZ

JSDIA5250ZZ

JSDIA5234ZZ

JSDIA5241ZZ

DLN-244

< UNIT DISASSEMBLY AND ASSEMBLY >

[REAR FINAL DRIVE: R145]

ELECTRIC CONTROLLED COUPLING

1.

Install connector bracket to electric controlled coupling.
• For tightening torque, refer to 

DLN-242, "Exploded View"

.

2.

Join 4WD solenoid harness with band clip and connector clip.

3.

Install drive pinion oil seal to the inside of gear carrier. Refer to

DLN-258, "Disassembly and Assembly"

.

CAUTION:

When removing electric controlled coupling, replace drive
pinion oil seal.

4.

Install wave spring 

 to the inside of gear carrier.

5.

Apply liquid gasket to mating surface of electric controlled cou-
pling assembly.
• For applying liquid gasket, refer to 

DLN-242, "Exploded View"

.

CAUTION:

• Remove old gasket adhering to the mounting surfaces.

Also remove any moisture, oil, or foreign material adher-
ing to the mounting surfaces.

• The width of sealant bead is approximately 3 mm (0.12 in).

Apply sealant evenly.

6.

Match electric controlled coupling assembly 

 to spline of drive

pinion, then install it to final drive assembly 

.

CAUTION:

Be careful not to damage drive pinion oil seal.

JSDIA5241ZZ

JSDIA5236ZZ

JSDIA5242ZZ

JSDIA5260ZZ

ELECTRIC CONTROLLED COUPLING

DLN-245

< UNIT DISASSEMBLY AND ASSEMBLY >

[REAR FINAL DRIVE: R145]

C

E

F

G

H

I

J

K

L

M

A

B

DLN

N

O

P

7.

Temporarily tighten reamer bolts 

 to the positions shown in the

figure.

8.

Tighten reamer bolts and electric controlled coupling assembly
mounting bolts to the specified torque.
• For tightening torque, refer to 

DLN-242, "Exploded View"

.

9.

Install stud bolts 

.

CAUTION:

• Never reuse stud bolt.
• Screw long thread side of stud bolt to electric controlled

coupling.

• Screw the stud bolt until the stop by applying a torque of 15 N·m (1.5 kg-m, 11 ft-lb) 

±

20%.

• After installing stud bolt, the length of the protrusion from electric controlled coupling must be

19.8 mm (0.780 in) 

±

1.4 mm (0.055 in).

JSDIA5263ZZ

: Electric controlled coupling side

Thread length

A

: Long

B

:  Short

JSDIA5237ZZ

DLN-246

< UNIT DISASSEMBLY AND ASSEMBLY >

[REAR FINAL DRIVE: R145]

DIFFERENTIAL ASSEMBLY

DIFFERENTIAL ASSEMBLY

Exploded View

INFOID:0000000011008627

Stud bolt

Connector bracket

Reamer bolt

Electric controlled coupling assem-
bly

Wave spring

Drive pinion oil seal

Drive pinion lock nut

Pinion front bearing

Gear carrier

Collapsible spacer

Drive pinion adjusting shim

Pinion rear bearing

Drive pinion

Drive gear

Differential case

Side bearing

Side bearing adjusting shim

Side oil seal

Rear cover

Stud bolt

Gasket

Drain plug

Filler plug

Pinion mate thrust washer

Pinion mate gear

Side gear thrust washer

Side gear

Pinion mate shaft

Lock pin

Oil seal lip

Screw hole

: N·m (kg-m, in-lb)

: N·m (kg-m, ft-lb)

: Always replace after every disassembly.

: Select with proper thickness.

: Apply gear oil.

*: Apply anti-corrosion oil.

: Apply multi purpose grease.

JSDIA5442GB


содержание   ..  706  707  708  709   ..