Nissan X-Trail 32. Manual - part 2244


  Главная      Nissan     Nissan X-Trail 32 - Service Manual


поиск по сайту            


содержание   ..  2242  2243  2244  2245   ..


Nissan X-Trail 32. Manual - part 2244


FRONT WIPER

WW-83

< REMOVAL AND INSTALLATION >

C

D

E

F

G

H

I

J

K

M

A

B

WW

N

O

P

2.

Remove front wiper arm cap.

3.

Remove front wiper arm mouonting nut, and then remove front wiper arm.

INSTALLATION

Note the following items, and then install in the reverse order of removal.

CAUTION:

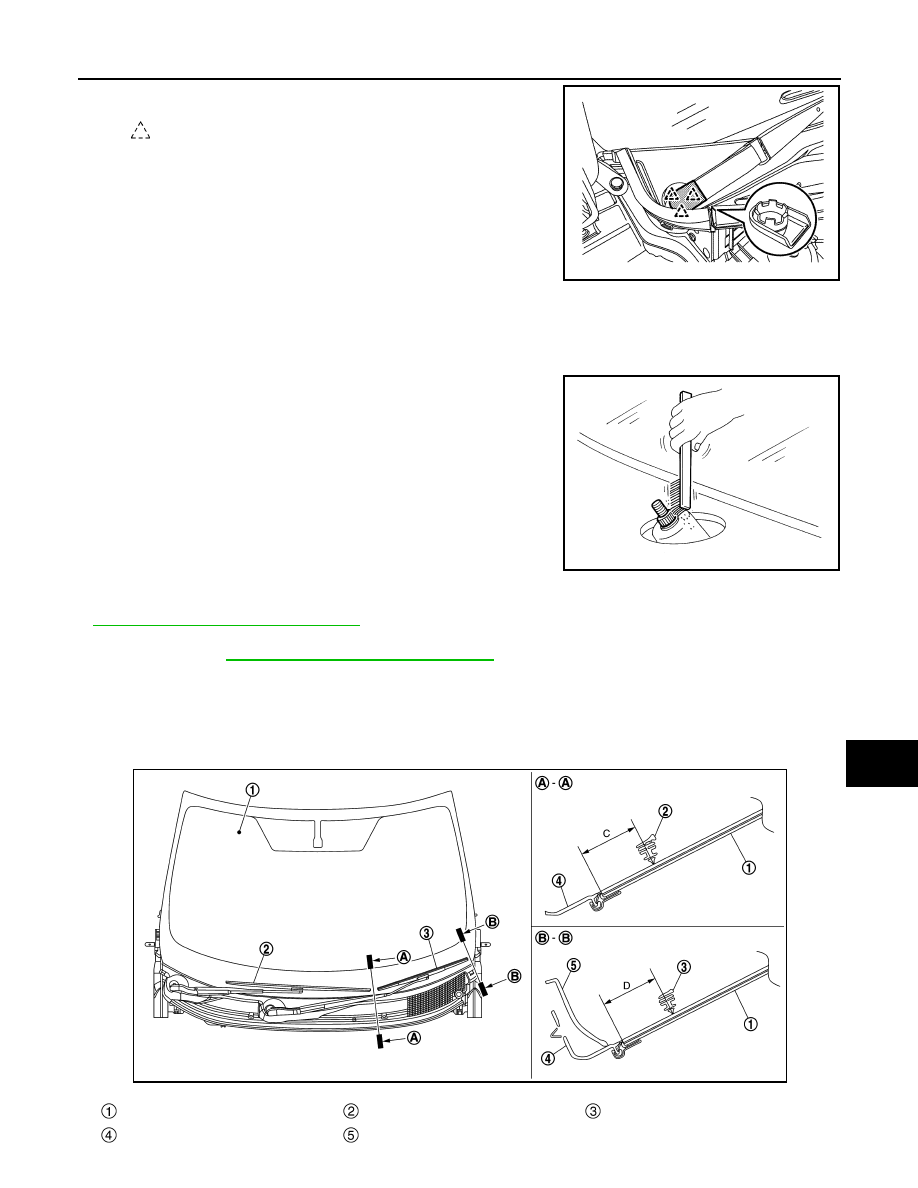
• Clean front wiper arm installation location as shown in the fig-

ure, and then fully insert front wiper arm to prevent nut from
being loosened by shakiness.

• When installing front wiper arm, install so that it is within the standard. For the standard, refer to

WW-83, "WIPER ARM : Adjustment"

.

• After installation, operate front wiper, and then check that front wiper blades stop at the specified

position. Refer to 

WW-83, "WIPER ARM : Adjustment"

.

WIPER ARM : Adjustment

INFOID:0000000010785448

WIPER BLADE POSITION ADJUSTMENT

Clearance between the end of cowl top cover / front fender cover and the top of front wiper blade center.

: pawl

JMLIA4840ZZ

ELH0717D

Windshield glass

Front wiper blade RH

Front wiper blade LH

Cowl top cover

Front fender cover LH

JMLIA4841ZZ

WW-84

< REMOVAL AND INSTALLATION >

FRONT WIPER

Standard clearance

WIPER BLADE

WIPER BLADE : Removal and Installation

INFOID:0000000010785449

CAUTION:

Clean the windshield glass and front wiper refill so that the windshield glass may not be damaged by
dust, etc. 

REMOVAL

1.

Move front wiper arm by service position operation to lock back possibility position. 
• With rain sensor: Refer to 

WW-13, "FRONT WIPER AND WASHER SYSTEM (WITH LIGHT & RAIN

SENSOR) : System Description"

.

• Without rain sensor: Refer to 

WW-17, "FRONT WIPER AND WASHER SYSTEM (WITHOUT LIGHT &

RAIN SENSOR) : System Description"

.

2.

Lift up front wiper arm, and then lock back front wiper arm.

3.

Slide the wiper brade 

 while pushing the lever 

 according to

the numerical order 1

2 as shown in the figure from front wiper

arm .

CAUTION:

After the wiper brade is removed, wrap the wiper arm tip
with a shop cloth and fold it down so that the wiper arm
does not fall against and damage the windshield glass.

INSTALLATION

Install in the reverse order of removal.

WIPER REFILL

WIPER REFILL : Removal and Installation

INFOID:0000000010785450

REMOVAL

1.

Remove front wiper blade. Refer to 

WW-84, "WIPER BLADE : Removal and Installation"

.

2.

Pull out front wiper refill using a long-nose pliers (A), and then
remove front wiper refill.

INSTALLATION

C

: 34.88

±

7.5 mm (1.37 

±

 0.30 in)

D

: 38.20

±

7.5 mm (1.50 

±

 0.30 in)

JMLIA0833ZZ

JMLIA4385ZZ

FRONT WIPER

WW-85

< REMOVAL AND INSTALLATION >

C

D

E

F

G

H

I

J

K

M

A

B

WW

N

O

P

1.

Check the front wiper refill insertion direction by arrow mark on
front wiper blade.

2.

Pass through pawl of front wiper blade in the groove of front
wiper refill.
NOTE:
Remove holder 

* at last procedure.

*: Attached to service parts.

3.

Engage front wiper refill stopper hole, and front wiper blade pawl with imprinted “SET” mark (“

” mark).

4.

Check the following items after installing.
• Front wiper refill thoroughly fits in the pawl on front wiper blade.
• Front wiper refill is not deformed (waving / tucking).

NOTE:

When the vertebra is detached

• Insert the vertebra 

 into the front wiper blade to the same bend-

ing direction.

• If a vertebra has a notch, fit it to a protrusion inside the front wiper

refill.

WIPER DRIVE ASSEMBLY

WIPER DRIVE ASSEMBLY : Removal and Installation

INFOID:0000000010785451

REMOVAL

1.

Remove cowl top cover. Refer to 

EXT-25, "Removal and Installation"

.

JMLIA2606ZZ

JMLIA4386ZZ

JPLIA1586ZZ

WW-86

< REMOVAL AND INSTALLATION >

FRONT WIPER

2.

Disconnect front wiper motor harness connector 

.

3.

Remove front wiper drive assembly mounting bolts 

, and then

remove front wiper drive assembly.

INSTALLATION

Note the following item, and then install in the reverse order of removal.

CAUTION:

When installing, temporarily tighten all mounting bolts, and then tighten bolts to specified torque.

WIPER DRIVE ASSEMBLY : Disassembly and Assembly

INFOID:0000000010785452

DISASSEMBLY

1.

Remove front wiper linkage 1 and 2 from front wiper flame.

CAUTION:

Never bend the link or damage the plastic part of the ball joint when removing front wiper linkage.

2.

Remove front wiper motor bracket mounting bolts, and then remove front wiper motor from front wiper
flame.

ASSEMBLY

Note the following items, and assembly in the reverse order of disassembly.

CAUTION:

• When front wiper motor is replaced, before installing front wiper arm, operate front wipers, set front

wiper motor to the auto stop position, and then install front wiper arms.

• Be careful for grease condition at front wiper linkage joint (retainer), apply Multi-purpose grease or

an equivalent if necessary.

JMLIA5002ZZ


содержание   ..  2242  2243  2244  2245   ..