Nissan X-Trail 32. Manual - part 1766


  Главная      Nissan     Nissan X-Trail 32 - Service Manual


поиск по сайту            


содержание   ..  1764  1765  1766  1767   ..


Nissan X-Trail 32. Manual - part 1766


RF-50

< REMOVAL AND INSTALLATION >

REAR SUNROOF GLASS

Removal and Installation

INFOID:0000000010735430
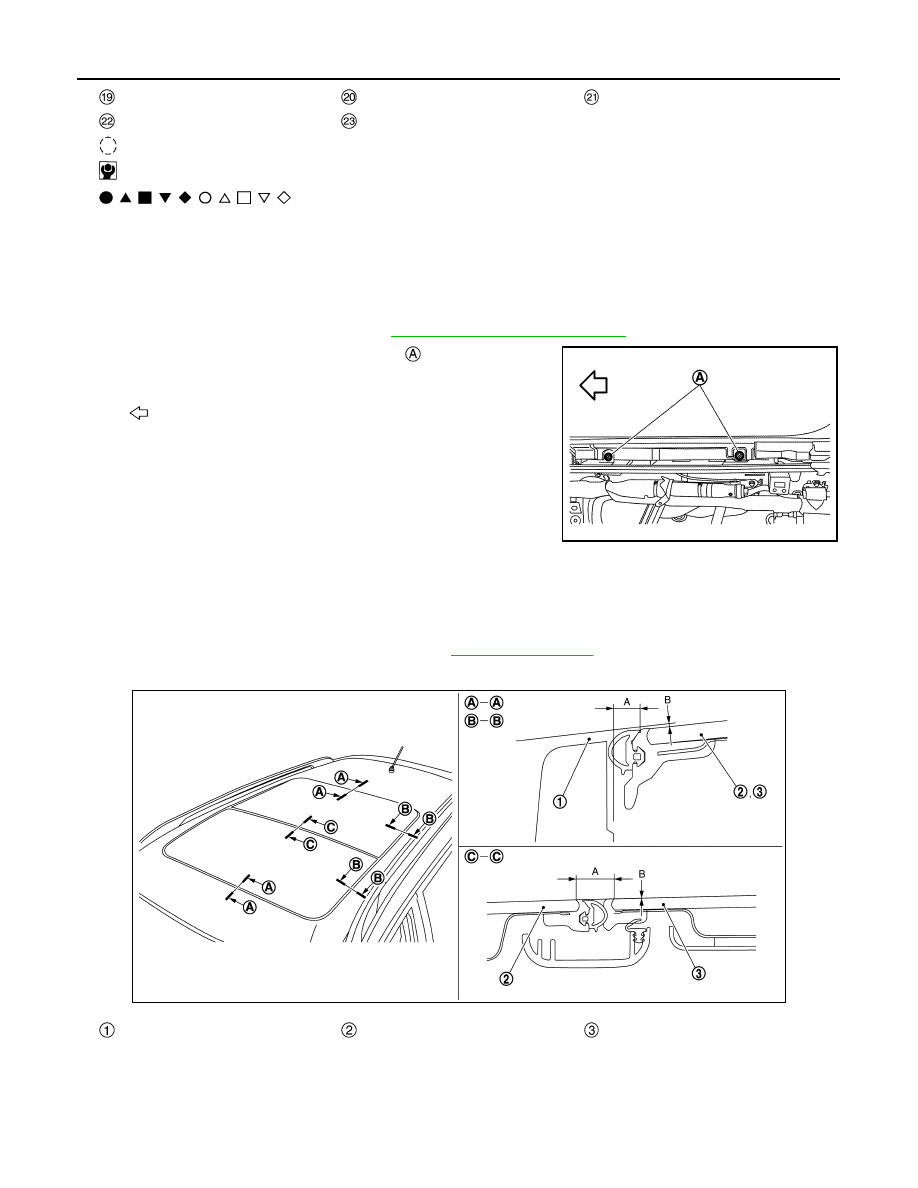
REMOVAL

CAUTION:

Always work with a helper.

1.

Remove sunroof unit assembly. Refer to 

RF-57, "Removal and Installation"

.

2.

Remove rear sunroof glass fixing screws 

, and then remove

rear sunroof glass.

INSTALLATION

Note the following items, and then install in the reverse order of removal.

CAUTION:

After installing the rear sunroof glass, perform the leak test and check that there is no malfunction.
NOTE:
After installation, carry out fitting adjustment. Refer to 

RF-50, "Adjustment"

.

Adjustment

INFOID:0000000010735431

If the clearance and the surface height are out of specification, adjust them according to the procedures
shown below.
NOTE:
Dimension (B) is given assuming that the glass upper side status is (+), and the glass lower side status is (

)

relative to the roof panel.

Rear drain hose RH

Rear drain connector RH

Front sunroof bracket LH

Rear sunroof glass

Drain assembly

  : Clip

: N·m (kg-m, in-lb)

: Indicates that the part is connected at points with same symbol in actual vehicle.

: Vehicle front

JMKIB2808ZZ

JMKIB2827GB

Roof panel

Glass lid

Rear sunroof glass

REAR SUNROOF GLASS

RF-51

< REMOVAL AND INSTALLATION >

C

D

E

F

G

H

I

J

L

M

A

B

RF

N

O

P

1.

Loosen rear sunroof glass fixing screws.

2.

Adjust the clearance of rear sunroof glass and roof panel according to the fitting standard dimension.

3.

To prevent rear sunroof glass from moving after adjustment, first tighten the fixing screws of front left, and
then tighten the fixing screws of rear right.

4.

Tighten remaining fixing screws, being careful to prevent rear sunroof glass from moving.

NOTE:
After adjustment the sunroof unit assembly, perform additional service. Refer to 

RF-24, "Work Procedure"

.

Portion

A

B


6.5 – 8.1 mm

(0.256 – 0.319 in)

(

2.2) – (+0.8) mm

[(

0.087) – (+0.031) in]


6.5 – 8.1 mm

(0.256 – 0.319 in)

(

2.2) – (+0.8) mm

[(

0.087) – (+0.031) in]


6.5 – 8.1 mm

(0.256 – 0.319 in)

(

1.5) – (+1.5) mm

[(

0.059) – (+0.059) in]

RF-52

< REMOVAL AND INSTALLATION >

SUNROOF MOTOR ASSEMBLY

SUNROOF MOTOR ASSEMBLY

Exploded View

INFOID:0000000010735432

Front sunroof bracket RH

Glass lid

Wind deflector

Rear sunroof bracket RH

Side trim RH

Sunroof unit assembly

Front drain hose RH

Sunroof motor assembly

Front drain connector RH

Harness connector assembly

Front drain connector LH

Sunshade motor assembly

Front drain hose LH

Side trim LH

Rear sunroof bracket LH

Sunshade

Rear drain connector LH

Rear drain hose LH

JMKIB2824GB

SUNROOF MOTOR ASSEMBLY

RF-53

< REMOVAL AND INSTALLATION >

C

D

E

F

G

H

I

J

L

M

A

B

RF

N

O

P

Removal and Installation

INFOID:0000000010735433

REMOVAL

CAUTION:

• Before removing sunroof motor, check that glass lid is fully closed.
• After removing sunroof motor, never attempt to rotate sunroof motor assembly as a single unit.
1.

Disconnect battery cable from negative terminal.

2.

Remove headlining to make work space. Refer to 

INT-37, "Removal and Installation"

3.

Disconnect harness connector 

 from sunroof motor assembly. 

4.

Remove sunroof motor assembly fixing screws 

, and then

remove sunroof motor assembly.

INSTALLATION

CAUTION:

Before installing the sunroof motor assembly, always place the link and wire assembly in the symmet-
rical and fully closed position.

1.

Move the sunroof motor assembly laterally a little so that the gear is completely engaged into the wire on
the sunroof unit assembly and mounting surface becomes parallel. Then secure the sunroof motor
assembly with screws.

2.

Install headlining.

NOTE:
After installation sunroof motor assembly, perform additional service. Refer to 

RF-24, "Description"

Rear drain hose RH

Rear drain connector RH

Front sunroof bracket LH

Rear sunroof glass

Drain assembly

  : Clip

: N·m (kg-m, in-lb)

: Indicates that the part is connected at points with same symbol in actual vehicle.

JMKIB2840ZZ


содержание   ..  1764  1765  1766  1767   ..